Connecting a flash drive to a smartphone: Four ways (plus bonus). How to enable a USB drive on Android - turn a regular smartphone into a mobile data storage
Despite the support of an Android smartphone or tablet for SD cards up to 32 GB, sometimes you need to connect external “storage” - portable hard drives and flash drives.
The essence of the problem with USB-Flash drives on Android devices
Modern Flash drives have a capacity of up to 128 GB. This amount of memory is not superfluous, especially when the owner of a smartphone or tablet downloads and distributes many films, music, programs, etc. at once. Additional memory is needed. The essence of the problem is as follows.
For this you need to connect additional “flash drives” via microUSB. An ideal option for those who often go on business trips or travel is to carry a tablet and several 32–128 GB flash drives in your bag.
How to connect a flash drive to an Android gadget via OTG
OTG is a USB-microUSB adapter, a replacement for a USB cable with a Card Reader device. Takes up little space - no more than a standard flash drive. In this case, the flash drive must be formatted in FAT32 - not everything is going smoothly with the NTFS file system for the Android operating system.
There is a more difficult way: install a special Android application that allows your smartphone or tablet to work with NTFS media. So, these can be exFAT/NTFS for Total Commander, Paragon NTFS & HFS+ and their analogues.
 You need OTG with a socket, not a plug for USB drives
 Select the USBdisk folder
If the flash drive is not readable, you need special Android applications. Some of them require Root rights.
How to get Root access
Applications that allow you to get Root access without using a computer: FramaRoot, Universal Androot, Visionary+, GingerBreak, z4root, BaiduRoot, Romaster SU, Towelroot, RootDashi, 360 Root, etc.
Applications that “hack” Root via PC: SuperOneClick, Unrevoked, GenoTools, vRoot, MTKDroidTools, etc.
Remember that by obtaining Root rights, you lose the supplier’s warranty and risk harming your gadget.
Another way is to change the licensed Android firmware to a “custom” one with unattached Root access.
Viewing the contents of a flash drive on an Android smartphone or tablet using third-party applications
USB Media Explorer app
If you want to simplify the process of accessing a flash drive, use the paid USB Media Explorer application. The old name of the program is Nexus Media Importer; it was initially developed for Nexus gadgets, but quickly expanded the line of supported Android smartphones and tablets. Root rights are not needed, the program is paid.
If this solution doesn’t suit you, you’ll have to work a little harder.
Solutions based on the StickMount program
The StickMount application is one of the most famous and requires Root rights. Works in conjunction with any Android file manager, for example, ES Explorer. Both applications are available on the Play Market.
 Confirm your request
 Confirm by pressing the Grant key
 Displaying information about the load on the flash drive
The flash drive is read/write.
 All your files are now available
Connecting USB flash drives to devices that do not have miniUSB/microUSB
A number of companies, not as well-known as ZTE, Huawei, Sony and their other competitors, install non-standard interface connectors. OTG adapters with miniUSB/microUSB are absolutely not suitable for gadgets with a highly standardized connector without a special OTG adapter.
Look on Ebay or AliExpress for an OTG adapter that matches the standard of the interface socket of your smartphone or tablet. Further steps to obtain software access to your flash drives are the same.
Other ways to connect a flash drive to an Android smartphone or tablet
Connecting a microSD memory card through a special adapter that has a USB plug is similar to a regular USB flash drive.
Video: Connecting additional devices to a smartphone and tablet, including flash drives: problems and solutions
By connecting flash drives and other storage devices to an Android smartphone or tablet, you free up your hands when it comes to organizing the storage of the data you carry with you. This can be very useful to you on business trips and travel. Good luck!
Modern smartphones no longer require a connection to a PC. In the first half of the 2000s, it was possible to install something new on a communicator or smartphone only using a PC. And in those days, a computer was also required for serious settings of a mobile device. Now you can connect Android to your computer without much difficulty, but this action has become required extremely rarely. Still, we will tell you how to connect your phone to a PC.
There is one wired and many wireless connection methods. The first one is the easiest, but there are a lot of problems with it. Sometimes the computer does not see the device, which causes natural hysterics in the user. In this material we will try to help in precisely this case.
- Replace the USB cable. The fact is that some wires serve only to transmit energy - they are simply not capable of working with information flow. This is especially true for cables purchased from Chinese online stores.
- Try plugging the wire into a different USB port. It has been noted that high-speed USB 3.0 connectors sometimes do not recognize some devices connected to them. Therefore, try connecting the device to an old USB 2.0 port.
- Try connecting the gadget to another computer. It is advisable that it work using a different version of the operating system. If such a problem occurs there, then something has happened to your microUSB connector or some other components. Unfortunately, we cannot help in this matter - you will need to have your smartphone repaired.
Other wired connection problems
Not everyone suspects this, but an unlocked device cannot be synchronized with a PC. If you decide to connect Android to your computer via USB, then first enter the code, draw a pattern or provide your fingerprint. Of course, this does not apply to those devices that do not have a secure lock.
Connecting via USB to a computer running Windows XP also causes certain problems. At the time of its popularity, there were no touchscreen smartphones, and therefore the corresponding drivers were not built into it by default. You can correct the situation by downloading the Media Transfer Protocol (MTP)

On any other computer you may also need to install a driver. It is usually installed automatically the first time you connect via USB. But there are exceptions when something interferes with the system. If this is the case for you, then go to “ device Manager" In the list you will see your device, currently unnamed, marked with a yellow exclamation mark. Right-click on it and select " Update" Next, follow the advice in the pop-up menu. So you can automatically search for a driver in the appropriate Microsoft database or install a driver stored on your PC (then you first need to download it from the manufacturer’s official website).
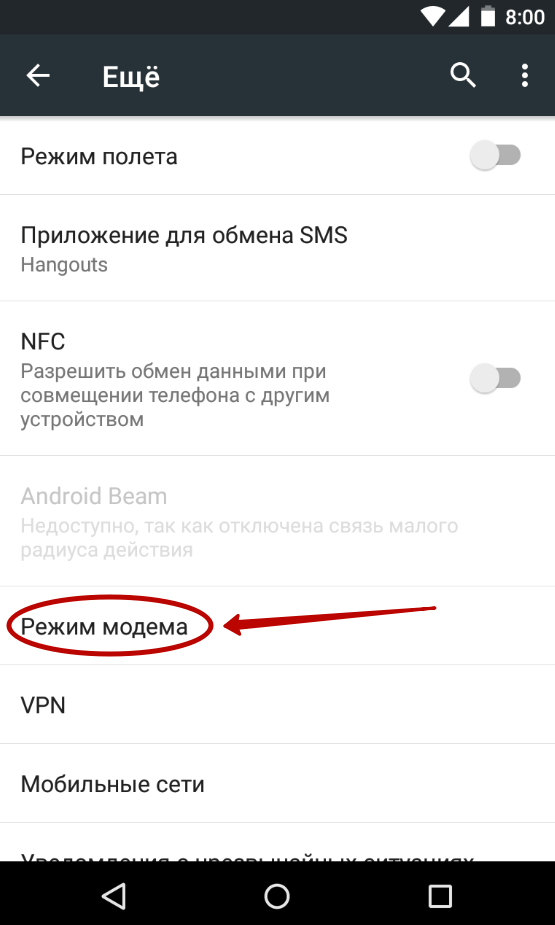
The activated “” mode may also make it difficult to connect to a computer. USB modem" Disabled along the way " Settings» - « Wireless network» - « More» - « Modem mode».
It should be noted that smartphones have several modes of wired connection to a PC. It is possible that you accidentally selected one that is not supported by your computer. You can change the mode by clicking on the corresponding notification (it is always displayed when the device is connected to the PC). You need to enable MTP (Media Device) mode.

Finally, enabling USB debugging can help in some cases. To do this, do the following:
Step 1. Open the section " Settings" and find the item " For developers».

Step 2. In this subsection, activate the checkbox of the item “ USB Debugging».

Connecting to a computer via Wi-Fi
There are several ways to connect Android to a PC without using a cable. The easiest way to use Wi-Fi technology for these purposes. Of course, your apartment should have a router, because the connection will be made with its help.
Theoretically, you can synchronize using built-in tools, but this path is too long and complicated. Therefore we recommend that you use Airdroid or some other similar application. Let's use his example to figure out how to connect to a PC over the air:
1. Install and launch Airdroid.
2. When you first start, you can register an account or press the inconspicuous button “ Login later».
3. Next, the program will offer to transfer all incoming notifications to the computer. Click the button Accept" In some cases, you will be additionally transferred to the corresponding section of the settings, where you need to check the box next to the Airdroid notification mirroring service.

4. Next, you can transfer files to your computer, record the screen, take screenshots and perform other actions. On a PC, to do this, you need to open a browser and go to the address displayed in the top line of the application.
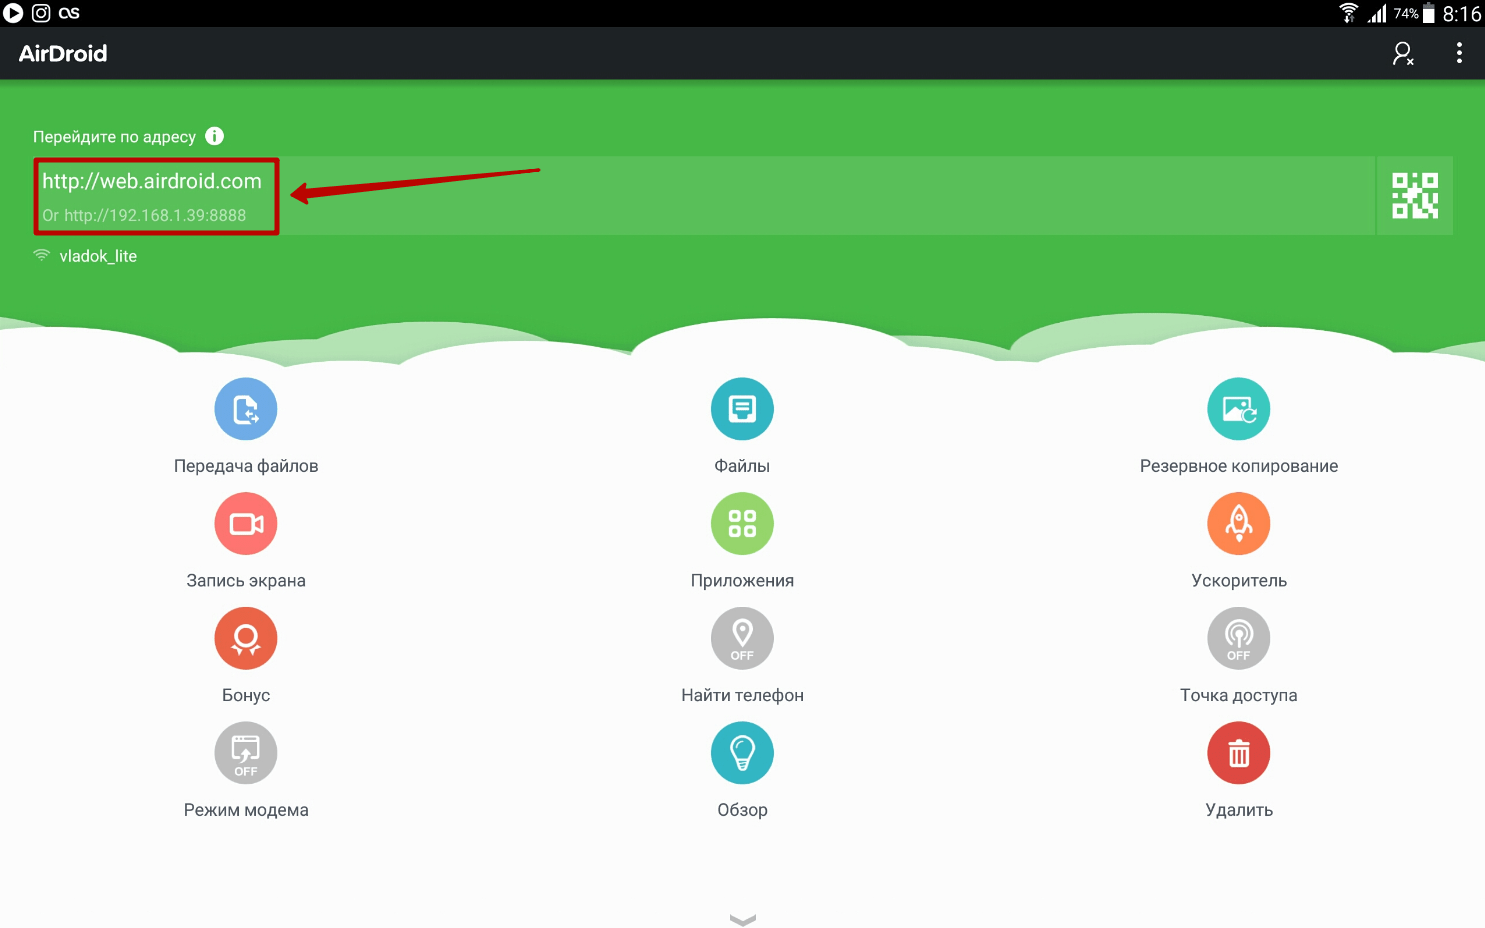
5. If you register an account, you can sync by going to a simpler URL: web.airdroid.com.

6. If you want to end the connection, go to the application and click on the “ Disconnect" You can also click on the “ Go out", then confirming his actions.
If the computer does not see Android via USB, then you will not be able to download photos, videos or music, install applications not from the Play Market, or flash the device. And this is very bad, because the functionality of the phone is not fully revealed due to some stupid error.
Someone might argue that you can flash a phone without a USB connection, but for transferring files there is Wi-Fi, instant messengers, cloud storage, and finally email. But I just can’t refuse a USB connection; I constantly carry a cable with me and consider it one of the most convenient ways to transfer data.
Checking the cable and port
Before you go into your phone settings, install drivers and curse the day you bought this Android, check the cable and USB port. I was once very surprised that the computer stopped identifying the smartphone, which it had previously seen perfectly well. It turned out that the cat liked the cable and chewed it through. From this situation I drew two conclusions: the wires must be put away in a box and inspected before connecting. The cat did not draw any conclusions. If no kinks, bites, breaks or other mechanical damage are found on the wire, check the USB port. Try connecting to a different connector or inserting another device into the same port - for example, a mouse.If Windows XP is installed on your computer, then urgently look for an opportunity to upgrade to at least “seven”. But first you can just install MTP protocol so that XP learns to work with Android. The trick is that when the first version of Android appeared, Microsoft had already released Windows 7. Therefore, there is no MTP protocol in XP, and you have to install it separately. You can download MTP

If the computer detects any other device, but the phone categorically does not want to see it, then it’s time to shift the focus to Android settings and connection features. Yes, there is a possibility of mechanical damage to the microUSB connector on the phone, but I have not encountered this yet. If you have something broken, you will most likely notice it.
Most often, the inability to establish a connection between a computer and a phone is due to software errors. If none of the methods listed below help solve the problem, contact a service center - it seems that the smartphone really needs repair.
Android setup
I came across two situations. The first phone required not only obtaining developer rights and enabling USB debugging, but also installing phone drivers on the computer. In the settings of the second smartphone, I did not find any parameters responsible for connecting via USB. They are not needed: the phone is perfectly detected by the computer, after which it offers to select a connection mode.So, if you connected your smartphone, but nothing happened:
- Open Android Settings.
- Go to the section "About the phone"(may be called “About device”).
- Find build number(models) and click on this item until a notification appears that you will soon become a developer. Usually n press 7-10 times.

After you become a developer, a new section will appear in the Android settings - "Developer Options". Inside it you will find a switch "USB Debugging", which needs to be moved to position "On".

Now try connecting your phone to your computer again. When connecting, a mode selection window should appear on the smartphone screen. The default setting on older versions of Android is “Charge Only”. If the window does not appear, slide it out of the notification shade.

To transfer files, you need to select media device (MTP) or storage mode. Among the options there will also be a PTP mode, but it is only suitable for photos that can just as easily be moved to MTP.
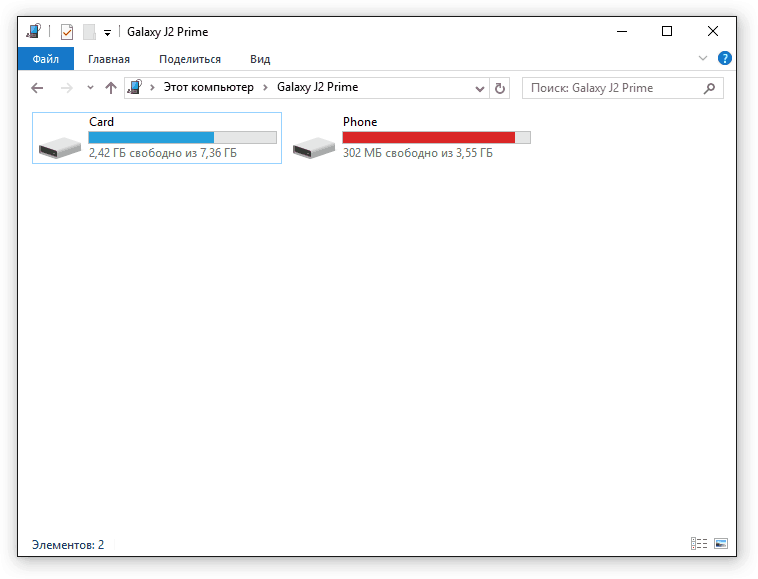
After selecting the appropriate mode in “Computer” on Windows, a media device will appear, the contents of which you can work with. Depending on your phone model and Android version, the internal memory and SD card may appear together or as separate drives. But this does not matter, the main thing is that they are displayed at all.
There are no other options in the Android settings that are responsible for connecting via USB, except for debugging. However, there are some peculiarities. For example, on Nexus smartphones, you need to unlock the screen, which is protected by a password or pattern, in order for the computer to access the contents of the memory.
Also, USB connection cannot be established if tethering mode is enabled on Android. To check its status and disable it if necessary:
- Open Settings.
- In chapter "Network and Connections" click "Additional settings" or "More".
- Go to modem mode and disable WLAN access point. If it is disabled, you don't need to do anything else.

Some manufacturers offer users special programs to control smartphones on a computer, but you can establish a simple connection via USB without this software. Utilities from manufacturers are needed not for the banal transfer of photos, but for performing more complex tasks: updating phone software via a computer, flashing the device’s firmware, resetting settings.
The reason that the computer does not see Android via USB may be an incorrectly installed or simply crooked custom firmware. Also, sometimes a factory reset helps, but before you do it, be sure to back up your data as it will delete your data. The problem may disappear even after a normal reboot of the smartphone - keep this in mind.Checking Energy Saving Settings
Windows is trying to save energy so that the same laptops can last longer on battery power. One of the saving factors is the automatic shutdown of USB ports. Sometimes this results in external devices not connecting at all. To check these settings and troubleshoot any deficiencies:
I haven't measured how much the ban on automatic port shutdown affects battery life, but there is no noticeable difference. But problems with connecting external devices such as Android phones are eliminated.
Installing drivers
The first time you connect any device, Windows installs drivers for it. Often this process goes unnoticed and very quickly (as was the case with my second phone), so you may not even know that the smartphone software is on your computer. But it exists, which means it should work correctly.- Connect your phone to your computer.
- Open device Manager. On Windows 10, the corresponding item is in the context menu, called up by right-clicking on “Start”. In earlier versions of Windows, Manager can be found in Control panels in viewing mode "Icons".
- Check all USB controllers. If there is an exclamation mark next to one of them, this indicates that there are problems with the software.
To make sure that it is the phone that is marked in the Manager, disconnect the USB cable. If the problematic controller disappears, then you have found the source of the problem. A smartphone without drivers may also appear in other sections: for example, among other or portable devices.

So, you discovered that something strange is happening with your phone drivers. What to do next?
- Connect your phone so it appears in Device Manager.
- Select it and delete it.
- Update the hardware configuration so that the computer detects the phone again and begins installing drivers.

You don't have to remove the device, just update the driver. Right click on the phone, select tab "Driver" and press "Update". Another option is to install it first and then install it again without touching the device itself.

In the search box, select automatic detection. If you downloaded the phone driver from the official website, you can click "Search this computer" and indicate the path to the downloaded software file.
If you have a Chinese smartphone, then there may be another problem with it - the inability to find a suitable driver on the Internet. They are often posted on forums like 4PDA, but if there is nothing, try installing a universal driver. It's called Universal Adb Driver and is designed to ensure the Android Debug Bridge and PC syncing utilities work properly with Android devices. Universality is not always good, but there is a high probability that in the case of a Chinese phone you will be able to simply access the contents of the memory.Troubleshooting error code 19
If, when you connect your phone, your computer displays a message about the inability to start the device due to incomplete or damaged settings, then you need to check the system registry. But be careful: deleting the wrong entries can cause Windows to stop working.

After removing the setting, restart your computer and try connecting your phone again.
Alternative file transfer methods
If you cannot resolve the problem with the USB connection, and you need to transfer files right now, use one of the alternative methods.- Sync your data via Google Drive. Android requires a Google account to function properly, so you definitely have access to cloud storage. You can transfer files through other services – DropBox, OneDrive. I use Yandex.Disk.
- Transfer files via email, instant messengers or social networks. I often add small files to Documents on VKontakte, and then download them to my computer.
- Install the AirDroid application on your phone and access the memory through a browser on your computer.
You can come up with other options. For example, create an FTP server on your phone or set up a remote connection via TeamViewer. So USB is not the only option. But if a wired connection is not established, it is still worth looking at what the reason is and, if possible, eliminating it.
Also on the site:
The computer does not see Android via USB updated: February 7, 2018 by: Sergey
On a smartphone you will not find a full-fledged USB port into which you can insert a flash drive. Therefore, connecting a USB flash drive to Android must be done using additional equipment.
Connecting the drive
For your phone to see and open devices connected via USB, it must have On-The-Go (OTG) support. The essence of the technology is that the mobile device supplies power to external equipment via a USB connector. The function is implemented in Android 3.1 and higher, so before you try to connect a flash drive to Android, you need to make sure that this is even possible. First of all, check the OS version:
To make sure there are no problems with the connection, install the USB OTG Checker application. This small program will check for OTG support and, if available, issue a confirmation.  The next step is to purchase a special adapter (equipment cost starts from 100 rubles). The smartphone has a microUSB port; the flash drive physically cannot fit in it. Therefore, you need to expand the port using an OTG adapter, which can be purchased at any mobile equipment store. Some phones, like tablets, come with a “native” OTG cable, so manufacturers also assume that external drives and other USB devices will be connected to their devices.
  The connection procedure itself is extremely simple: one end of the adapter is installed into the microUSB connector on the phone, and a flash drive is inserted into the USB port at the other end.
  Now you can find universal flash drives with USB and microUSB, which do not require an adapter to connect.
  This is still rare, but it is quite possible that over time the ports will become universal, and users will be able to abandon adapters and other additional equipment.
To open a flash drive on a tablet or smartphone, it is usually enough to have a file manager installed on the device. The flash drive must be formatted in FAT32; data from NTFS cannot be read on Android. This primarily applies to the latest models of smartphones from Samsung: just connect the flash drive via an OTG adapter and find the drive through any file manager. The data will be located in the /sdcard/usbStorage directory.  However, the procedure does not always go so smoothly: even if the device supports OTG, the question of how to open a connected flash drive on Android causes difficulties. The problem is that not all mobile devices automatically mount external equipment, be it a flash drive, camera or mouse.
You can eliminate the shortcoming using the paid application USB Media Explorer, which allows you to copy music, video photos, documents from flash drives connected to Google Nexus smartphones and other devices with Android 4.0 and higher.  The application has two drawbacks: it is paid and correct operation is guaranteed only on Nexus phones and tablets, although the developers claim support for other devices. One of the advantages is support for the NTFS file system, that is, you do not have to format the flash drive in FAT32 before connecting.
If you don’t want to spend money on an application for copying data, or you basically can’t install USB Media Explorer on your device due to lack of model support, then the only way to access the data recorded on the flash drive is to use superuser rights (root).
For each model, it is better to look for its own separate instructions for obtaining superuser rights. There are also universal methods, such as using the Kingo Root program, but it should be borne in mind that obtaining root rights is a potentially dangerous operation, as a result of which the mobile device will be removed from warranty. In addition, performing the procedure incorrectly may damage the system.

If your phone is rooted, you can use the free StickMount app to detect a connected flash drive on Android.
- Launch StickMount.
- Connect the flash drive to your phone.
- Set StickMount to open automatically when this drive is connected and give the application superuser rights.
You can view and copy the contents of the flash drive after mounting through any file manager. The information will be located in the sdcard/usbStorage directory. 
It would seem that connecting an Android device to a computer is not difficult at all. I connected it with a USB to mini USB cable and everything should work. But this doesn't always happen. Sometimes additional steps are required. Let's talk about them further.
Let's start with the fact that different versions of Android have slightly different ways of connecting the device to a computer as storage. Don't know your version? Go to settings, look for the menu item “About phone”, “About tablet” or “About device”. The version of your gadget is listed there. Next, proceed according to the instructions prescribed for your version of Android.

Android 2.1 – 2.3.7
- Connect your device to your computer using a USB cable
- Wait until the computer detects the device. If the computer detected your phone or tablet, skip the next step. Otherwise, follow the next step of the instructions
- Disconnect your device from your PC. Go to Settings -> Applications -> Developer options -> USB Debugging. Press the button to enable USB debugging mode. Connect your device to your PC.
- Once the device has been recognized by the computer, a USB icon will appear in the status bar. Pull the status bar down with your finger, tap “USB Connection”
- If you are given a choice between the options “Connect as a media device (MTP)” and “Connect as a camera (PTP)”, select the first option
- Ready! The green Android icon turns orange, and on the PC your device is displayed as a data storage (removable disk with an assigned letter)
Android 4.0 – 4.2
As a rule, in these versions of Android, the device is recognized automatically after connection. If this does not happen, follow these steps:
- Connect your gadget to your PC via USB
- Select Settings -> Storage -> USB Connection Settings
- Of the two options offered (connect as a media device/as a camera), select the first one. Ready! Device connected as storage
Now you know how to enable a USB drive on Android of any version.
How to Clean Android Internal Storage
Clogged internal memory of a phone or tablet is a problem that any user faces sooner or later. Once you have connected to your PC via USB, you have a convenient way to solve it. Here is a short list of actions that you can take to clean the internal storage of your Android device by connecting to a PC.
- Transfer your photos and videos to your PC. Just drag them to the desired PC folder and delete them from your phone
- Check your Download folder. As a rule, a lot of unnecessary downloaded files accumulate there. Delete them and transfer the ones you need to your PC
- You can also save some data directly from applications to your PC. For example, you can archive all your SMS and save them on your computer
By connecting your Android device to your PC as storage, you can easily exchange information between devices, and also comfortably clear the internal memory of your gadget.


