Why doesn't my phone connect to Wi-Fi. Why doesn't my phone connect to wifi? Trouble-shooting. Wi-Fi does not work due to programs
Screenshots:Description:
For those who are planning to connect Wi-Fi for the first time, it will be useful to learn how to set up Wi-Fi on your phone at home.
Select and connect the router
The first thing you need to do is purchase a router or Wi-Fi router, having first read the instructions for the device you plan to connect. The most important parameter in this case is the type of radio signal. Based on this, you need to choose a suitable option. The device may only accept a signal from a specific network with a certain WER security type. Ideally, you need to choose a router that can create an access point with the necessary parameters. After you have purchased a router with the necessary characteristics, you can connect wifi to your phone by following a series of sequential steps.
1. Connect the router to the network.
2. Connect the Internet cable to the corresponding connector on the case.
3. Enter the IP address into the address bar of the browser and open the settings web interface.
4. Select the WAN menu and begin the process of setting up an Internet connection.
5. Go to the Wi-Fi settings menu, where we set the access point parameters for the connected device.
6. Save the settings and reboot the router.
7. Open the Wi-Fi settings on the phone, add a new network, enter a name, select an authentication protocol and enter a password.
This completes the connection process.
But even if you did everything correctly, the phone may not connect to Wi-Fi, notifying you of an error.
Connection errors
It happens that a mobile phone works great with Wi-Fi in public places and flatly refuses to see the home network. The reason for this behavior, strange at first glance, is not in the phone at all, but in the router, or rather in its settings. Solving this problem is very simple and does not matter, the phone does not connect to a Wi-Fi router of the Zyxel, Asus or any other brand. Go to the router settings using any Internet browser and enter its IP address in the address bar. You can find out the router's IP like this:
1. Go to “start” and click “run” (Win + R).
2. On the command line, type CMS.
3. Then in the “MS-DOS” window, type “Ipconfig /all” and press “enter”.
4. In the “Default Gateway” window, find the router’s IP and type it in the address bar of the browser.
5. Go to the DHCP section and check the box next to Enabled.
6. Register the IP in the Primary DNS and Default Gateway windows.
If everything is done correctly, your problem will be successfully resolved.
Sometimes the message “Authentication” appears on the device screen. It can occur in two cases: when an incorrect password is entered or security settings are incorrectly configured. The first thing to check is your password. It must be eight characters long. If there are no problems with the password, you should check your security settings and set the type to WPA2.
Sometimes it happens that the settings have not changed, but the phone does not connect to the wifi router tp-link, d-link, asus, Rostelecom and others. The reason may be a change in the operation of the channel of the router you are using, or the appearance of another one that creates interference. In this case, you can solve the problem by changing the Wi-Fi channel.
There may be other reasons why a Samsung phone, or any other, does not connect to Wi-Fi, but before you dive into searching for them, just try rebooting the router. In most cases, this helps solve the problem.
The most common problem among Internet connections and Wi-Fi networks is when the laptop does not connect to the Wi-Fi network through the router. We have a lot of questions on our website on this very topic, and they often ask what to do if the laptop doesn’t want to connect to the Internet via Wi-Fi? I decided to write a separate article in which I will collect all the possible reasons and their solutions related to connecting to Wi-Fi networks.
We will look at laptops and computers with Wi-Fi adapters. Simply put, any computer that can connect to the Internet wirelessly. Also, this article is suitable for Windows 7, Windows 8, and Windows 10. We already have many separate instructions on our website, with solutions to various, specific problems with Wi-Fi on both laptops with Windows 7 and Windows 10. As I write this article, I will provide links that will definitely be useful to you.
In the question itself, “what to do if the laptop does not connect to Wi-Fi,” there is no specific information at all. There can be many reasons why you cannot connect your computer to the router, as well as solutions. And as practice shows, the computer is not always to blame. I will try to consider all possible problems in order, so that you yourself can fix them without any problems. Of course, everyone has different laptops, different routers, settings, problems, errors, etc. This undoubtedly complicates the task; it is very difficult to prepare universal instructions that would help absolutely everyone.
If you have a laptop with Windows installed, a Wi-Fi router that distributes the network, and you just can’t connect your laptop to the Internet via a wireless network, you can’t figure out what’s what, then this article should help you.
Before we move on to any settings, be sure to try connecting your laptop to a Wi-Fi network using. If you have Windows 10, then see. Perhaps you will succeed. If the problem remains, the computer was unable to connect to Wi-Fi, then see the article below.
I would divide all problems with Internet connection and operation into three categories:
- The laptop does not see the Wi-Fi network at all: the wireless adapter is turned off, the driver is not installed.
- The computer sees the Wi-Fi network, but does not connect to it: incorrect password, “failed to connect,” endless connection, etc.
- The laptop connects to the wireless network, but the Internet does not work: “No Internet access”, “Limited”.
You can go straight to the section you need, depending on what problem you have. Whatever it is, it must definitely fall into one of the categories. It will be much simpler and clearer this way.
What to do if the laptop does not see the Wi-Fi network?
And so, let's start with the problem when your computer does not see wireless networks at all. At the same time, you are absolutely sure that your Wi-Fi network is working, there are neighboring networks, and they are displayed on other devices. But they are not in the list of available networks in Windows. And there is no list itself. In this case, the connection status (icon on the taskbar), most likely it will look like this:
If you see a wireless network icon with a red cross “no connections available” in the notification panel, then most likely there really is not a single wireless network within the radius. But it is possible that this problem appeared for other reasons. In this case, running "Problem Diagnosis" may help. (you can start by right-clicking on the connection icon). I wrote about this using Windows 10 as an example in an article.

Most likely, you have the first case. Red cross near the computer. In this case, the driver for the Wi-Fi adapter is not installed. Or, the wireless adapter itself is turned off. Let's first make sure that everything is in order with the driver, since without it nothing will definitely work.
Checking the wireless adapter driver
To do this, we need to go to the device manager. Right-click on “Computer” or “This PC” and select Properties. In a new window, on the left, open device Manager. You can also go to the start menu and start writing “device manager” in the search and open it in the search results.

In Device Manager we need to open the tab Network adapters, and see if there is a driver for our wireless adapter there. You will recognize it by these words in the name: “Wireless” and “Wi-Fi”. This is roughly what it looks like:

If everything is in order there, then read this article further. If the driver for the Wi-Fi adapter is not in the device manager, then you need to install it, and everything will work. If you don’t know how to install the driver, where to download it, etc., then see the article on. On Windows 8 or Windows 10, this process will be virtually no different.
The main thing is to download and install the driver specifically for your laptop model (or the adapter itself if you have a USB/PCI adapter), and for your operating system. Well, I recommend downloading the driver from the official websites of the manufacturers. If it doesn’t work out at all, then you can try programs for automatically installing drivers. But, this is if you can’t find the required driver and install it manually.
Checking if the wireless adapter is turned on
The adapter itself, through which the laptop connects to Wi-Fi, or rather in our case does not connect, can be turned off. This needs to be checked. Right-click on the Internet connection icon and select "Network and Sharing Center". In the new window, select Change adapter settings.

There should be a Wireless Network Connection adapter, or Wireless Network in Windows 10. If such an adapter is not there at all, then see above where I wrote about installing the driver. If it is, then perhaps it is turned off. Right click on it and select Turn on.

If it is enabled, then you need to check whether the wireless connections on the laptop itself are disabled. On every laptop, there is a keyboard shortcut that can be used to turn off/on wireless connections (activate airplane mode), including Wi-Fi. This, as I already wrote, is either a key combination or some kind of separate switch. For example, on Asus laptops, these are the Fn+F2 keys. You can always find this combination yourself. Key Fn+antenna key, Or something like that. You can see separate instructions for. And if you have Windows 10, then see these instructions
So we’ve sorted out the problems that prevent us from connecting to Wi-Fi. When the list of networks available for connection is not displayed. If you've tried everything, but you can't get your computer to see wireless networks, then it is possible that the adapter itself (hardware) is simply broken or disabled. This, by the way, often happens after disassembling a laptop and cleaning it from dust. You can describe your problem in detail in the comments, I will try to advise something.
Computer won't connect to Wi-Fi
According to plan, the second big problem is when the laptop sees and displays a list of available networks, your network is there, but it does not connect to it. At the same time, other devices connect to your network (it would be good to check and make sure of this). Let's now look at the most popular problems with connecting to Wi-Fi in Windows 7 and Windows 10. On the eight, everything is the same, there is nothing new there.
First of all, if any error appears, reboot your router and computer. Try connecting again.
Error: "Windows could not connect to..." and "Cannot connect to this network"
A very popular error that may appear when trying to connect a laptop to a Wi-Fi router.

I wrote about solving this error in Windows 10. As for Windows 7, the solutions are the same. To be honest, there are not many solutions there, the error is not very clear, and there is no specific way to get rid of it.
What else can you try to do: check on the laptop, in properties Wireless network connection (protocol version TCP/IPv4) Is it set to automatically obtain an IP address? In the router settings, you can try changing the security type of your network to WPA2-PSK (if you have another one installed). All this can be done in the router settings. We have detailed instructions on our website for changing the password on different routers.
There is a solution to the error “Windows could not connect to...” in Windows 7.
Security key mismatch. Windows does not accept Wi-Fi network password
You select your network from the list, specify the password, and Windows writes that the password is incorrect. Well, of course, the computer does not connect to Wi-Fi.

Try again, maybe you really entered the wrong security key. Check if CapsLock is enabled. If the laptop does not want to accept your password, then there are two options: remember the password by looking at it in the router settings, or change the password for your wireless network. See article: . You can change the password, for example, to some simple number. To check, then set a more complex password.
Read more about this error and its solution.
Another error that often appears in Windows when trying to connect to a wireless network. And it usually appears after changing some settings on the router. Basically, this is the network name and password.

When the error “The network settings saved on this computer do not meet the requirements of this network” appears, deleting the Wi-Fi network on the computer and reconnecting always helps. I gave links to instructions for deleting a network in Windows 7 and Windows 10 (forget the network) a little higher (they are highlighted in blue).
After deleting information about the wireless network, simply reconnect, indicating the key to your network.
There is a Wi-Fi connection, but the Internet does not work
This is a completely different story :)

Therefore, we have separate, large articles on this problem, when a laptop connects to Wi-Fi, but the Internet does not work:
I won’t write here why the “No Internet access” and “Restricted” errors appear. The article was already very large. If, after connecting to a wireless network, you encounter a problem when there is a connection, but the Internet does not work, then feel free to follow the links above. I am sure you will find a solution to these problems there.
I wanted to collect all the possible, or at least the most popular, problems encountered when connecting a computer to Wi-Fi. I think I succeeded. If you still could not solve your problem, then carefully read the article again. If it still doesn’t work out, then describe your case in the comments, and we’ll think about it together.
Modern life is quite difficult to imagine without phones and the Internet. Therefore, modern smartphones provide the ability to work with the Internet. At the same time, most people use Internet access using WiFi. This is due to the fact that it is much more convenient, and a large amount of money is not spent.
Reasons for lack of Wi-Fi on your phone
It can often happen that the phone connects to Wi-Fi but does not connect to the Internet, this may be due to various reasons, let’s look at them in more detail:
- The first thing you might think about when connecting to the network is whether the Internet itself is paid for. But this rarely happens;
- therefore, the problem is quite solvable;
- It may be that the Internet is connected, but it is written: without access to the network. This happens quite often;
- The phone does not connect to Wi-Fi, it says obtaining an IP address. It turns out that you connect to the Internet, the connection is shown, but at the same time the connection itself does not occur;
- authentication error. This is also a fairly common reason why the Internet will never connect;
- error type: “Saved, WPAWPA2 protection.”
This may not be all the problems that may occur when connecting to the Internet from mobile devices. But at the same time, they are the most common.
Many people, not knowing what to do, immediately try to call the operator and find out why they do not have Internet, although, in many ways, the problem may not be on their part.
Video: How to connect the Internet to your phone?
Cause Solutions

It is logical to assume that it is necessary to solve these problems, therefore, we will tell you how this can be done.

Therefore, in addition to the usual tips in terms of rebooting the router, there are a number of really useful and more
Restarting the router
Many people wonder why I can't connect to the Internet and what can be done to solve it. There is one procedure that every person can do, and that is restarting the router. This can help with many problems where your phone won't connect to your home Wi-Fi because it can help you set up your router again.

Rebooting can be done in several ways: These are the main ways in which you can reboot
. This is really quite simple, but I would like to note that the first method is the highest quality, and at the same time gentle on the device itself.
Removing the old connection
The problem is solved mainly because when you delete the old connection, all Wi-Fi settings are deleted, allowing you to reconnect with new settings.
All this suggests that you will be able to work with the network. But this does not mean that you can solve any problem in this way. This is just one of all options.
Video: How to remove unnecessary network connections
Changing the channel in the router
You should change the channel in the router when you start having constant problems with your Internet connection.
Because it may happen that two routers operate on the same channel, and then this is precisely why such interference occurs. If you have often had similar connection problems, then this is exactly what needs to be done.
Also, there is a possibility that for the same reason there may be such a problem: Wi-Fi works within only one room, and then it catches, but the Internet does not load sites. This may just be due to interference that occurs from other devices. Therefore, it’s worth changing the channel, especially since nothing bad will definitely come from it.
Connection password

Probably everyone understands what a connection password is and why it is needed. It is with the help of it that you can connect to Wi-Fi of any network. Using the Internet also depends on the correctness of this password.
Many people advise changing the password if necessary to solve connection problems, because this may be the problem.
Checking MAC and IP addresses An IP address is what is assigned to a device after connecting to the Internet.
It is necessary to check the MAC and IP address, because this may be the main problem of the lack of Internet in the device.
Checking the IP address is not that difficult to do; just go to the network settings. The correctness of this address gives you the opportunity to work with the Internet without problems or interference.
Encryption/Security Type
If such a problem occurs, then simply check the encryption type and change it if necessary. Then you can reconnect Wi-Fi and check its operation. Basically, the type of encryption is the last step in troubleshooting connection problems.
Why doesn't my phone connect to Wi-Fi - authentication error
Connecting your phone to the Internet via Wi-Fi always happens without any problems, but there are times when you need to take additional steps in order for the connection to happen.

The most common cause is an authentication error. As in all cases, it is advised to go through many steps that can help solve the problem.
It is quite difficult to solve such a problem since you do not have access to the router settings. But you can simply check the password, and that's the only thing you can do. An incorrectly entered password also leads to authentication problems. Therefore, to prevent this from happening, you just need to be careful.
Error Saved, WPA protection Also, most people ask questions like:

Why doesn't my phone see the network? This problem is quite logical. The first thing that could be, of course, is a problem in the router, or an error Saved, WPA protection, this problem is completely solvable. It occurs quite often, and mainly due to the fact that there was some failure in the router settings. And in such cases, the phone sees Wi-Fi but does not connect.
As a result, we can say that no matter what problem you have, the first thing you should do is reboot the router. Because it is quite safe, does not require a lot of time, and besides, anyone can do it. Then you can begin other actions, which will be more complex, but at the same time, you can cope with them.
The problem of connecting to a wireless Wi-Fi network is quite common. Your mobile device may refuse to accept Internet traffic from your router for many reasons. We will look at solutions to the most popular problems that happy owners of mobile devices have to face.
Let's consider solving connection problems using the example of the Android mobile operating system with the MIUI graphical shell and a router from TP-LINK.
This situation may be accompanied not only by a problem with the phone’s software, but also with the hardware. In this case, the mobile device will need to be taken to a workshop for diagnostics by experts. We will analyze the problems with connecting to the router from the software side in order of complexity:
Reason 1: Incorrectly entered password
No matter how funny it may sound, most cases where a mobile device refuses to connect to a wireless network occur precisely because of an incorrectly entered password. In this case, the user may enter characters in the wrong case (large characters instead of small ones, and vice versa) or miss some of them.
If you own the router, an attacker could change your password through hacking without your knowledge. Find out your password again and try to enter it again carefully.
Reason 2: Router frozen
Even the most expensive device designed to transmit Internet traffic over the air can, over time, accumulate “garbage” in the form of extra data packets and temporarily fail. The solution to this problem is very simple - reboot the router. You can do this by turning the router off and on using the power button on its back panel.
Turn off the router for 10 minutes, then turn it on again. If this trivial action does not help, we move on to more complex solutions to the problem.
Reason 3: Mobile device authentication failed
Every day, mobile devices are subject to heavy load over the airwaves. This is not only the reception and transmission of Internet traffic, but also mobile calls, SMS messages and everything related to this. Therefore, the device may no longer accept data from the router due to information overload.
- Remove the network from the Wi-Fi settings on your phone, and then connect again. Then the connection configuration will be redistributed, and, quite possibly, your problem will be solved. We enter the advanced settings of the connected network. When using the MIUI graphical shell, to the right of the network name there is an arrow leading to these settings.

- Next, click on the button "Delete this network" at the bottom of all settings.

- After pressing the button "Delete this network" the phone's operating system will ask you if you are sure of the action, press "OK".

- We find our network again and try to connect by entering the password set on the router in a special window.

Reason 4: The limit of connected devices has been exceeded
By default, modern routers are ready to connect 16 or 32 devices to their network. Often this problem occurs with routers in public places, or those that simply do not have a password set. Of course, your neighbors will not miss the opportunity to use the free Internet, and thus the device that distributes the Internet in your home may be overloaded.
To solve this problem, you need to set a password on your home router to control the number of its clients. If you don’t know how to do this, you can read our article on this subject.
When installing security on your router, try to come up with a password that is as complex as possible. A special lesson will help you with this:
In order to find out how many clients are currently connected to your device, you need to go to the router control panel in the tab "Wireless - Wireless Statistics". In the table, the ID value shows the serial number of the device connected to the network:

Instructions for logging into the control panel of the TP-LINK router are described in the lesson on changing the password on the router, which was mentioned above.
Reason 5: Hardware failure
No working device guarantees perfect operation without breakdowns. Likewise, the router may at one time refuse to continue working correctly. In this case, it requires hardware diagnostics by an expert at a service center and its further repair.
Problems setting up the router
There may be connection problems due to the current settings of the router being incorrectly configured. All settings are made in the special panel mentioned above when changing the password. Changing the following parameters is advisable only after checking methods for eliminating common errors.
Don’t forget to save the changes after each change of parameters using the “Save” button at the bottom of the settings window. After saving, reboot the router with the button "Reboot" in the tab "System Tools - Reboot".

Let's look at additional reasons why your connection may be temporarily inoperative.
Reason 1: Duplicate SSID
The SSID is the local network ID on your router. Simply put, it's his name. If there are two identical models with the same identifiers in the same radio frequency range, disagreements will be created between them. The problem is quite rare, but very real. To solve this problem, you need to change the SSID of the router to the original one in the .

Reason 2: Communication channel is full
In places where several routers are concentrated, which could be a home, office or public place, there are communication channels through which information packets are transmitted. If many routers use the same communication channels, they become overloaded and become unable to transmit more data. What do we have to do?
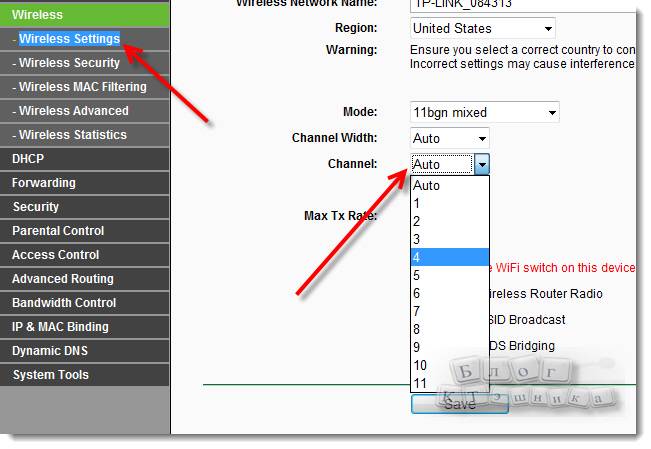
- Change the communication channel in the router settings to any other in the tab "Wireless - Wireless Settings" or "Wireless Mode - Wireless Settings" by changing the parameter "Channel".

- Change the frequency at which your router's data transmission operates to any other by changing the parameter "Channel Width".

Reason 3: Incorrect router operation mode
The operating mode of the information transmitter in the form of a device like a router is determined by a parameter in the same settings window called "Mode". It is impossible to answer which mode exactly the set parameter needs to be changed due to its subjectivity. Try to solve the problem with mode change "bgn", having first tried "bgn mixed"(combined mode), or, if you are the owner of a router from another company, this parameter may be called "Auto".
Reason 4: DHCP server is disabled
The DHCP server assigns temporary IP addresses to wireless network subscribers. For some reason, this server may be disabled, which prevents the router from seeing potential devices in its range. To fix this problem, you need to enable DHCP distribution mode by clicking on the checkbox "Enable" in line "DHCP Server" in the tab "DHCP".

Reason 5: Security Settings
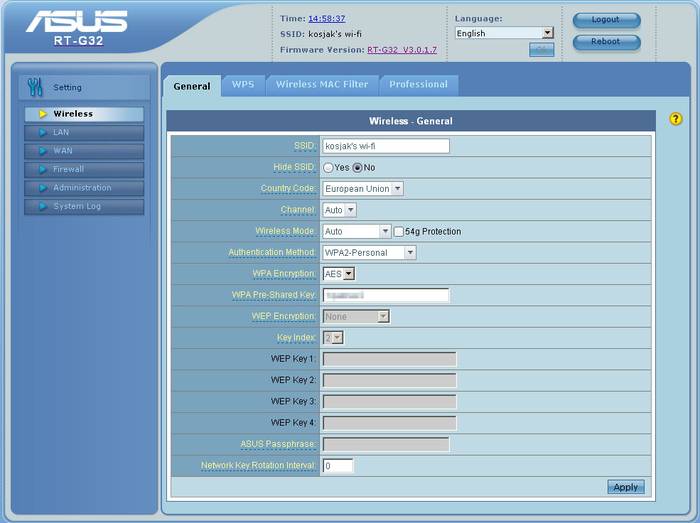
Sometimes the connection problem lies in the changed data transmission security parameters provided by the router company. Security settings can be found in the tab "Wireless - Wireless Security". By default, the checkbox is set to "WPA/WPA2 - Personal(Recommended)", and this is the best option today. It is recommended to set the parameters shown in the screenshot, since they are stable:

If they do not suit you, in points "Version" And "Encryption" you can set options "Auto", which configure parameters in their own way depending on the behavior of the router on the network. It is not advisable to disable parameters altogether by clicking the checkbox "Disable Security" for the security of your valuable data.
Reason 6: Presence of device in MAC filter
It’s one thing if the filters contain dynamic IP addresses of devices that tend to change with a new connection, but physical addresses are quite another. The owner of an Android phone cannot change this address. Entering the physical address of your device into the router's MAC filter completely blocks its access to the network. Make sure your device is not in the table in the tab "Wireless - Wireless MAC Filtering".

As you can see, the problem of connecting to a wireless network is quite versatile, but solving it is not difficult if you follow the instructions. The graphical interfaces of the control panels of different router models may be different, but the essence of the settings is the same everywhere. Depending on the type of firmware, the language and graphics that accompany the settings may differ.
Recently I helped one of my blog readers solve a problem with a wireless network. The gist of it was that his phone did not connect to the WiFi router. Moreover, it was not just some cheap Chinese Lenovo, but an expensive (albeit also Chinese) fashion iPhone 6S. We spent a lot of time, tried many different options and, in the end, found a solution to the problem. Looking ahead, I will say that the “root of evil” was the incorrect configuration of the home router.
After all this, I decided to combine all our actions into one universal instruction - what to do if a tablet or phone does not connect to Wi-Fi, does not see the network, or sees it but cannot connect to it. Go.
1. The phone does not see the WiFi network
The most common reason is a mismatch in the region settings for the router and for the tablet or phone. The fact is that almost all home routers and access points that are sold in Russia have the “Russia” region set by default, which uses 13 radio frequency channels. But phones, especially those brought from abroad, have a different region by default, which may have 10 or 11 channels. This is exactly the problem that most often occurs with iPhone smartphones and iPad tablets that came to us from the USA. The funny thing is that you can connect to the router, enjoy the benefits of a wireless network for some time, and one day discover that your phone does not see the router’s WiFi network. The solution is very simple. First, reboot your router. With a high degree of probability, after a restart it will occupy another radio channel and everything will work fine again. To avoid falling into the trap again, you can go to the router’s settings by entering its IP ( or ) in the address bar of your browser. After this, you need to go to the main WiFi settings:

In the “Region” field, try replacing “Russia” with the value “USA”:
You can do without changing the region. In the “Channel” list, replace “Auto” with the value 1 or 6:

As a rule, after this, iPhones no longer lose the wireless network and everything works like a clock.
2. Can't connect to Wi-Fi
In this case, usually all devices see the wireless network without problems, but when they try to connect to it, they are simply rejected. There are several options here:
— Endless connection
This usually happens when the communication standards used on the devices do not match. For example, the router is forced to use 802.11n, but the smartphone uses 802.11b or 802.11g. Or vice versa. Therefore, it is best to set the router to a mixed type - 802.11bgn.

— Infinite authorization
This same trouble can happen if the password on the router is changed, but the old one remains in the smartphone’s memory, which is why it cannot connect to the WiFi network. Try to find it in the list of available ones, click on it and select the “Delete this network” option in the menu that appears.

After that, select again from the list and try to connect.
If it doesn’t help, then go to the security settings of the router and try setting the “WPA2-PSK” standard with “AES” encryption.

If this does not help, completely disable security and observe how the connection proceeds.
— There is a message “Obtaining an IP address”
This usually happens when the DHCP server is disabled in the router settings. We go to the web configurator, find the LAN or DHCP section and make sure that the DHCP server item is set to “Enable”.

Sometimes you may get stuck in obtaining an IP address due to the fact that a static IP address is registered in the Wi-Fi settings on the phone or tablet itself. To check this, open the “Settings” -> “WiFi” section and click on the connected network. In the menu that appears, select “Change”. A window like this will open in which you need to check the “Advanced” box. Next, make sure that the “IP address” field contains the value “DHCP”.

3. There is a connection, but no Internet
Start by checking whether other phones, tablets or laptops work through this Wi-Fi. Are they working? Then we go into our device, namely “Settings”>>>”Wi-Fi”>>>”Change network”:

We check whether work through a proxy server is enabled.
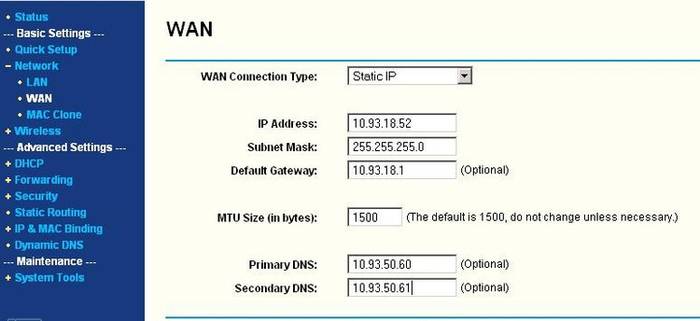
This option is also possible, although very, very rare, when an incorrect or non-working DNS server is assigned when connecting. It’s easy to check - in your phone, click on the desired network, select “Change” in the menu, check the “Advanced” box, “Manual” IP address and enter the full IP address from the router’s subnet, mask and gateway. But in the DNS servers field we enter the following values:
8.8.8.8 77.88.8.8
On an Android phone or tablet it looks like this:

These are public DNS from Google and Yandex. They are 100% working, which will completely eliminate this option.
If none of the above methods help, then try this. Take your device and check it on another wireless network - from a friend, acquaintance or comrade. If there the phone or tablet does not connect to the WiFi router either, then the problem is clearly in your device and it must be taken in for repair.


