Online Word Office - Interactive Office from Microsoft
The intensive development of computer technology makes it possible to perform various functions without installing software on a computer. All you need for this is the Internet and a browser, through which you will be able to log in to interactive services to perform the functions the user needs. One of the successful projects is Word Online, which has been successfully integrated into the Web and is already bringing a lot of benefits.
Benefits of Microsoft's online Word office
In order to open Microsoft Word Online, go to the Start page opens. 
The main advantage of the service is its mobility and the ability to use it from any device that has a browser installed (Yandex browser, etc.). and network connection. This opens up new horizons of possibilities and range of office use, since now, without installing programs on your device, you can use it absolutely free. Of course, it is impossible to note the fact that, unlike the Word program from Microsoft,
The interactive version of the product is absolutely free.
Thus, this product has become even more relevant, and the range of software uses has expanded many times over.
Functionality of Word online
Of course, the developers did not create a completely new product, since the Word program already has very good capabilities with easy navigation, so the interactive analogue has a similar interface to the program and is in no way inferior in capabilities.
If you click on the icon at the top left, you can see the contents of the package. There is both Word and Excel.

Working with this service is quite comfortable; you don’t need to learn new functions or remember the location of tools, everything is in the same places as in the program. 
They even integrated Skype here. By clicking on the button you can make a document and consult on Skype!
Thus, from the first minutes you can already perform the necessary operations, for example, open a document, edit it and save it, or create a new one and download it to your PC. The only difference is in opening and saving files, which is done using a file explorer, in which you need to specify the path of the saved file or select the location of the downloaded one.
Format support
The interactive Word office can work with the same formats that Microsoft Word understands. Thus, the online analogue of Microsoft Word is in no way inferior in terms of capabilities and format support to similar programs. You can create a document with a Doc extension or edit an existing one and save it. All this is available at any time directly from your browser.
Differences
Microsoft projects never lose ground, and online Word can also deservedly be called successful. The most tenacious difference is that it is free, and very wide functionality. At the moment, there are no similar projects on the Internet that would offer such opportunities for free. Therefore, the main differences include free use and good functionality.
If you need a text editor that supports most modern formats, then online Word Office from Microsoft is the ideal solution to your problems. There is no need to install the program, just visit the resource and you will receive a free, fully functional tool for doing office work.
Word 2010 is a word processor that allows you to create different types of documents such as letters, documents, flyers, faxes and more. In this lesson you will become familiar with the main menu ribbon and the new pop-up menu, learn how to create new documents and open existing ones.
Word 2010 is a little different from previous versions. The toolbar is the same as in word 2007 and includes the Main Menu Ribbon and the Quick Access Toolbar. Unlike word 2007 commands like "open" And "seal" are located in a pop-up menu that replaces the Microsoft Office button.
Ribbon
The new main menu ribbon was first introduced in word 2007 to replace the traditional menu. The ribbon contains everything you need to perform common commands. It contains numerous tabs, each of which contains several groups of commands. You can also add your own tabs that contain your preferred commands. Some groups have an arrow in the lower right corner that allows you to open more teams.
Some programs, such as Adobe Acrobat Reader, can add a separate tab to the ribbon. These tabs are called “built-in elements”.
To collapse and expand the ribbon
The ribbon is designed to meet your current needs and be easy to use. However, you can minimize it if it takes up too much screen space.
- Click the arrow in the top right corner of the ribbon to collapse it.
- To expand the ribbon, click the arrow again.

When the ribbon is minimized, you can temporarily bring it up by clicking on any tab. The ribbon will disappear again if you don't use it.
Setting up the main menu ribbon.
You can customize the ribbon by creating your own tabs with any commands. Commands are always located within a group, and you can create as many groups as you like to organize your tabs. If you wish, you can even add commands to any standard tab, creating a custom command.
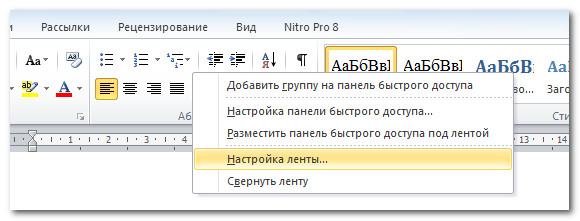
- Right-click the main menu ribbon and select Customize Ribbon. A dialog box will appear.
- Click Create Tab. A New Tab with a new group will appear.
- Make sure you select a new group.
- Select a command from the list on the left, then select Add. You can also drag commands directly from the group.
- When you're done adding commands, click OK.

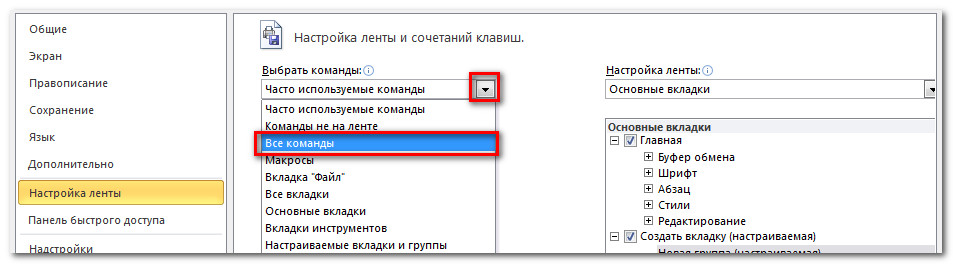
If you don't see the command you need, click Select Commands and select All Commands from the menu that appears.
The pop-up menu contains various options with which you can save, create, print and share documents. It is similar to the Word 2007 button menu and the file menu of previous versions. However, unlike a regular menu, it has a full-page layout, making it easy to work with.
To bring up the pop-up menu:
- Click on the File tab.
- The options are on the left side of the page.
- To return to the document, click any tab on the ribbon.

The Quick Access Toolbar sits above the Ribbon and gives you quick access to common commands no matter what tab you're on. By default, it shows the Save, Edit, and Redo commands. You can add other commands to make your work more convenient.
To add commands to the Quick Access Toolbar:
- Click the arrow on the right side of the menu
- Select the team you want to add. The command will appear in the quick access menu.

Ruler
The ruler is located at the top and left of the document. It allows you to accurately align your document. Optionally, you can hide the ruler to free up more screen space.

To hide or show the ruler:
- Click the Ruler icon in the scroll bar.
- To show the ruler, click the icon again.

Creating and opening documents
Files in Word are called documents. To start a new project in Word, you first need to create a new document, which can be either blank or template. You also need to know how to open an existing document.
To create a new document:
- Click on the file tab. A pop-up menu will open.
- Select create.
- Select a new document from the available templates. It will be highlighted by default.
- Click "create". A new document will appear in the Word window.

To save time, you can create a document from available templates, which you can select in the new document window. We'll talk about templates in the next lessons.
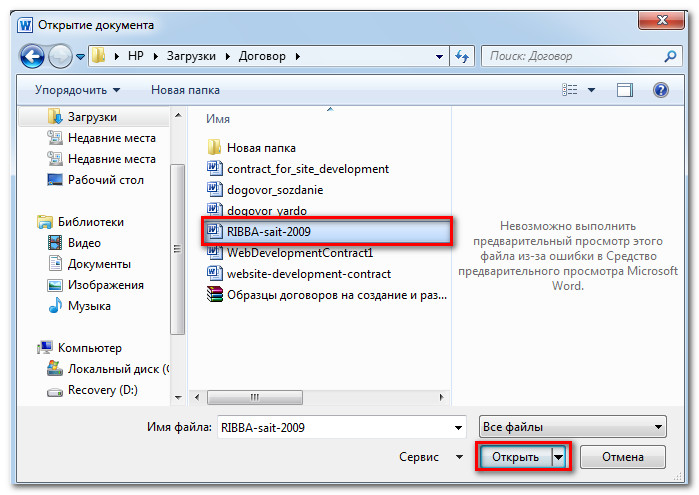
To open an existing document:
- Click on the "File" tab. A pop-up menu will open.
- Select "open". A dialog box will appear.
- Select your document and click open.
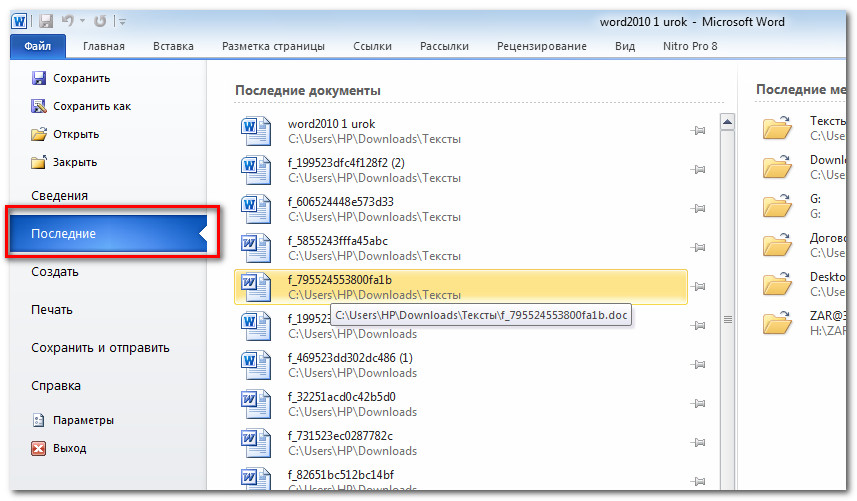
If you opened a document recently, you can open it from the Recent Documents list. Just click on the file tab and select the latest ones.
Compatibility Mode
Sometimes you will need to work with documents that were created in earlier versions of Word, such as Word 2007 and Word 2003. When you open such documents, they will open in compatibility mode.
Compatibility mode has certain restrictions, so you will only have access to the commands that were in the programs in which they were created. For example, if you open a document created in Word 2007, you can use Word 2007 tabs and commands.
Russian State Committee for Higher Education
Ryazan State Radio Engineering Academy
Computer Department
Test
Topic: Microsoft Word Text Editor (Basics)
Ryazan, 2006
1. General information about the text editor Microsoft Word
Text editor is a program that provides the PC user with the means of creating, processing, printing and storing documents of various natures and degrees of complexity, including text data, tables, graphs, images, formulas, etc.
Microsoft Word is the most widespread and one of the most powerful text editors.
Basic editor operations MS Word no working with documents:
Text input;
Editing the contents of a document (making any changes to the text of the document: changing the relative position of individual parts of the document, searching and replacing characters, words and sections of text);
Formatting the contents of the document (setting line spacing, left and right indents, text alignment, etc.).
Possibilities MS Word:
Simultaneous work with several documents;
Spelling and grammar checking;
Automatic document formatting;
Inclusion of tables, figures and mathematical formulas in documents;
Collaborative work on large documents, etc.
The MSWord editor program is launched using the main menu command IIyc To\ IIporpa mmm\ Microsoft Word .
The MSWord editing environment (Fig. 1) contains the following elements:
Document title line;
Main menu;
Toolbars;
Edit window;
Horizontal and vertical rulers;
Document scroll bars;
Status bar.
The command menu is designed as a hierarchical system of pop-up submenus, i.e. submenus that are activated when you select some item from the main menu. Each pop-up menu item corresponds to a specific command or the name of the next level menu. Running a command to execute carried out by clicking the left mouse button. To close menu, without selecting any commands, you should left-click in the document editing area.
Below the main menu are located toolbars, which contain buttons for quick access to those menu commands that are used most often.
Edit window The document occupies the main area of the editor window. This area is intended for entering and editing document text. After launching the MSWord editor, a blank document appears in the editing window, ready for typing.
On the left and top of the document editing window there are vertical And horizontal ruler with divisions and markers. The horizontal ruler shows the values of the right and left margins of the page and the values of the parameters of the paragraph in which the cursor is currently located. The vertical ruler is only visible in page layout mode. It shows the top and bottom margins of the page.
On the right and below in the document editing window there are horizontal and vertical scroll bars. They are used to move around the document along with the cursor keys and the PageUp and PageDown keys.
Status bar at the very bottom of the document editing window contains information about the document and hints about the actions performed by the editor.
Entering text– typing the appropriate text on the keyboard by pressing the appropriate keys.
The location where the typed text will be placed indicates cursor(flickering vertical line). While typing, when the right margin is reached, the text automatically moves to the next line. To divide text into paragraphs, when completing the previous paragraph, press the key < Enter >. Typed characters can be deleted both to the right and to the left of the cursor using the keys < Delete > And <←> respectively.
To move the cursor to the desired place in the text, you must either click the mouse in this position or use the cursor keys. If together with the key <Вправо>or<Влево> press < Ctrl >, then the cursor will jump to the beginning of the next or previous word, respectively.
MSWord allows you to choose between two text editing modes: insert mode And replacement mode.
Working with text fragments, using a buffer exchange
MSWord allows you to work with clipboard, which serves for temporary storage of various information (fragments of text, pictures, etc.). To perform an operation on a whole fragment of text, the desired fragment must first be selected. The selected text can be copied to the clipboard by pressing the keys < Ctrl + Insert >. To paste text stored on the clipboard at the current cursor position, click < Shift + Insert >. To remove selected text from a document, press the key < Delete >.
Alignment
There are four types of text alignment:
Left: button
Center: button
Right: button
Width: button
,[page 266]To set alignment, select the paragraphs you want to center or align and click the appropriate alignment button on the toolbar.
Indentations
Indentations- distances from the left and right borders of the paragraph to the corresponding page margins.
A horizontal ruler with markers is used to create indents. Each marker allows you to configure a different type of indentation.
To set the indentation, you need to select the required paragraphs, and then use the mouse to move the indentation markers to the desired position on the horizontal ruler.
To change the font, you must first select a piece of text, and then in the submenu "Format" select item "Font". In the dialog box that opens, you can change any font parameters. To quickly select the font type, its size and drawing method, it is convenient to use the corresponding elements on the toolbar (Fig. 3).
Starting the program MS Word
Open the main Start menu on the Windows taskbar;
In the main menu section that opens, select “Programs”;
In the submenu that opens, select “Microsoft Word”.
Individual tasks
For option No. 7, you must complete tasks 1,4,9,14,17,18,25,26,27.
1. Type the source text in the editing window
Type the text of the first paragraph on the keyboard;
Press key < Enter > ;
Type the text of the second paragraph on the keyboard;
Press key < Enter > ;
Type the text of the third paragraph on the keyboard;
Press key < Enter > .
The original text is given on page 6.
Original text:
Windows can automatically perform timely updates to system components. There is no need to search for key updates and important information; Windows downloads them automatically. Windows recognizes that you are connected to the Internet and uses it to look for downloadable updates on the WindowsUpdate Web site. When there are new updates, an icon appears in the notification area.
In Windows, you can select the desired update mode. For example, you can choose to notify you when updates are available. Selected updates will be downloaded in the background, allowing the user to work uninterrupted. Once the download is complete, an icon will appear on the taskbar indicating that the update is ready to install. You can install new updates in a few simple steps by clicking this icon or message.
If you decide not to install any of the downloaded updates, Windows will remove the corresponding files from your computer. If your decision is later changed, you can download the update again by clicking the Restore rejected updates button. If any previously rejected updates are still applicable, they will appear the next time you are notified of available updates.
1) Center align paragraphs
Press the keyboard shortcut < CTRL - A >;
In submenu Format select a team Paragraph;
Press key < Enter > .
2) Add a line with the current date to the end of the text
Place the mouse cursor at the end of the text;
Press key
Enter the current date: “10/26/2004”.
3) Align last line to center
Select the last line, do the following:
Place the mouse cursor at the beginning of the last line;
Press the left mouse button and, while holding it, move the cursor to the end of the line;
Release the button;
In submenu Format select a team Paragraph;
In the window that appears, in the “alignment” field, select center alignment;
Press key < Enter > .
4) Set the text font type to " Courier "
Press the keyboard shortcut < CTRL - A >;
In submenu Format select a team Font;
In the window that appears, select a font in the “font” field “ Courier ”;
Press key < Enter > .
5) Set the text font size to "11"
Press the keyboard shortcut < CTRL - A >;
In submenu Format select a team Font;
Not all users know about the ability to open a Word document online. Web services today are the best alternative to full-fledged utilities. Online editors of the most popular text application provide full access to all the functionality of well-known office programs. They will be especially useful to those users for whom this software does not work due to hardware or software failures. Let's talk about the most popular and reliable Word services.
Word is a text file created in the Microsoft Word utility. Currently, this product is considered the most popular; many users pay to install the official version from the manufacturer. The file created in this program is a complete imitation of a regular document printed on a piece of paper, so working with it is easy. Here you can write texts, edit, make signs and insert graphic images.
Today the Internet is available almost anywhere in the world, so there is no urgent need to install office applications on your computer. In addition, with online services you don’t have to think about updating the software, the lack of a suitable font, or creating a backup version if the device freezes. Remote applications easily cope with their tasks.
Open a Word editor document online using Google Docs
According to many users, this free product is the best. It allows you to create and edit Word objects, and it works with .doc and .docx formats. It has a simple interface, so even a user with minimal knowledge can quickly figure it out. The functionality is wide, the editor has a lot of tools for formatting text, correcting errors in real time, inserting images, converting and exporting documents to other extensions.

The principle of working with Google Docs will be as follows:
- come to website;
- Among the available formats, which are located in the top menu, select the one you are interested in;
- left-click to activate the “Open Google Docs/Sheets/Presentations/Forms” tab (whatever you choose);
- in a new window with a list of files available for viewing and editing, you can open them with any left click of the mouse;
- to create a new Word object, click on the “+” icon in the lower corner on the right side;
- a menu will open with editing tools, the same as in the local release of the product;
- objects are saved automatically; to download, click “File/Download as” and find the desired format in the list.
Resource capabilities
The Google Docs website offers not only standard features, but also various interesting and useful additional options. For example, “Shared access” - with its help you can easily edit Word online simultaneously with other users, make an individual link or open access.
- Sharing is activated by clicking on the “File/Sharing” tab, after which you enter the name of your text project and in the second window indicate the email of users who will participate in working with the document;
- To receive a link to the publication, you should open the “File/Publish” sections and in the window that opens, find “Publish”; a link will be generated automatically. It can be copied or taken for posting on other sites;
- To configure access parameters, open the corresponding block, which is located in the corner at the top, on the right side, in the new window, tap on the “Advanced” tab and in “Access Levels” click “Change”, and then select the protection level.
Useful content:
This is a special web package of MS Office Word applications, it has the same tools and functions as the standard installer program on a PC. In addition, the online service allows you to revise texts simultaneously with other people.

The most noteworthy thing is that you can work with the editor only after registering a Microsoft account. You can register Here. After creating an account, full-fledged service capabilities open up, for this:
- come to Word Online website;
- choose one of the offered products;
- after confirming the choice, the desired program will be opened, which provides all the tools of the traditional Office package;
- the document is saved by successively clicking “File/Save As”, here you can upload the result to the Cloud in OneDrive, directly to your own computer in doc/PDF/ODT formats. Saving is done by clicking on the selected extension.
Online collaborative editing is activated in the “Sharing” tab, it is located on the right side above the Word menu; in the form that appears, enter the email of the user with whom you plan to allow sharing.
A worthy tool that allows you to open Word online for free, closing the top three. Its main difference from its analogues is that it uses the familiar interface of Word 2003-2007. But you can’t do without registration here either; you’ll have to create a rollApp account. You can do it like this:
- firstly, go to website;
- secondly, look for “Office” in the list of programs, and in a new window, left-click the mouse to launch the selected editor;

- then a page will open on which you click “LaunchOnline”;
- as a result, the section with information will be activated, where the “Iamanewuser” sub-item should be checked for registration;
- after completing the registration process, the editor menu of the Microsoft Office application we need will open;
- Finally, in order to save the document, you should activate one of the possible storages (Google drive/Dropbox/onedrive/Box).
This is how easy it is to open a Word document online from any computer. For this you only need an Internet connection. Thanks to such services, it became possible to work at any time, regardless of location.
Most of us have to work with documents, and, understandably, everyone wants to do this with maximum convenience, which only a quality editor can provide. There are many packages for working with office documents, including LibreOffice, OpenOffice and Ms Word. The first two are free, but that’s where their advantages end; in all other respects, the Microsoft product is far ahead of its competitors.
There are many versions of Microsoft Office, the old ones are characterized by low functionality, low system requirements and simplicity, while the new ones, on the contrary, are heavy and filled to the brim with various goodies, which on older PCs simply cause slowdowns during operation. In order to get maximum functionality and not have to wait for the thoughtful actions of the office, you need to choose the right version. Microsoft office 2007 is that golden mean. You can download the Russian version of Microsoft Office 2007 for free at the very bottom of the page via torrent or via a direct link, but for now let's take a closer look at the office suite.
Description of MS Office 2007
Below we will tell you in detail why this edition is good, what its disadvantages are, and we will learn how to use Office 2007 and install it. We will also talk about the features that may arise during the work process. This package includes several separate tools, including:
- Word;
- Excel;
- OneNote;
- PowerPoint;
- etc.
There are many other components included in Microsoft Office 2007, the popularity of which is low, only a narrow circle of people use them, so we will mention them briefly.
Additional components of Microsoft office 2007:
- Access;
- Groove;
- InfoPath;
- Project;
- Publisher;
- SharePoint Designer;
- Visio.
We proceed to a detailed examination of each of the programs; for clarity, we will not only describe them, but also accompany them with screenshots.
Word
Among all the products that are included in the Microsoft office suite, Microsoft Word 2007 is the most popular. At the same time, only a small part of the overall functionality is most often used. There are a lot of additional features here, you can configure the Quick Access Toolbar or hide ribbons, and in Office 2007 it has become really convenient to do this. Now, in just a few clicks, we can hide unnecessary tools and leave the ones we use.
Let's take a closer look at the program, and start with its menu, which is divided into 7 tabs. Since we installed the OfficeTab add-on, we have 8 of them.
home
This menu (ribbon) is divided into 5 blocks, this structuring is very convenient, a person’s visual memory is well developed, and you just get used to where to point. In the first block we see tools for working with the clipboard, there is a large button “Paste”, copy and cut, but it is much more convenient to use the hot keys, Ctrl+V, Ctrl+C and, accordingly, Ctrl+X.

Next, we have the basic text settings: font, size, zoom buttons, bold, italic, underline, upper case, color and highlighter. In the lower right corner there is an arrow, clicking which will open the settings menu and allow you to configure the default text appearance and direction.

In the “Paragraph” block, you can adjust the text alignment, create bulleted and numbered lists (including multi-level ones), change the indentation, line spacing or fill color. In the same way as in the “Font” section, you can use the arrow to set default values.

The next block is “Styles”. Here you can set text size and color profiles for highlights, headings of different levels, or quotes. The arrow in the lower right corner can open an additional menu with detailed settings.

And the last section of the Home menu includes basic editing tools. This is search, replace or selection work.

Insert
Here we, similar to the previous point, have several columns with different instruments. There are 7 of them in total, these are:
- Pages.
- Table.
- Illustrations.
- Connections
- Headers and footers.
- Text.
- Symbols.
The first item has "Cover Page", "Blank Page" and "Page Break". When you click on any of these buttons, a list of ready-made templates opens that will help you pre-format our document.

A little to the right is a tool for creating tables. In Word 2007 they are implemented very conveniently; literally everything is configured and it is done simply.

It’s also easy to understand pictures and other media objects; there is an “Illustrations” block for this. It contains pictures, clips, shapes, SmartArt, and charts.

In the “Links” section, the insertion of hyperlinks, bookmarks and cross-references is implemented. Using the latter, you can link two parts of the same document. For example, you can associate a phrase with an object, picture, or diagram.

You can also customize headers and footers (add or remove them). There are many templates for headers and footers, and you can number the pages right away.

The next block of the “Insert” menu is “Text”. There are many different objects that are inserted from templates. This includes a simple inscription, express blocks, WordArt, and drop caps. You can also add a date and time or a signature, a small button in the lower right corner opens a menu of objects.

In the last block “Symbols” you can configure the insertion of formulas or special symbols.

Page layout
“Page Layout” is divided into 6 main blocks. The first one is “Themes”. By clicking on the button, we can see a number of ready-made templates and choose the most suitable one for ourselves. There are also several more buttons that customize the colors, fonts and effects of our theme. In this section you can activate automatic word wrapping.

The next block configures the page parameters, or more precisely: margins, orientation, size, columns, breaks, line numbers and hyphens.

In the "Page Background" section, you can customize the background, background color, and borders. Paragraphs are also regulated here.
Links
This tab is needed to fine-tune the work with links. All information is structured into blocks, there is: table of contents, footnotes, references and bibliography, titles, subject index and reference table. Using the same section, you can create an automatic table of contents in Word.

Newsletters

Review
The “Review” tab involves checking the text and making comments in case of errors. There are many other functions, but most often it is used precisely for this. The verification algorithm in Microsoft Word 2007 is capable of learning; those words that it perceives incorrectly for some reason are entered into the database using the context menu.

View
And finally, the “View” section. It has a document view mode such as draft, outline or read, setting additional panels, ruler, grid or outline of the document and zoom adjustment. Macros are also created in the same menu. A macro is a tool with which you can record any action so that the program can perform it automatically.
You can also adjust the size of text and other content in a document using buttons. To do this, hold down the Ctrl key and rotate the mouse wheel.

To open Word 2007 settings, click on the round icon in the upper left corner of the program.


How to remove reduced functionality mode in Word 2007
In the new version of Word, developers switched to the Docx format; therefore, in older offices, such documents open in limited functionality mode. To correct the inconvenience, you can open the main menu of the old version of Word and select the “Convert” item, then confirm the command. Done, you can work with the file even in Office 2003.
How to remove a blank page in Word 2007
In order to do this, you need to click on the page break icon, which is located in the “Paragraph” menu.


