Surround sound on PC. Installing audio codecs. Increase sound using Windows
Good afternoon friends. Most people love to listen to good quality music. Previously, this required buying a decent stereo system, a subwoofer and a bunch of speakers. It was necessary to purchase additional speakers so that the sound would be more voluminous, quadratic.
But, with the advent of computers in our lives, many people abandoned stereo systems and began listening to music on the computer. The whole point is that to get decent sound through a computer, it’s also worth spending money.
You need to buy a sound card and configure it correctly. Buy additional speakers (for surround sound), and, again, buy a subwoofer. Among other things, many people connect stereos to computers.
For example, in recording studios, there is very complex, professional audio equipment connected to a computer and several monitors. Of course, such pleasure costs a decent amount. But what to do if you want to listen to music in decent quality, on a regular desktop computer with two speakers (or, in general, on a laptop with built-in speakers). I mean, without a sound card (a decent sound card costs from 3000 rubles and more)?
In this case, it is worth installing an equalizer program to improve the sound. There are a decent number of similar programs. Moreover, some of them provide a sound effect no worse than that from a sound card.
How to work with the sound program Hear
So, we will look at the famous Hear program. This is a very convenient program that allows you to create surround sound, even if you have speakers or headphones of not very good quality. Or just quiet. This program allows you to increase the sound volume. Many users claim that it gives an effect that is not inferior to a sound card.
The program is paid, but on the official website there is trial version. You can also download the Hear program for free from one of the torrent sites. The program is in English. I searched for Hear in Russian, but couldn't find it. Yes, we don’t really need him. Its interface is already clear.
Install Hear. During installation, you will be asked several times if you agree to install this equalizer program? We agree. So, let's start working with this sound program. But, first, just in case, I advise you to create an OS restore point so that, in case of incorrect settings, you can roll back the system.
First of all, let's make Hear the default device for working with sound. If you don't like what you've done, you can return the previous device (speakers) to default. To do this, go to the control panel and select the “Sound” shortcut.

Then, in the playback tab, select Hear. These steps are for Windows 10.

For seven, select the Audio menu, and then Hear.

Now, let's check whether you really have the Hear program installed to play sounds. To do this, click on the speaker icon in the quick launch panel and see:

If desired, you can select speakers by clicking on the triangle at the top.
Let's move on to consider the program itself. Pay attention to the top menu.

It contains program presets (ready-made sound effect settings). For example, I'll select Speech. At the same time, the letter S in styles indicates that this style exists in order to listen to sound from speakers. The letter N means that this style should be listened to with headphones.

Now, I advise you to turn on some music to understand which preset suits you best. You can also create presets yourself. But we'll talk about this later.
Bottom Tabs
Let's move on to the bottom menu. General Tab. In it you can configure different sound effects using sliders. Also, in the right column you can disable or enable the commands you need.

Also, I advise you to consider EQ tab, which contains the equalizer and can be changed. So, pay attention to the commands in the lower right corner: Curve - the equalizer is shown in the form of a graph, Sliders - in the form of sliders.

That's what we need, they can be changed to suit your taste. I don't just mean the sliders, but also the graph line.

The sliders can be set as in my screenshot. I think this is the most suitable option.
Playback tab— makes it possible to customize the sound options yourself and see if there are any errors or warnings. If they are not there, the field will be clear.

3D– creates the volume of sound reproduction. Something like sound from all directions, even with only two speakers. Move the sliders as you wish.
Ambience– introduces a reverberation effect. It can be disabled by clicking Enable.
FX– makes it possible, with the help of sliders, to redirect the sound away from the person.
Maximizer– adjusts bass and treble frequencies in headphones.
B.W.– makes it possible to listen to music in different modes. For example – morning awakening, meditation, relaxation.
Limiter– allows you to adjust compression.
Space– along with the 3D menu, creates expanded sound. If you select Normal, the sound will be heard from behind. If Wide, the sound will be closer to you.

– helps restore sound quality lost during recording.

Speaker– increases the volume from the speakers. Expands the scale of emitted frequencies.
Sub– makes settings in the virtual subwoofer.
How to create your own preset
We randomly change the sliders in different menu windows as we like. Then, go to the main menu and select Save from the drop-down tabs.

We have a conductor opening. Name the file, for example, noviy and click “Save”.

As you can see, a preset with this name immediately appeared in the main menu. You can now enjoy the new settings.
Conclusion:— the Head program creates sound effects comparable to a sound card, which is very useful when it is not possible to purchase a decent sound card. And why spend extra money when there is such a program?
In addition to this program, for high-quality sound it is advisable to purchase high-quality computer speakers and a high-quality sound card. For example, on AliExpress. Speakers can be selected on this page. Sound map on this. Interestingly, many sound cards look like a regular flash drive with inputs for headphones (speakers) and a microphone. You can buy a decent one for 300 rubles.

Each user uses their computer differently, but almost everyone listens to music and watches videos on it. In order to get the most favorable impression from using your computer as a media center, you need to correctly configure the sound settings.
Software
When installing the operating system, the initial sound setup and installation of the necessary drivers occurs. Sometimes it happens that the sound card was released later than your operating system, or the Windows drivers were not installed quite correctly. Open “Control Panel” – “System” – “Device Manager”.
If there is an exclamation mark next to our video card, you should reinstall the drivers. You can take the version most suitable for your OS from the included disk or the manufacturer’s website.
After reinstalling the drivers, in order to play sound correctly, you need to install the package. We can recommend a completely free set of codecs K-Lite.
Setting up effects
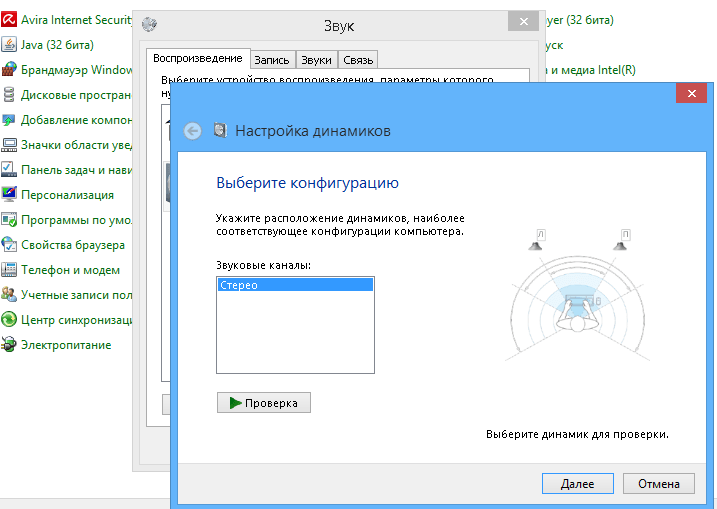
After installing the necessary programs, we move on to setting up various effects, with which you can significantly improve sound reproduction. Go to “Control Panel”, “Sound”, select our speakers and configure them.
After completing the settings, move on to the effects. Go back to the sound settings, select the speakers and click “Properties”. Let's go to "Additional effects". If this tab is not there, then your card either does not support fine-tuning or the manufacturer’s driver package has replaced it with its own settings:

If the page is available, you should configure the effects like this:

- Surround Emulation . If you want to output two-channel audio on multi-channel 5.1 or 7.1 speakers, this option should be enabled.
- Sound correction . This effect will allow you to achieve optimal sound at a specific point in the room when using a microphone.
- Virtual surround sound . The effect emulates surround sound. The optimal solution if you have a 2-channel audio card and multi-channel speakers.
- Creating Phantom Speakers . This effect allows multi-channel audio to be reproduced better on systems with fewer speakers. Used to play 5.1 channel sound on a 2.1 system.
- Loudness compensation . Improves bass reproduction on laptops with small speakers.
Using player add-ons
According to statistics, real music lovers prefer the foobar2000 audio player, which allows you to output sound to the audio card as accurately as possible. The player is very customizable, and there are many digital sound processors (DSP) for it, implemented in the form
This article is for those who are just starting to master computer technology, as well as for curious and experienced users who want to know everything. We will try to tell you simply and briefly how to increase the volume on a laptop in various ways. Let's look at the settings for the equalizer, speakers, etc.
The laptop is not a speaker system that is designed for frequent listening to music. Most of them only have two speakers built in for sound output. Therefore, in order to increase the sound, many people connect special speakers with greater power and sensitivity than the built-in ones.
Have you bought a laptop, connected speakers to it, but still no volume? The fact is that the PC is simply not configured. You will have to deal with the problem yourself. Lack of good volume on a laptop can be easily fixed. To do this, you need to know how you can increase the volume of the speakers on your laptop.
How to increase volume
A large number of people still use Windows 7. Based on this, let's look at the first method step by step on how to increase the volume on a Windows 7 laptop. With such a system, it is best to increase the volume through the standard OS settings on Windows.

- Close the settings and check the sound.
In version 10, the mixer, which allows you to increase the volume, opens from the tray. More on this below.
We use the tray
Before you begin any manipulations, check the volume level by opening a tab in the tray. Perhaps the sound slider is simply not set at high levels. This icon is located on the taskbar near the clock and usually looks like a loudspeaker (horn). If you right-click on it, you will find the mixer. 
To increase the value, simply move the slider up.
Sometimes users do not find the icon on the panel. In this case, on laptops a keyboard and volume up or down buttons will help. The location of these keys varies by model.
If the speaker icon is missing and you don’t know how to increase the volume on a Windows 10 laptop, then you can easily return it to the panel. Follow the following instructions:

Audio equalization options on a laptop
"Audio Equalization Options"- This is a great feature on laptops with Windows 10, helping to increase the sound quality of the speakers. We provide you with complete instructions:

Installing audio codecs
The sound settings can be corrected using a special installation of audio codecs.

Audio and video codecs are special programs for signal conversion. If you try to play a file and the player doesn't play it, it may simply not understand the format. This is where codecs will help you.
Zoom through speaker settings
You can increase the volume in the equalizer settings. Its type and availability depends on the sound card. Let's show using Realtek as an example. Follow the instructions:

Using third party programs
Special programs will help you increase the volume on your laptop. For example, let's talk about three.
- VLC is the most popular program of all. For those who are not particularly professional users and do not want to understand all the nuances, the developers have prepared an automatic setup. In addition, the player reads a huge number of formats.
Download VLC.
In addition to increasing the volume in the lower right corner, you can use the settings - equalizer and music type selection. You can go to them in the “Tools” - “Effects and Filters” menu.
- Razer Surround is for those who listen to everything on headphones from a laptop. The program has a list of parameters for sound calibration.
Download Razer Surround.
Has an equalizer.
But all this is available in the paid version. The screenshot shows the functions of the free and PRO versions.
The cost is $19.99.
Another disadvantage is the mandatory registration with confirmation by email. - DFX Audio Enhancer is a plugin that supports most players. It is designed to adjust the sound quality and is used if the player’s functions are not enough.
Instructions
Download SRS Audio Essentials from the link in the Resources section of this article. Install the program. After installation the program automatically and demo sound. Minimize the SRS Audio Essentials window.
Click the "Start" button, select "Control Panel". Double-click Sounds and Audio Devices in Windows XP or Sound in Windows Vista and Windows 7. You may have to click the Classic View or View: Small Icons button to see the option.
Make sure your default audio device is set to: SRS Labs Audio Essentials. If so, the program is installed correctly. Close the control panel window and return to the SRS Audio Essentials window.
Turn on your audio player, select a music file and start playing it to check the sound quality.
Click on the menu next to the Content option and select Music. This optimizes the sound according to the type of content you are playing. In addition to music, you can select Movie, Games and Voice.
Click the button next to the Auto Tech option to open the Technology menu. Select WOW HD from the drop-down menu. WOW HD optimizes stereo audio for playback on dual-channel systems such as laptops and headphones.
Click the Advanced Controls button to configure WOW HD settings. These settings allow you to adjust the level as well as the size of the stereo field to improve the sound. After this, the sound quality of the laptop increases significantly.
Sources:
- SRS Audio Essentials Description and Download Page
Music is truly a wonderful resource for recuperation and relaxation. With the help of music, we can create the mood we want - we can get in the mood for energetic action and relax perfectly after a hard day at work. In order to maximize the pleasure of listening to your favorite music, we can improve its sound.
Instructions
To change the volume of a track, you can change the volume to computer, and change the volume of the track itself. To do this you need to use a music editor. Normalize the track's audio level to the level you want and save.
Video on the topic
A game running on a computer is not always enjoyable for the player. Default settings affect video quality, sound transmission and other factors that affect the overall attractiveness games.

You will need
- Computer, computer game.
Instructions
Once you install a game on your PC, you can set certain parameters for it that will affect games and gameplay. These parameters can be configured directly in the interface of the running application. So what do you need to do to improve quality games?
First of all, launch the game with permissions. To do this, right-click on the shortcut games, then select “Run as”. A window will appear in which you need to opposite the “Administrator” user. After selecting the administrator, click "OK" and wait for it to launch games.
Once the main menu becomes available to you games, you need to go to the settings section by clicking on the corresponding entry. Once here, you will see sections such as: “Settings”, “Settings”, “Settings”. If the sound settings have little to interest you, then the video settings deserve special attention.
Go to the "Video Settings" section. In this section you need to set all indicators to. You can also set the desired resolution for games. After all changes, save the settings. The game will automatically reboot, after which you will be able to play with higher quality video accompaniment.
Video on the topic
Related article
The absence of , as in desktop computers, is almost always a consequence of its incorrect configuration. The reason may lie in either a banal volume adjustment or in setting up the functions of the sound card. To get sound back, you need to perform a number of settings on your laptop.

Instructions
If the problem is not resolved, use the standard mixer - a Windows utility for adjusting sound settings, in most cases this will be the Realtek AC97 Audio panel. The mixer has a variety of sliders designed to adjust volume, balance, and frequencies. Here you need to pay attention to the Mute All checkbox; it must be cleared. If there is no sound from certain devices, such as Microphone, CD or DVD, you need to adjust the corresponding sliders.
Sources:
- how to fix sound on computer
The Windows Vista operating system provides many options for changing various settings so that each user can tailor the interface to work in the way that best suits them. In particular, this concerns the settings sound and selection of individual sound effects to accompany events.

Instructions
Each Windows Vista user has his own specific way of working with a computer. Therefore, the policy of this operating system is to flexibly configure parameters, which allows you to more individually build an interface and sound for work, thereby increasing the efficiency of your work.
For settings sound open Control Panel. This can be done through the Start button. On the panel, go to the “Hardware and Sound” section.
In the window that opens, you will see all the devices used while the system is running. Find the “Sound” section, it contains three subsections: “Adjusting volume”, “Changing system sounds” and “Managing sound devices”.
In the “Volume” window, which appears when you select the first subsection, there are two controls by default sound. The first one, called “Device”, is responsible for playback sound through speakers or headphones. The second, “Windows Sounds,” controls the volume of system sounds that accompany various events. This setting can also be accessed from the bottom right of the screen on the taskbar.
The “Change system sounds” subsection controls the settings of Windows sound effects. The default sound scheme is set to a standard one, which can be changed. To do this, on the “Sounds” tab, select the desired line from the “Program events” list, then the desired melody from the “Sounds” drop-down list.
You can add your own sound files using the Browse button. The setting also provides the opportunity to listen to the selected recording by clicking the “Check” button. In addition to the standard scheme sound Vista provides a complete absence of sound, which can be set by selecting the “No” scheme. sound" When you have finished changing the settings, click Apply and close the window.
The third subsection is called “Managing audio devices.” Here, on the Playback or Recording tabs, you can configure new audio devices or change the settings of existing ones. To do this, select a device from the list and click “Properties”. Changed parameters can be checked using the “Configure” command. When finished, click “Apply” for the new settings to take effect.
Users often encounter the problem that the built-in speakers on a laptop or connected external playback devices sound very quiet, and there is not enough volume reserve. In this case, you will need to perform a number of specific actions that will help increase the volume a little and even make the sound better.
There are several simple ways to increase the volume on your device. In most cases they won't give you a huge boost, but rest assured that by doing one of these you're almost guaranteed to increase your volume by about twenty percent. Let's look at each method in detail.
Method 1: Programs for adjusting sound
Sound adjustment programs help not only to edit it and adjust it to certain equipment, but in some cases they can also increase the volume. This process is carried out by editing the equalizer or turning on built-in effects, if any. Let's look at all the steps in more detail using the example of a program for Realtek sound cards:

After completing all the steps you will get a volume increase of about 20%. If for some reason Realtek HD Audio is not suitable for you or you are not satisfied with its limited functionality, then we suggest that you use one of the other similar programs to configure the sound.
Method 2: Programs to enhance sound
Unfortunately, built-in tools and additional programs for adjusting sound do not always help raise the volume to the desired level due to the lack of necessary editable parameters. Therefore, the best option in this situation would be to use special software that enhances sound. Let's look at it with an example:

Other programs work on approximately the same principle. You can learn more about the best representatives of such software in our article.
Method 3: Standard OS tools
We all know very well about such an icon in the notification area as "Speakers". By left-clicking on it, you will open a small window in which you can adjust the volume by dragging the lever. First of all, it’s worth checking whether this lever is turned 100%.
In the same window, pay attention to the button "Mixer". This tool allows you to adjust the sound in each application separately. Therefore, it is also worth checking, especially if problems with volume are observed in a particular game, program or browser.

Now let's move on to amplifying the sound using standard Windows 7 tools, if the levers have already been turned up to 100%. To configure you need:

If, after completing all these steps, you are still dissatisfied with the sound, then all that remains is to resort to using special programs to adjust and increase the volume.
In this article, we looked at three ways to increase the volume on a laptop. Sometimes built-in tools help, but this is not always the case, so many users have to download additional programs. With the correct settings, the sound should increase to 20% of its original state.


