HP laptop wireless network is disabled. The router does not distribute wifi: Video. Setting up Wi-Fi on different versions of Windows
24.03.2015
The wi-fi function is the most important element of laptops that is very popular today. A laptop without wifi is like a gas industry without gas.
Usually, when you buy a new laptop, the wifi function is turned off by default or you have to manually configure the wifi settings.
Configuration is carried out differently on different operating systems. There are also external settings that differ by laptop model (turned on using keys).
In this article I will tell you how to enable wifi on different laptops and how to make internal settings.
First of all, you need to configure the router and check whether wifi is turned on on the router itself. There are two ways to enable or disable wifi on your router:
1. On the back of the router there is a wifi button to turn it on and off.
2. Wi-Fi is turned on and off in the internal settings of the router.
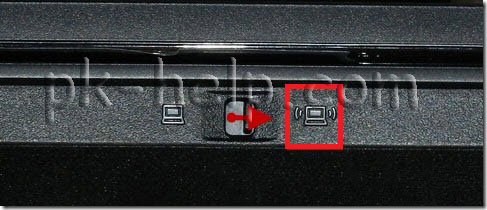
We carry out an external inspection of the laptop, if you see an icon in the form of an antenna that lights up, it means that wi-fi is turned on, if it doesn’t light up, it’s turned off.

If you see an “X” on the wi-fi sign at the bottom of the panel, it means that the network is disabled.

Almost all laptop models have a mechanical wifi network switch or built-in software that turns wifi on and off. Laptop with mechanical wi-fi switches.

How to enable wifi on different laptop models
HP laptop:

HP Connection Manager software.
To open the program, go to “Start” - “all programs” - “HP Connection Manager”. Open this program in front of the device and press the power button. Let's look at the picture

Asus laptop:

For Asus laptops, Wi-Fi is turned on using a mechanical switch (on or off button).
In this case, managing wi-fi becomes convenient, but if the switch fails, there will be some problems.
Wi-Fi can also be controlled using the Fn+ F12 key combination on the keyboard, hold down the Fn key and press F12
Acer laptop:

But some Acer laptop models do not have a button on the case to turn Wi-Fi on and off. Therefore, the Fn+ F12 keyboard is used to control the wi-fi connection. You need to press Fn and without releasing press F12.
Lenovo laptop:

To enable Wi-Fi on Lenovo laptops, use the Fn+ F5 keys. Press the Fn key and without releasing it press F5. After performing these steps, the wi-fi indicator on the laptop should light up
Samsung laptop:

To connect a laptop to a wireless wi-fi network, you need to press the Fn+F9 combination on the keyboard. Hold Fn without releasing and press F9. As in all cases, if the connection to the network is successful, the indicator on the laptop will light up.
Toshiba laptop:

To activate wi-fi on Toshiba laptops, use the Fn+F8 key combination. Again, hold down the Fn key and press F8.
Internal wifi setup on a laptop
These settings depend on the operating system, which is configured differently. Basically, all settings are related to wi-fi in sleep mode, i.e. In some cases they must be enabled manually. Let's look at the settings on each Windows operating system. Before starting the settings, check the following parameter.
On the bottom panel on the desktop we look for the battery charging sign. Right-click on this sign and select “windows mobility center.”
In the window that opens, look for the wireless network section and make sure it is turned on.

How to enable wifi on a laptop with windows 7 operating system
Open “Start”, go to “Control Panel”, select “Network and Internet”. In the window that opens, go to “Network and Sharing Center”. Next, on the left side of the window, go to the “change adapter settings” section.

After that, the wireless networks window will open. Right-click on “wireless network connection” and select “enable”

If the network is on, leave everything as it is. If the data section is enabled, the window that opens will contain available wifi points.
Select the desired network and click connect. If you specified a password when setting up wifi on the router, then when you connect to the laptop network, it will ask you for that password, enter the password and press OK.
How to enable wifi on a laptop with windows vista operating system
In order to set up wifi on Windows Vista, you need to follow the same steps as on Windows 7.
Go to “start” and open “control panel”. On the left side, click “switch to classic view.”
Now you need to select “Network and Sharing Center”. On the left side of the window, click “manage network connections.”
Now go to “manage network and connections”, right-click on “wireless network connections” and click “connect”.
After completing these steps, a list of wifi connections will open. Select the desired connection, click connect, if necessary, enter the password, click OK.
How to enable wifi on a laptop with windows xp operating system
In order for the laptop to be able to connect to a wifi network on the Windows XP operating system, you must complete the following steps.
Click “start”, open “control panel”, go to “network connections”. Right-click on the “wireless network connection” section.
Right-click on “connection” and select “view available wireless networks.” A window will open in this window, click on “change order of network preference”.
Next, click on “network and access point” and click on the “automatic connection to the network” checkbox. Now go to the “view available wireless networks” section, select the network you need and click “connect”. If everything is done correctly, a message will appear on the taskbar in the lower corner indicating a completely successful connection to wifi.
If, when applying the above settings, it was not possible to turn on wifi on the laptop, then you need to check the following parameters.
Installing the wifi adapter driver on a laptop
In order to check whether the wifi adapter driver is working, you need to go to “Start” “Control Panel” “System and Security” and click “System”. Next, go to the left side of the window “Device Manager”

In the window that opens, go to the network adapters section. If there is a yellow triangle with an exclamation mark as in the picture

This means that the driver is not working. To fix this situation, right-click on the non-working driver and select “update driver.”
In the window that opens, select “automatic update”, if you have Internet access. Or go to the official website of your laptop manufacturer and download the required driver in the drivers section.
In practice, there are cases when the wi-fi adapter is disabled. In this case, right-click on the adapter and click “enable”.
There are also cases when the adapter is located under the energy saving filter. To check whether the adapter is under this filter, go to the “control panel” “security system” “system” “device manager” then right-click on the driver itself, click “properties” in the window that opens and go to “power management”

In this window, uncheck “Allow the computer to turn off this device to save energy.”
This solves the question of how to enable wifi on a laptop. I hope the information was useful to you. If you have any questions, write comments.
A wireless network has long become a common thing for many owners of computers and laptops. It is easy and convenient to use. You can access the Internet anywhere in your apartment or office, but at the same time, kilometers of wires will not get tangled under your feet. You can access the Internet not only from a laptop, but also from a tablet or smartphone.
However, most users do not know how to solve even simple router-related problems and do not understand how to enable wireless communication on a laptop. When access to the Network is lost, you do not need to immediately call the provider’s technical support. First you need to figure out what caused the Internet outage: the computer or the service provider.
Some models, such as the MSI GT780, have a touchpad located above the keyboard, which allows you to turn the wireless network on or off with one touch.
How to enable wireless communication on a laptop through Network and Sharing Center
There are cases when the Wi-Fi receiver is disabled by software and it is impossible to activate it using a button or keyboard shortcut. How to enable wireless communication on a laptop (Lenovo, Asus or Acer - not so important) in such cases?
The user will need to right-click on the Network icon on the taskbar. Next, select “Network and Sharing Center” from the list. In the window that opens, go to the page where you can change the adapter settings. Select a wireless network from the list provided and turn it on.

The connection will change from gray to color, and after a while a connection to the Internet will be established.
Enabling wireless communication through Device Manager
You can also programmatically activate the network adapter through Device Manager. As a rule, such shutdowns occur rarely, mainly during operating system failures.
To enable the Wi-Fi adapter through Device Manager, you must:
- Open the “Control Panel” tab.
- Select "Hardware and Sound" from the list.
- In the "Devices and Printers" group, click on "Device Manager".
- Expand the list of network adapters.
- Right-click on anything that contains the word Wireless and click Enable.
This way you can enable the wireless network either hardware or software.
I will describe all the ways I know to turn on a Wi-Fi network on a laptop (after all, everything that can be turned off can be turned on?!) I will start with the simpler and more common methods, then I will move on to more complex methods that only a few will need.
So if you see on taskbar icon Wi-Fi is turned off (or you don’t see the icon at all), then this article is for you.
Turn on Wi-Fi using the slider/button on the laptop body.
On many laptop models, to turn on Wi-Fi, you need to use the slider or a separate button to turn on Wi-Fi. Often this switch is located on the front end of the laptop.

The switch looks different, but has one function - turning the wireless network on and off.
To turn on Wi-Fi, simply move the slider to the On position.
How to turn on Wi-Fi using a keyboard shortcut.
If your laptop does not have sliders or separate buttons for turning on Wi-Fi, take a closer look at the keyboard; on it you can find a Wi-Fi icon on one of the function keys (F1-F12).

It can be located on different buttons, it all depends on the manufacturer and model of the laptop.

In order to turn on Wi-Fi, you need to press this key or use a keyboard shortcut

Let's look at the key combinations that are most often used in laptops from different manufacturers:
- Acer. Press the keys:
+ . - Asus. Combination
+ . - HP. Click here
+ . - Lenovo. Required buttons:
+ . - Samsung. Or
+ , or + . - Dell key combination
+ or +
How to enable Wi-Fi in Windows settings.
If the above procedures did not help and you are still wondering How to enable Wi-Fi on a laptop? You need to check whether the Wireless network connection is enabled in Windows settings. To do this, you need to go to the Network and Sharing Center. One way is to right-click on network icon in the lower right corner of the screen and select "Network and Sharing Center".


Another way to use hotkeys

It doesn’t matter which method you used, the result will be the same - the Network Connections window will appear on the monitor. Next, you need to find a wireless connection, right-click on it and select “Enable” (if the Enable option is not available, then the Wi-Fi network is enabled).

Enable Wi-Fi through Windows Device Manager.
If your Wi-Fi adapter is still not enabled, you need to check whether it is enabled in the task manager. To do this, click the Start button, right-click Computer, and select Manage. From the left menu, select Device Manager.

Or press the keyboard shortcut


If the adapter icon is marked with a down arrow, it means it is turned off; to turn it on, right-click on it and select “Enable”.
Update drivers for Wi-Fi.
Another reason for Wi-Fi not working may be an inappropriate driver or its absence. In order to install the required driver, go to the laptop manufacturer’s website, find your model (on some sites this will be difficult, you can write the laptop model in the comments, I will try to help you) and download the driver for the Wi-Fi network card for your operating system systems. After this, it will be enough to install the drivers; after rebooting the laptop, Wi-Fi should work.
No matter how you turned on the wireless network, you should eventually see a Wi-Fi icon in the taskbar. When you click on it, you will see the Wi-Fi networks available for connection.

Hello! Since I myself use an ASUS laptop, I decided to write a separate article about turning on Wi-Fi on an ASUS laptop and connecting to a wireless network. This is a very popular topic. As a rule, when it first becomes necessary to connect a laptop to a Wi-Fi network, users have a lot of questions: “where to turn on this Wi-Fi,” “where to find it on an Asus laptop,” “how to connect to a wireless network,” etc. d. In addition, many problems and errors may arise. Both during the process of turning on the wireless module and during the process of connecting to the network.
We have a task: connect an ASUS laptop to a Wi-Fi network. And here it is important to understand that the decision depends largely not on the laptop itself (manufacturer's company), or a specific model, but on the operating system installed on the laptop. Now the most popular are Windows 10, Windows 8, and Windows 7. I think that there is no point in considering Windows XP. Yes, this system is still used now, but everything has been set up there for a long time. And I don't have XP installed.
We will do everything according to this scheme:
- First, I'll show you how to connect your laptop to Wi-Fi. Most likely, you already have everything turned on and configured there. And there is no need to burden yourself with some buttons and settings.
- Next I’ll show you how to enable Wi-Fi on an ASUS laptop. This step will come in handy if you are unable to connect in the usual way. We will enable it using a keyboard shortcut, and without using the Fn key.
I will try to show everything using the example of Windows 10 and Windows 7. Most of the settings and actions will be similar. My laptop is ASUS K56CM (not the newest). But the article should be suitable for all models, including: X553M, X55a, X54H, N61VG, X751M and others.
Connecting an Asus laptop to a Wi-Fi network
Ideally, the Internet connection status should be like this (provided that there is no network cable connected to the laptop):
This star-shaped icon indicates that the laptop sees wireless networks available for connection and is ready to connect to them. If you have a different status, see the article below. To connect, just click on this icon, select the desired network, click the connect button, enter the password (if the network is secure), and you're done.

This is how the connection goes when everything is configured and turned on. Of course, type errors may occur, but that's another story. Ideally, everything goes as I showed above. It's very cool if everything worked out for you. Next, I will show you what to do if the Wi-Fi adapter in your laptop works, the driver is installed on it, but for some reason it is disabled.
There may also be a connection icon in the form of an antenna with a red cross (no connections available):
![]()
In this case, see the solutions in the following articles:
- For Windows 7 –
- For Windows 10 –
Turn on the Wi-Fi adapter on the ASUS laptop
If the connection icon on the notification panel does not in any way resemble a wireless network, but looks like a computer with a cross, then most likely the wireless module on the laptop is disabled or does not work at all (most often due to an uninstalled driver). Let's figure it out now.

I immediately advise you to go to the "Device Manager" and see if the "Wireless" adapter is there. If it is not there, then there is no point in torturing the laptop and yourself. You need to install drivers. If the adapter is not in the device manager, then there is no way to enable it. And it doesn’t matter what kind of laptop you have, Asus or another.
It's very easy to check. In Windows 7, open Start and start typing “manager...” in the search bar. Launch Device Manager. On Windows 10 it’s exactly the same, only there is a search button next to the Start button.
In Device Manager, open the "Network Adapters" tab and look. If you have an adapter there whose name includes “Wi-Fi”, “Wireless” “802.11 b/g/n”, then everything is OK. Let's look at the article further and try to enable it. Since you are already in the device manager, try right-clicking on the adapter. If there is an “Engage” item in the menu, then click on it. Perhaps after this Wi-Fi will work. You can tell by the icon in the notification bar (if there is no network cable connected to the laptop!).

If there is no such adapter, there is only one (network card), then this most likely indicates that the Wireless adapter driver is not installed. Previously, I had already prepared an article in which I showed how to install the Wi-Fi driver on ASUS laptops:. The instructions are very detailed. After installing the driver everything should work.
And we continue. What to do if you have an adapter, but there is no way to connect to a wireless network.
Turn on Wi-Fi using a switch or a combination of buttons on the keyboard
It seems to me that ASUS no longer makes separate mechanical switches to enable/disable wireless modules. But on older laptops they may be. If you have an older model, then look for such a switch on the laptop case.
Typically, a keyboard shortcut is used for these tasks. Key Fn with a key from a row "F". But on ASUS laptops, most often this is Fn+F2. An antenna is drawn on the F2 key. This is what it looks like on my laptop:

If after pressing the key combination there is no result, then I advise you to press it once and restart the laptop.
Trying to turn on Wi-Fi on an ASUS laptop without the Fn key
It doesn't matter what Windows you have installed. Right-click on the Internet connection icon and select "Network and Sharing Center." Next, go to “Change adapter settings”.

There should be "Wireless Network Connection". Or “Wireless Network” - in Windows 10. If this connection has a “Disabled” status, then right-click on it and select “Enable”.

In Windows 10, the wireless network can also be disabled with the "Wi-Fi" button:

All these tips should definitely help you. If you encounter a situation that is not described in this article, or the solutions described above do not help, then write in detail about your case in the comments. Write the ASUS laptop model and what problem you encountered while connecting to the Wi-Fi network.
A few more articles on this topic that may be useful to you:
- Solving various problems with connecting to a wireless Wi-Fi network -
- A separate article on solving problems with Wi-Fi in Windows 10 –
I hope I didn’t waste my time and that my article was useful to you. Write about it in the comments. Best wishes!
Currently, wireless communication technologies have found very wide application and WiFi networks are widespread both in public places and in users’ homes. This happened due to significant convenience, because in order to access the World Wide Web, there is no need to extend cables to the gadget, and device owners also have freedom of movement within Wi-Fi range without losing the connection to the network.
Therefore, a significant number of users are faced with the task of using Wi-Fi on their mobile devices every day. One of the most popular devices for working on the global network, of course, is a laptop with the Windows 7 operating system. Below we describe in detail instructions on how to properly connect the Internet via WiFi on a laptop with Windows 7, providing specific recommendations on what to do when the laptop does not see WiFi.
Basic requirements for a successful connection to a wireless network
Almost all modern laptops have the necessary functionality to connect to WiFi. Despite the huge number of laptop models produced by different manufacturers today, they all operate in accordance with the same communication standards. Basically, differences in settings depend on the version of the computer's operating system.
Sometimes the manufacturer provides special software for a more comfortable connection to wireless networks, but it is better and more reliable to master the configuration skill using Windows tools.
The main requirements for successfully solving the problem:
- The wireless communication device (adapter) built into the laptop must be activated;
- The current version of the WiFi device driver has been installed;
- The WLAN AutoConfig service is enabled.
How to turn on a Wi-Fi device on a laptop?
The method differs depending on the model and manufacturer of the laptop, so it is recommended that you read the documentation included with the PC. Usually there is a separate mechanical switch for the WiFi adapter on the laptop case. A characteristic icon indicating wireless communication must be drawn next to it. The user is only required to set this switch to the “On” position.
But if the computer owner, after carefully examining the device’s case, did not find such a switch, then the manufacturer has provided for activating the adapter using the keyboard, for example, the Wi-Fi sign will be displayed on one of the “F1 - F12” function buttons. To turn it on, you need to hold down the Fn key and click on the function key. The success of the procedure will be indicated by the activity of the WiFi indicator light, which is often located on the front panel of the laptop. 
Installing the latest driver for a WiFi device
Through the network of a mobile operator or via a wired connection to the global network, you need to visit the official resource of the PC manufacturer from your laptop and download the necessary software for the normal functioning of the built-in wireless device. 
Next, install the driver and restart the computer.
How do I enable the WLAN AutoConfig service?

You need to do the following several steps:
Connection procedure
 In Windows 7, the entire process is carried out through a special network icon located in the system tray. In the figure below it is clear that by the appearance of this icon you can immediately determine whether the laptop is connected to Wi-Fi or not.

To connect to WiFi, the user will only need to complete the following few sequential steps:
Most common problems
- Often the network icon is not displayed in the tray. The problem occurs due to the following:
- Drivers are not installed or updated;
The WiFi adapter is turned off.
Obviously, the first point can be solved by visiting the official Internet pages of the equipment manufacturer and installing the required software from there.
The second point, in addition to the method described at the beginning of this guide with activating the adapter using buttons, also sometimes requires activation through Windows 7 tools.

To this end, the following steps should be followed:


