Foolishly send a copy to my e-mail. Rules for business correspondence by email. Business letter: sample. How to send a letter by email. What to do with letters of transfer and inheritance
Unlike burning a DVD, ripping a DVD is much more complicated. There are many questions related to copying DVD online, for example, I only have one DVD drive, how can I rip DVD to blank disc? Do I need to prepare two DVDs to copy DVDs? How to copy protected DVD? If you are going to copy DVDs and you have such questions that may be popping in your mind, you can explore many useful solutions in this article. First of all, you can copy DVD to a blank disc with one DVD drive. And we will share the details related to copying DVD with one DVD on Windows or Mac computers.
Part 1: Copy Encrypted DVD to DVD
If you want to copy a commercial DVD or an encrypted DVD to a blank disk, you will have to rely on more powerful tools like Tipard DVD Cloner. This is one of the best DVD ripping software. And you can use this to create the highest quality DVD copies possible, no matter what types of encryption the original DVD uses.
How to Copy DVD to New DVD or Computer in 4 Steps
Regarding how to make a copy of a DVD with original quality, many people will want to copy the DVD to a new disc, or copy the DVD to DVD folder and ISO file to save them on PC.

Click "File" button, select DVD source from DVD hard drive. If you want to boot from an existing ISO image or DVD folder from your computer, select them.
Selecting output and destination formats

Select "Target Size" from DVD disc, DVD folder and ISO file.
Select DVD copy modes and other options

Three DVD ripping modes provide you with, for example, full copy of DVD, main movie, and set up DVD video to rip multiple parts. Then go to "NEXT" and it will provide more options to meet all your DVD ripping needs.
Play DVD copy
The last step is to go ahead and start your DVD copy. In about a few minutes or less, you can enjoy a duplicate of the original DVD.

When the process is finished, you can enjoy your new DVD in original quality. Moreover, Tipard DVD Cloner is compatible with both Windows and Mac OS, so everyone can use this DVD copying software to copy DVD to new DVD.
Part 2: Copy DVD to DVD Directly in Windows 10
If you want to copy DVD to a blank DVD with one DVD, you need to split the whole process into two parts: copy the DVD to your Windows 10 computer and burn the folder to a new blank DVD. Windows 8 and Windows 10 have built-in DVD burning capabilities. So, you can use the built-in features to rip DVD to DVD without third-party tools.

How to Rip DVD on Windows 10
Insert the DVD you want to copy into your DVD drive, create a new folder on your computer, and copy the DVD into the new folder.
The copying process may take some time depending on the performance of your DVD drive. After copying, remove the original DVD and insert a blank disc into the DVD drive.
When the DVD is detected, the AutoPlay window will automatically open. If the AutoPlay window does not appear, you should go to This computer and click on the DVD to bring it up.
Then choose Writing files to disk option to continue. On the second screen, select a name for the drive and select With CD/DVD player, Click on Next and then drag the folder containing the original DVD files into the DVD burning window.
Finally, click burn on the disk button to complete the process. DVD to DVD copying with built-in disc burning is only available for DVDs that are not encrypted.
Part 3. Copy New DVD from DVD to Mac
If you have enough space on your Mac, you can copy DVD to a blank DVD with one DVD drive. This process is similar to Windows 10; but the details are different.

How to Transfer DVD to Local Hard Drive
Place the DVD you want to copy into your DVD drive and run Utility disk in Application folder.
Find out and click on the DVD title on the left side. Click on New image on the top tape. Select a name and destination to save the image accordingly. From the Image Format list, select DVD/CD Master.
Once the image is taken, you can eject the original DVD.
How to create a new DVD
Mac OS creates the DVD/CD master as a .cdr file. If you want to burn it to DVD, you need to convert it to .dmg. In Disk Utility, click Convert option on the top ribbon.
In Image format List, select Compressed And select All in Encryption field.
Add the extension .dmg to the file name and click on Convert to convert the file to .dmg one.
Place a blank DVD in your DVD drive and open Disk Utility again.
Drag the .bmg file you created into Utility disk and select it from the left sidebar.
Click on burn on the top ribbon and then click burn in the confirmation window to complete the DVD to DVD copying process.
The built-in features are handy when you want to create a DVD of the original, although there aren't many customizable options.
Conclusion
Based on the guides above, you can learn how to rip DVD to blank DVD on Windows and Mac computers. Microsoft has integrated DVD ripping and DVD burning features into Windows 8/8.1 and Windows 10. And Mac OS has similar built-in features. Before you use the built-in feature to create new DVDs from the original DVD, you should remember that there are limitations. These features are only available for decrypted DVDs and you have no control over the quality and other settings. If you need to copy a commercial DVD or an encrypted DVD, you can try Tipard DVD Cloner. This cross-platform DVD ripping program allows users to rip DVD to DVD easily and quickly. Moreover, the quality of the products is quite impressive.
Greetings! Although CDs are no longer in fashion, because they are being intensively squeezed out by flash drives, I still decided to write an article today about how to copy an entire DVD/CD to a computer or other CD. I think many people will find this instruction interesting and useful. We will copy the contents of the disks using the UltraIso program, thanks to which you can create disk images, write them to flash drives, hard drives, CDs, etc. The program is easy to learn and at the same time functional, so we will use it to copy disks .
Note: You can copy the contents of a disk to a computer and then write it to a blank disc using standard operating system tools. However, if you copy the contents of the boot disk in this way and write it to a new blank disk, the new media will not be bootable.
How to copy DVD/CD to computer
If UltraISO is not installed on your computer, then download and install it first. So, first of all, insert the disc into the DVD-ROM drive. Afterwards we launch the UltraISO program,
Now we need to click on the "Create CD image" button

The image creation window will open, where we need to specify the main parameters. First of all, let’s check whether the correct drive is selected, then indicate the location on the computer where you want to save the disk image (for example, I chose the Desktop). Click the "Make" button

The process of creating a disk image will begin,

When finished, you will see a window like this:

Click no.
The disk image is successfully created and saved on the local disk.
How to copy a DVD/CD to another CD
Using the method described above, we saved the disk image to the computer. Now if you want to make a copy of the disk, you need to burn this image to a blank CD/DVD disk. Well, let's get started.Insert a blank disc into the drive. Now let’s open the previously created disco image in *.iso format,
In Microsoft Outlook, you can specify that for all messages you send, an automatic Bcc (Bcc) will be sent to other distribution lists or users.
One scenario in which this rule is useful is when all group members reply to incoming email messages, such as Help Center. When one group member replies to a message, other group members automatically receive a copy of the reply, keeping all outgoing messages up to date.
client rules
Create a rule
Now, every time you send a message, be it a new message, forward a message or reply, people or groups that are specified in the rule will be automatically added as copy recipients. The names of people or groups do not appear in the Cc line of the compose message, but those names will appear to all recipients of the message.
Disable a rule
In the Mail view, on the tab home click the button rules > Manage Rules and Alerts.
On the tab in the section Rule
Click the button OK.
Rules and Alerts.
Advice: For more information about how to quickly disable this rule for individual messages, see the next section ("").
Use a category to disable automatic CC for individual messages
If you want the flexibility to turn off automatic new copy rules based on a single message without having to navigate through the dialog box rules and alerts, you can use the categories feature in Outlook, along with a rule.


Advice:
First, you need to create a rule to automatically send blind carbon copy (CC) for all email messages you send.
This specific rule is called client rules. Client rules run only on the computer on which it is created and run only if Outlook is running. If you were to send an email using an email account on another computer, the rule would not run from that computer so that it would be generated on that computer. This same rule must be created on each computer that plans to use it.
Create a rule

Now every time you send a message, be it a new message, forward a message or reply, people or distribution lists specified in the rule will be automatically added as copy recipients. The names of people or distribution lists do not appear in the Cc line of the compose message, but those names will appear to everyone who receives the message.
Disable a rule
To prevent a copy from being sent automatically, you must first disable the rule.
In Mail in the menu Service click the button Rules and Alerts.
On the tab Email Rules In chapter Rule uncheck the box corresponding to the rule you created.
Click the button OK.
You can now send a message without automatically sending a copy to other people or mailing lists. The rule will be inactive until it is re-enabled in the dialog box Rules and Alerts.
Advice:
Use a category to disable automatic CC for individual messages
If you want to disable the new automatic Send CC rule for individual messages without calling the dialog box Rules and Alerts, you can set the rule to a category that is available in Office Outlook 2007.
Modify the rule you created earlier so that when you add the specified category to a message, the rule does not automatically send a copy.

Whenever you want to disable the auto-cc rule for a message, apply a category to it.
Advice: You can use a keyboard shortcut if you specified it when creating the category.
When you send a message, the auto-copy rule will not apply.
Addressing an email using Thunderbird is not a difficult task, but there are several ways it can be done, with some differences from other mail programs. The most obvious change noticed by people migrating from Microsoft products is that Thunderbird places only one recipient into each addressing box, creating multiple addressing boxes when there are multiple recipients. This does not in any way affect the way the mail appears to the recipient; it is just the result of a layout choice that was made early in the Thunderbird design process.
Address Fields
To: The primary recipient(s) of this email
CC:(Carbon Copy) The secondary recipient(s) of this email. Recipients will see the email addresses of those in the To: and CC: field
BCC:(Blind Carbon Copy) Addresses in this field will have mail sent to them, but recipients won't know who was in the BCC: field i.e. those in the BCC: field will receive the email but those in the To: and CC: fields won't know who was in the BCC: field
If there is no entry in the To: field but only in the BCC: then the mail will be sent to all the BCC recipient(s) and the mail will be displayed to recipients as being sent to "undisclosed recipients" or similar wording by the receiving email program.
Special Note for Google users
Google IMAP mail accounts will remove the names in the BCC list from your sent folder. As a result the sender – i.e. you – will have no record of to whom an email was BCCed. If you need a record of whom you BCCed in an email, you will have to manually record this yourself before sending the email. This is a feature only of Gmail.
Selecting the entries from your address book
Thunderbird does offer a Write option if you right-click a Contact in the list.
This is handy if you want to send just one mail, but rather useless if you have multiple people in mind to send the mail to. There is however a rarely used key combination supported by the operating system that allows you to select multiple entries in a list such as the one in the address book:
By holding down the CtrlCommand key you can select multiple entries, one per mouse click. Clicking on an entry in the list that is already selected will deselect that item.
In addition to this there is the ability to use the Shift key. Holding down the Shift key will select everything in the list between your mouse clicks.
Using a combination of Shift and CtrlCommand in the same action by changing the key held down at appropriate times you can make very efficient use of your time while fine tuning the selected list.
Selecting the entries from the Contact Pane
Whenever you click Write, Forward or Reply, Thunderbird opens a composition window. One of the features of the compose window is that it contains a Contacts Sidebar pane from which you can see all of the entries in your address book. This pane can be turned on and off using the key F9 , or from the View menu in the composition window.
You can select entries from this pane simply by double-clicking, or by using the buttons at the bottom of the pane
or by right-clicking on the entries you have selected with your mouse or the Ctrl and Shift keys and then selecting a destination from the menu.
After you selected the add option, the addresses will be added to the list of recipients at the top of the mail, one line per recipient.
You may also drag and drop single Contacts or multiple selections of Contacts from the sidebar into any of the addressing boxes. Unlike the other methods described here, this will insert multiple Contacts into a single addressing box, but note that the Contacts will be parsed into the one-line-per-recipient format if you type Enter into the addressing box.
If you need to send copies of some letters in Mail.ru mail to another mailbox (email), i.e. send not all mail, but only that which comes from a specific address or contains certain words, then using this detailed instruction “” the setup will take 3 minutes.
Step 1. In the mail, find the desired letter in the “Inbox” and mark it with a checkmark, then in the “More” drop-down menu, select “Create filter”:
Step 2. A page with many filter settings will open. To set up a filter for sending some letters to another email, put a tick in the first line “From” and in the column opposite insert the address or part of it from which these letters come. In the second paragraph, we indicate the address to which copies should be sent. In the third paragraph, indicate what to do with the received letter in your mail. Next, enter your email password and click “Add filter”: 
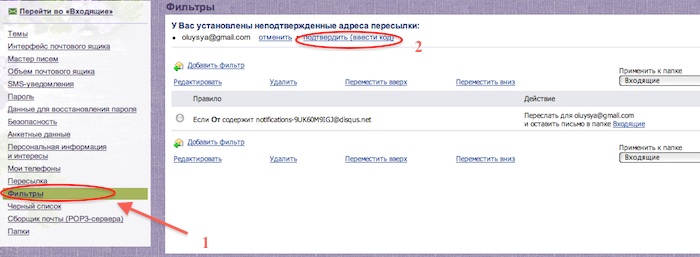
Step 3. Now a letter with a forwarding confirmation code is automatically sent to the address you specified; this code must be entered in the appropriate field, which you will find in the left “Filters” menu. The top line will be the unconfirmed forwarding address, click on this link and you will see a field to insert the code:
After setting up, the specified letters will be sent to you and to the address that you specified and confirmed with the code. To set up forwarding all incoming mail please use another .


