Configuring and installing XAMPP. Installing a local XAMPP and WordPress server
Below I will try to tell in detail how it happens setting up XAMPP server and creation of a new database. Analysis of typical errors is included in a separate article. Problems installing XAMPP. The setup will be completed after we create a trial website on XAMPP.
Optional
|
1.1. It’s probably time to create a folder for your website, because we are doing all the “body movements” just for the sake of creating a website on your home computer. You can create it wherever you want, but I created it in the root of the drive D: and called her designfornet, which is almost the same as the name of this site, but without the dot and dash. Why can’t you use names for your home site that extend existing Internet zones, for example, . com or . ru? For the reason that any browser you have will look for your site mysite . ru or my design-for . net, not inside your computer, but on the wider Internet. So, let's remember the rules for names inside the computer: – without extensions or using non-existent zones, for example, you can call the site mysite.local because the zones .local does not exist; Without spaces in one word (dot and dash are possible). Usually the neutral names homesite or mysite are used for example, but since you are on my site, I think the name designfornet is more appropriate, as it allows for continuity with the article, which talks about creating a home site. In general, we need an arbitrary name - just to somehow name the folder where we will copy the zero files. 1.2. I advise Beginners to immediately make a copy of the folder xampp somewhere else, and in case of a fatal error, replace the entire folder or individual file from the saved copy. This way you can save time that would otherwise be spent on uninstalling and reinstalling. This is exactly what our new folder designfornet (homesite) comes in handy for. You just need to drag and drop the entire folder xampp(from disk C:) right-click on/in the created designfornet site folder and select “Copy”. |
1.3. An even more reasonable approach is this:
1.3.1. since during the setup process we will make changes only to some files, therefore, to speed up access to them, it is better to immediately install shortcuts to these files on the Desktop.
1.3.2. if we mess something up in them, we will not re-upload the entire manual, but will only replace these files with zero ones from the “emergency reserve”. Execution of files when replacing crippled ones with zero ones can be performed as many times as desired.
1.4. Set your work browser as the main one. I installed FireFox as my default browser, as the most popular one. Set its settings to automatically detect UTF-8 code.
Today, FireFox has advantages over Opera and Internet Explorer: Opera has become a little heavy and “bloated” after many hours of use. Donkey IE is used only to check the appearance of a newly created site. Ghrom is catching up with FireFox among the “masses” in terms of polarity, since it has good speed, but is still quite “bare” due to the lack of useful plugins, for example, its owner’s policy prohibits stealing and downloading videos.
1.5. To tinker with the codes, a novice web master will need a “correct” text editor, so called because it does not add formatting to the texts. Therefore, you cannot use Word. The notepad built into Windows is also not suitable for editing codes. After reading the article Correct code file editors must be installed on your computer Notepad++ .
Learning XAMPP Control Panel Application
2.1. If you continue the installation process of the XAMPP web server, then the XAMPP Control Panel Application window is still in front of you. If you closed it, then the panel must be activated through its shortcut.
Fig.1 XAMPP Control Panel Application window
I hope you already have or have taken it out of your folder C:\xampp the necessary shortcuts to the desktop: xampp_start.exe, xampp_stop.exe, xampp-control.exe. Clicking on the latter will open the same panel.
To remove the shortcut you need to open the folder C:\xampp and right-click to drag the shortcut to the computer desktop. After you release it, select “Create shortcut” in the menu that appears.
2.2. At the bottom of the panel we can find out about the versions of the panel and the operating system installed on your computer, the location of the directory of Xamp itself and its installer, and the status of the panel - Check OK (launched).

Fig.2 The lower part of the panel window shows the status of each component
2.3. Much of what I write about here is of no interest, because after setting it up we will never return here.
In the very top line of the panel we see two buttons “ Service…" And " SCM..." Using the first one, we can run the XAMPP Control Panel Application as a service on our computer. The second takes us to a window in which we can find all the services running on our computer.
2.4. It is generally recommended to run XAMPP as a service, which eliminates some compatibility issues. However, I am annoyed by the work of server programs when I am not working with the site. My web server does not have access to the Internet, so I launch its components only as needed. Moreover, I don’t need to run its control panel as a Windows service.
2.5. Left row of square fields (windows) with names Svc it just allows you to run individual Xamp components as services. The second column on the panel lists these components. That they didn't turn on And didn't work consistently with Windows- leave these fields empty.
2.6. The third column consists of start buttons - Start. We have already agreed that the important things for us are Apache And MySql, and ftp client FileZilla and mail client Mercuri We don't need them yet.
2.7. Click on the button Start against Apache. If everything is installed normally, the green button with the inscription will light up Running(launched), and the inscription Start will change to Stop.
In a similar way, we launch the two main components of the web server - Apache And MySql.

Fig.3 After launching the component, you can see not only its status, but the port it occupied
2.8. Depending on the version, the appearance of the Control Panel may differ, usually by the presence or absence of buttons in the rightmost column. For this reason, setup options may vary slightly. I think you'll just skip the points that don't apply to your XAMPP version
In earlier versions of XAMPP there are buttons " Shell», « Setup», « Port-Check».
2.9. We remember that for us the XAMPP web server is a pass-through program. We won’t try scripts on it; as soon as we install it, we’ll immediately forget it. Therefore, we just need to get acquainted with the buttons, since if we have to use them, then only once. If you don’t have some buttons, then skip the corresponding paragraphs of the article.
2.10. Button " Shell" - launches the Windows command line, which is somewhat unusual for the user of this operating system, and even more so for beginners.
2.11. Button " Setup"returns us to the installation point via the command line, where you can enable or disable any XAMPP module by setting a certain number. Can be used if you have an extra module enabled ( Perl). You will be returned here if something is not as the program installer wants.
2.12. Button " Port-Check» checks free or port 80 busy necessary for the server to operate Apache. Port 80 some Windows services are often used, but most often port 80 occupied by such a popular program as Skype.
If you have port 80 busy another program, then the XAMPP web server core will not start - server program Apache . How release port 80 you can find out in the article Problems installing XAMPP. After opening port 80 return to this article to continue setting up Xampa.
2.13. The last row of buttons is of an auxiliary nature, then you can press them yourself for fun.
We are more interested in buttons Admin in line with running components.
When you launch it for the first time, a window may appear in which you can select the language for XAMPP. There is no Russian there - so we choose English - English.

Fig.4 Window for selecting language
2.14. When you press the button Admin along with Apache, then your main browser will launch, in the window of which you will see the welcome page “” with the address http://localhost/xampp/.

Fig.5 XAMPP Welcome Page
2.15. The text under the greeting " Welcome to XAMPP for Windows!" is of little interest to us, but in the line "For OpenSSL support please use the test certificate with https://127.0.0.1 or https://localhost“We are asked to follow a link and receive a certificate, and at the same time identify addresses in the browser.
Click on the first link https://127.0.0.1. While the browser does not know the XAMPP address, it considers the connection untrusted. After the transition in the browser, select “ I understand the risk" and click on " Add exceptions».

Fig.6 We go through the browser settings to add the XAMPP page to exceptions
On the next tab, we get the trusted identifier and confirm the security exception.
Fig.7 In the browser we make an exception for the XAMPP address
2.16. We will perform the rest of the setup by following the links that are in the left column (sidebar) on the XAMPP pages.
The main ones for us will be “ Status», « Security», phpMyAdmin" Those who are curious can look at the rest of the links for themselves.

2.17. To go to the XAMPP management utility, click on the link phpMyAdmin. A page will open, in the center of which there is a form for filling out two fields: the first field for entering the name of the base of our site, the second for encoding.

Fig.9 On the phpMyAdmin page we need to fill in two fields.
2.18. Paste it in the first field above which it says New database, the name of your site designfornet(I think it’s logical that the name of the database is the same as the name of the site).
To fill out the second field, there is a pointer at the end of the rectangle of the form; clicking on it will display a list of encodings. We must go down to the line utf8_generai-ci and by clicking on it, fix this encoding in the form.

Fig. 10 Insert the name into the empty fields and select the base encoding

Fig.11 Confirmation of database creation designfornet
2.20. Next, we need to create users of this database and give them access passwords. Click on the link Privilege at the top of the page.

Fig.12 Page with a list of preset users
As it turns out, XAMPP has already created a couple of users for us with the same names root.
Actually, this one user in two persons, but the system will allow us to activate one person via the link 127.0.0.1, and the other – via localhost.
2.21. To create a password for the first user root Click on the “Edit” icon in the extreme “Action” column. In the page that opens, go down to the “Change password” block.

Fig. 13 Block “Change password”
For myself, I used the password in the form of the same name " root", which makes it the simplest.
Users who are going to open XAMPP for the Internet can generate a complex password, for which there is a button below.
2.22. After clicking on the “OK” button, a page will appear confirming the creation of a password for the first root.

Rice. 14 Confirmation window for creating a password
2.23. To create a password for the second user, click on the link Privilege at the top of the page. Click on the “Edit” icon and repeat the procedure for creating a password.

Fig. 15. Repeat password registration for the second root
As you can see, I set a password for it too root, the same as his name.

Fig. 16 Set the same password - root
2.24. After setting passwords for root let's go back to the link Privilege, where in the lists we can find unnecessary users who need to be deleted. Check the box next to this user and select the “Delete selected users” action.

Rice. 17 User list page
After all the movements, we should have three users left: pma(user from the system) and two identical ones - root, with the same passwords.
2.25. Now, to save all our settings, we need to restart XAMPP, for which we find a shortcut on the Desktop xampp_stop.ex e. After clicking on it, a black command line window will appear and disappear. Next you need to click on the shortcut xampp_start.exe and close the black warning window so that we run Start before Stop. However, it is easier to launch Apache and MySql through the XAMPP Control Panel buttons and immediately go to “ Admin»
2.26. Press the button on the Control Panel Admin" to login to XAMPP again. Follow the link Status to a page where running components are visible.

Rice. 18 Page Status
2.27. Much more interesting is the page at the link Security , where we see warnings about problems with XAMPP components. I have highlighted all the problems that concern us in the figure in rectangles. As you can see, we have overcome one problem.

Rice. 19 Page Security
To make a quick translation, you need to copy English phrases into the form on the online translator page.
The essence of the problem is free access from the external network, to solve which you should follow the link http://localhost/security/xamppsecurity.php located below the warning table.
2.28. On the page that opens, insert your favorite root in all forms. You can also specify that Xamp create documents in which passwords will be stored.

Fig.20 Page Security console MySQL & XAMPP
2.29. After setting the passwords, you need to restart XAMPP. We repeat everything as in paragraph 2.25. and follow the link Security to check for remaining problems.

Fig.21 Page Security after setting passwords
As can be seen from Fig. 21, the main components are running and users with access rights have been created for them.
Another thing is that I inserted my favorites everywhere root, since there is no point in creating complex passwords on a home computer. I already wrote that XAMPP is not intended for industrial use, and on a home network, complex passwords only create additional complications.
As I said at the beginning of the article, we will finish setting up the XAMPP web server after creating a test site.
To do this, you will need to go to the article Website on XAMPP.
When developing a site, it is often more convenient for me to write relative paths from the root folder, so as not to change them when uploading to the server, and also so that when working with PHP, I can test the page on my computer directly on the local server.
XAMPP is completely free and contains the Apache distribution and allows you to work with PHP, Perl, MySQL.
Also, when using XAMPP, you can quickly install LMS Moodle or Wordpress using Bitnami.
Installing XAMPP
So, let's start with how to install a local server on a computer using the XAMPP kit.First you need to download the installer for your operating system. This can be done using the link on the official website: www.apachefriends.org/ru/index.html
In this article I will download an installer for Windows using the example of which I will look at installing and configuring XAMPP.

After clicking the download button, the download of the .exe file will begin (file weight is approximately 110MB).
When the download is complete, open the installation file (xampp-win32-5.6.30-0-VC11-installer.exe), run as administrator. In the welcome window, click next.

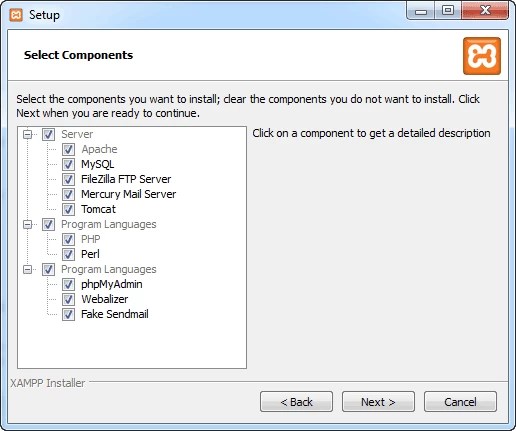
Next, select the required components. We are interested in Apache. Additionally, you can choose PHP and MySQL.

Next you need to select the installation path.

Next, the installer asks us to confirm that we are ready to begin the installation. Click next.

XAMPP installation has started.

After the installation is complete, you will be prompted to launch the XAMPP control panel. Leave a checkmark. Click Finish.
The control panel will open. There is no need to launch anything yet. Now we can start creating domains on our Localhost.
Setting up subdomains and virtual hosts
Editing hosts
On a local server, we can configure redirection of any browser requests to a specific folder on our server.First you need to add site redirects in the hosts file. This file is located in the etc folder at: C:\Windows\System32\drivers\etc
It is permissionless, so when you launch it you will need to select regular notepad to open it.

If we want that when we type barbershop.local in the browser, the site will open from a folder on our computer in D/:XAMPP/htdocs/barbershop, we will add the following line to our file.
Creating Hosts
After editing the hosts file, let's move on to setting up the server.We also open the file httpd-vhosts.conf in notepad, which is located in the folder D:\XAMPP\apache\conf\extra
At the very end add the following text:

Now go to the control panel and click start on Apache. The server has started its work.
Bottom line
Ready! Now, if we save the index.html or index.php file in the D:/XAMPP/htdocs/barbershop folder, and go to barbershop.local in the browser, then the main page of our virtual host will open. If we now want, for example, from the file /barbershop/css/main.css to go to the /barbershop/img/ folder, then now this link can be specified relative to the site root "/img/".The popularity of the server is due to the quality of the product, a large number of tools, and good information support. In practice, the XAMPP build, for unknown reasons, is more popular among Western developers.
System requirements for installing XAMPP
There are no pitfalls to be expected from XAMPP. Everything here has been refined to the smallest detail. XAMPP can be installed on a local machine with operating systems: Windows 2008, Vista, Win 7, Win 8. There is even an option for XP SP3.
What's included in the XAMPP build?
The XAMPP acronym means that this assembly can be installed not only on Windows, but also on any other axis. This is indicated by the first letter [X]. The letters AMP stand for the classic Apache+MySQL+PHP, but the last letter [P] stands for the Perl programming language. This is why XAMPP is called a cross-platform local web server build.
XAMPP local server and Bitnami
The XAMPP developers went further than others and created the Bitnami cloud server. Bitnami for XAMPP makes it much easier to develop PHP applications on top of Apache. Using Bitnami you can easily install popular open source CMS: WordPress, Drupal and Joomla! and so on.
Where to download XAMPP
There is no need to search for a XAMPP local server on forums and other resources. There is an official website with a free download of the release. XAMPP official website: https://www.apachefriends.org/ru/index.html. Download .
Download XAMPP
On the official website we download the version for Windows 7. First you need to decide which version of PHP you need to work with. There are three PHP variants: 5.6.30, 7.0.15, 7.1.1. The lower version of php changes periodically. I choose: xampp-win32-5.6.30-0-VC11-installer.
For information: On the same page you can download XAMPP for Linux and OS X.

Installing XAMPP on Windows 7 step by step
As you can see from the name of the release, XAMPP is downloaded with an installer, which greatly simplifies its installation.
For peace of mind, we check the downloaded file with an antivirus. After checking, run the installation as administrator.
Step 1.

Step 2.

Step 3.

Step 4.
We skip Bitnamy, so we open the check side.

Step 5.

Step 6.

The installation process is quite long, please be patient.
Step 7. Finish

Launch XAMPP
We work on Windows 7.
XAMPP is installed, it's time to launch. XMAPP is launched with the “XMAPP Control Panel” shortcut.
 XAMPP open panel
 When you open the program, XAMPP checks the computer system. If the system meets the XAMPP requirements to run modules, there will be no errors. Errors will be visible in the information window and highlighted in red.

Here is an example of a screenshot with errors. In the example, I see that port 80 is busy and Apache cannot start.
XMAPP, port 80 busy: how to release port 80
The inability to start the Apache module due to port 80 being busy is one of the common Windows errors. If you see information like this, it means you won't be able to start Apache. Your task is to release this port or run XAMPP on another port.
Windows port 80 release example
When I was preparing this article and reinstalling XAMP, I received an error that port 80 was busy. When I try to open the address in the browser: http://localhost I see this picture.

To do this, go to the Control Panel tab>>>All small icons>>>Programs and Features>>>Turn Windows components on and off and disable IIS and reboot the computer. All port 80 is free.
 Disable IIS
 This is just an example of several possible scenarios why port 80 is busy. You can even run XMAPP on another port, for example 8080. Link to corrections up in the text.
XAMPP Panel
Let's get acquainted with the XAMPP panel.
- Launch XAMPP as administrator;
- We look for the absence of errors;

The XAMPP panel contains all the access to work with platform modules and all the necessary Windows tools.
- Buttons on the right: XAMPP settings and Windows tools
- We see the columns: Start, Admin and Config.
- Start, also known as Stop, start and stop modules. Mercury is a mail server.
- Admin. These are access buttons to the administrative panels of the modules.
- Config. Great buttons. On the Config buttons you will find access to all configuration files of system modules.
XAMPP Settings
- Netstat- An excellent button that will show all the ports that are currently used by the system. This button will help you, “without dancing with tambourines,” see what is hanging on port 80.
- Shell- command line.
- Explorer- will simply open the XAMPP local server installation directory. Analogue Computer>>>Disk C.
- Service- a pop-up window with a list of all running services on the axis. Analogue: Control Panel>>>All elements small icons>>>Administration>>>Services.
- Help and Quit no comments.
- Buttons on the left: start/stop modules
- Buttons on the left: administration
Notice the admin button column. This is the entrance to the module administration panel. Let's check their work using phpmyadmin as an example.
XAMPP phpmyadmin panelWe see a standard phpmyadmin panel with which you can work without dancing with tambourines, such as in Denver.
Note: If XAMPP were in Russian, there would be no price for it.
How to run XAMPP
After correcting all errors, you can launch XAMPP. Launching XAMPP is the start of the modules necessary for operation: Apache, MySQL.
 required XAMPP modules
 Checking XAMPP is working
To check the operation of XAMPP in the address bar of the browser we write http://localhost.
Few are able to install and configure Apache, MySQL And PHP. And develop on PHP I already want it right away and right now. And so as not to waste time learning fine tuning Apache, MySQL And PHP, have come up with ready-made assemblies of Web servers that simplify the entire installation and configuration process. But I think that for professional development you still need to learn how to install and configure a Web server yourself. Of course, if you already have paid or free hosting, you can use it to test your projects, but this will create a bunch of unnecessary problems in the first stages of development; you will need constant and high-speed Internet access and good hosting. And in order not to have to worry about hosting, you can still develop everything on a local computer, which is why you actually need an installed Web server. XAMPP- this is one of the few development kits that is cross-platform, in other words, it will work well on both Windows and Linux, Mac OS X, Solaris.
XAMPP- an excellent solution for a novice web programmer, since, again, you won’t have to worry about settings, and when you read some book on PHP (for example, the one I wrote about earlier -) you will immediately be able to try all the examples from the book in practice, while without going into the details and subtleties of setting up the Web server.
Today I will try to talk about XAMPP, how to install it and briefly about how to work with it.
XAMPP is more common among the English-speaking population, while the Gentleman's Denwer set is very common among Russian-speaking users. Why did I choose XAMPP? I just think XAMPP is more convenient to use, and it also attracts good support, that is, the XAMPP developers always make sure that when a new version of a particular library appears, the Web server kit is updated. XAMPP does not create any additional disks, and contains a very wide selection of libraries that can be added.
By the way, the abbreviation XAMPP means - X(any of the OS: Linux, Windows, Mac OS, Solaris), A pache M ySQL P HP, P erl. We will consider for Windows OS, for which there are two versions of XAMPP Windows and XAMPP Lite. They differ only in the content of the packages; the Lite version has fewer different libraries.
XAMPP Windows 1.7.3
This version contains the following libraries:
- Apache 2.2.14 (IPV6 enabled)
- PHP 5.3.1 (PEAR, Mail_Mime, MDB2, Zend)
- Perl 5.10.1 (Bundle::Apache2, Apache2::Request, Bundle::Apache::ASP, Bundle::Email, Bundle::DBD::mysql, DBD::SQlite, Randy Kobes PPM)
- XAMPP CLI Bundle 1.6
- XAMPP Port Check 1.5
- XAMPP Security 1.1
- SQLite 2.8.17
- SQLite 3.6.20
- OpenSSL 0.9.8l
- phpMyAdmin 3.2.4
- ADOdb v5.10
- FPDF v1.6
- Zend Framework 1.9.6 Minimal Package (via PEAR)
- Mercury Mail Transport System v4.72
- FileZilla FTP Server 0.9.33
- apc 3.1.3p1 for PHP
- eAccelerator 0.9.6-rc1 for PHP
- Ming 0.4.3 for PHP
- rar 2.0.0-dev for PHP
- Xdebug 2.0.6-dev for PHP
- libapreq2 v2.12 (mod_apreq2) for Apache
System requirements:
- 128 MB RAM
- 320 MB free hard disk space
As I already said, the Lite version is distinguished by the absence of some libraries, and accordingly takes up less disk space, and the installation file itself weighs less. According to the developers, the Lite version is not updated as often as the full version.
XAMPP Lite 1.7.3
- Apache 2.2.14 (IPV6 enabled)
- MySQL 5.1.41 (Community Server) with PBXT engine 1.0.09-rc
- PHP 5.3.1 (PEAR)
- Miniperl 5.10.1
- XAMPP Control Version 2.5.8 (ApacheFriends Edition)
- XAMPP CLI Bundle 1.6
- XAMPP Port Check 1.5
- XAMPP Security 1.1
- SQLite 2.8.17
- SQLite 3.6.20
- OpenSSL 0.9.8l
- phpMyAdmin 3.2.4
- msmtp 1.4.19 (a sendmail compatible SMTP client)
- Webalizer 2.21-02 (with GeoIP lite)
- Ming 0.4.3 for PHP
- PDF with pdflib lite v7.0.4p4 for PHP
System requirements:
- 28 MB RAM
- 192 MB free hard disk space
- Windows 2000, XP (Server 2003), Vista (Server 2008), 7
- all 32 bit OS (64 should work)
Let me remind you if I said it, and I’ll say it if I haven’t already said that XAMPP is completely free and distributed under the GNU GPL license. As you can see from the list of libraries of both versions, the Lite version would be suitable for you to start working with PHP, but you need to think about the future and the fact that in the future you may need more libraries, so we will consider the version XAMPP Windows 1.7.3.
Installation
In order to start the installation process, you need to download the installation file or archive, in this case we will use the installation file located at the following address - http://www.apachefriends.org/download.php?xampp-win32-1.7.3.exe.
I hope you have already downloaded the installation file, because there is nothing complicated in the installation process itself, everything is quite simple, you only need to click on the button Install. Before installation, you can change the installation path, I left the default C:\, while XAMPP itself will be installed in the directory - C:\xampp.

In fact, this is a self-extracting archive, so we just wait while the unpacking (installation) process takes place.

After this the file setup_xampp.bat will start automatically, and you should have a command prompt open where the installation continues XAMPP. Here you are asked whether to create a shortcut on the desktop, select "y" if you agree and "n" if you disagree and then click Enter.

Now we are asked if the path to XAMPP, press "y" if you agree that XAMPP was in the directory C:\xampp, if you don’t agree, then click “x” and start all over again. Click "y" and then the key Enter.

In the next window you can select the installation type - portable version XAMPP(so that you can transfer it to a flash drive), for this you need to select "y", in this case we press "n" and then Enter, since we are installing on a hard drive.

The next window will display a list of what has been installed, including what we need, namely PHP, MySQL, Apache. Here they ask you to press Enter to continue, which is exactly what we do.

At the next step, we will receive a message stating that the time zone was automatically determined and added to the files "php.ini" And "my.ini", in my case - Europe/Helsinki. Click here Enter.

Our kit XAMPP web server installed. At this point, the command line displays several actions to choose from, namely:
- launch XAMPP Control Panel
- move XAMPP (current path: C:\xampp)
- disable HTTPS (SSL)
- disable Server Side Includes (SSI)
- enable IPv4 only (current: IPv4/6(automatic))
- disable mod_perl
- disable Apache:ASP
Here, of course, you can select any menu item at your discretion. In order to launch XAMPP Control Panel you need to select item No. 1 and click on Enter, or choose x(as I did) to exit and then launch the shortcut on the desktop - XAMPP Control Panel. If you installed without creating shortcuts, then you need to go to the C:\xampp directory and run xampp-control.exe. The same directory contains shortcuts for launching individual modules.

After launching XAMPP Control Panel one way or another, you should see the following:

Usage
XAMPP very easy to use, and NetBeans integrates well (I wrote about this IDE earlier -). IN XAMPP very comfortable Control Panel,it is easy to use and contains everything you need for comfortable work and creating masterpieces in programming.
In the screenshot above you can see the List of modules ( Modules)namely: Apache, MySQL, FileZilla, Mercury, Tomcat. In order to launch a particular module, you need to press the button located next to the module, namely Start. In our case, we will launch Apache and MySQL. If you want to run modules as Windows services and have them run automatically after loading the OS, you need to check the box next to the module name Svc. Modules are installed as Windows services when the checkbox is checked and removed when the checkbox is unchecked Svc.

On the right are all the buttons for useful functions, namely:
Shell— launches a command line in which you can work with the server

Setup— here are some XAMPP settings, which are collected in a small menu, I wrote about them above

Port-Check— by clicking on this button you can check the ports required for the Web server

Explore— after clicking this button, the directory in which XAMPP is installed will be opened (C:\xampp)
SCM- a window for managing Windows services will open here
Refresh— when you click on this button, the state of all modules will be updated, please note that they will be updated and not reloaded
Help— here is a little help on working with XAMPP Control Panel
Exit- exit from XAMPP Control Panel, please note that this will simply close Control Panel all modules that have been enabled will remain in working order
If you just close the window XAMPP Control Panel then an icon remains in the tray, and when you hover over it, information about running modules is displayed. When you right-click on the tray icon, Refresh XAMPP.
When you launch the modules you need, the buttons with the inscription will become active Admin. When you click on any of them, the default browser is launched and the administrative panel of a particular module is launched in it. For example, this is what the welcome page looks like XAMPP, after pressing the button Admin near Apache. Here you need to select the language that you like best, in older versions Russian is also available, in this case we select English.

After selecting the language, the XAMPP web interface will appear. In which the first page welcomes us and congratulates us on installing the Web server kit.

The web interface has a lot of useful things, there is a fairly large menu in which:
Welcome- welcome page
Status— here you can check the status of all components, which components are working and which are not working

Security— here are all kinds of security settings, green indicates reliable settings, red indicates completely unprotected ones, and yellow means that there is no way to determine the status, here you can find a list of XAMPP ports, and recommendations for eliminating unprotected components, the address is also indicated here (http:/ /localhost/security/xamppsecurity.php), where you can change the password for root (MySQL), set a password for the XAMPP directory, and set the access method to phpMyAdmin

Documentation— here is On-line documentation for various XAMPP components

Components- here is a list of all components that XAMPP contains, and links to the authors of these components

phpinfo()— displays information about PHP, namely about settings, extensions, PHP version, etc.

pearinfo()— displays information about PEAR

perlinfo()- displays information about PERL

aspinfo()— displays information about ASP

Demos— in this section there are several scripts that demonstrate the operation of certain XAMPP components, namely:
CD Collection- a simple program using PHP, MySQL, FPDF, in which you can add, delete and generate a list of your CDs in PDF

Biorhythm- a program showing biorhythm graphically, using PHP, GD

Instant Art— a program demonstrating the work of PHP, GD, FreeType

Flash Art— demonstration of the use of PHP+MING

Phone Book- phone book using PHP and SQLite

ADOdb- using ADOdb

Guest Book- a simple guest book in Perl

Tools— this section contains additional utilities that can significantly help in the development of a particular software product
phpMyAdmin- application on PHP, which provides a web interface for working with MySQL, this application can be called from XAMPP Control Panel by pressing a button Admin next to the MySQL module, which is actually very convenient and speeds up startup phpMyAdmin

Webalizer— statistics on the site’s performance with charts

Mercury Mail is a program that allows you to send and receive mail both on one computer and on a local network.

FileZilla FTP— FTP server

In general, XAMPP has everything you need to develop applications; if you need something more, you can turn to the add-ons.
Translation of XAMPP documentation
Passwords:
- MySQL:
User:root
Password: (no password by default) - FileZilla FTP:
User: newuser
Password: wamp
User: anonymous
Password: [email protected] - Mercury:
Postmaster: postmaster (postmaster@localhost)
Administrator: Admin (admin@localhost)
TestUser: newuser
Password: wamp - WEBDAV:
User: wampp
Password: xampp
About safety (a must read!)
XAMPP is made to be completely open source, this was done so that developers can do whatever they need, and for this reason it is not recommended to use XAMPP as it is out of the box in production, as it is practically unsecured.
List of the most vulnerable places in XAMPP:
The MySQL administrator login (root) does not have a password by default.
MySQL daemon, accessible via local network.
PhpMyAdmin, accessible via local network.
Examples are available via local network.
These and other security flaws can be fixed on the following page:
http://localhost/security/
Passwords for MySQL and PhpMyAdmin, and passwords for the XAMPP directory can also be configured at the above address.
MySQL Notes:
As mentioned above, by default in MySQL there is no password for the user with the “root” login. To be able to access MySQL databases from PHP, you need to write the following:
| mysql_connect ("localhost" , "root" , "" ) ; |
mysql_connect("localhost", "root", "");
To set a password to access MySQL, you need to use MySQL Admin.
In order to set the “secret” password for the “root” user on the command line, you need to write the following:
\xampp\mysql\bin\mysqladmin.exe -u root -psecret
If you change the password, you will have to reconfigure PhpMyAdmin to use the new password, but if you do not reconfigure, then access to the databases will be denied. To change PhpMyAdmin settings you need to open the config.inc.php file, which is located in the \xampp\phpmyadmin\ directory and change the following lines:
$cfg["Servers"][$i]["user"] = "root"; // MySQL user $cfg["Servers"][$i]["auth_type"] = "cookie"; // HTTP Authentication
After this, in order to access PhpMyAdmin, you will first be asked for the password for the ‘root’ user.
CPAN/PEAR:
CPAN and PEAR are pre-installed in the OS and are basic. If you need additional packages, you need to use the XAMPP Shell utility (xampp_shell.bat), for which you need to write the following on the command line and install them using command line utilities:
- cpanp i foo
- pear install foo
If you don't have a VC6 compiler, you can use "ppm" instead of "cpanp" to install binary packages.
General directories
| \xampp\anonymous | For anonymous FTP access you need to upload to this directory. |
| \xampp\cgi-bin | For CGI scripts. |
| \xampp\htdocs | This is the main directory where you need to create your projects. For example, I do this: I create a directory in \xampp\htdocs for example blog (C:\xampp\htdocs\blog) and write the main project files here, after which my blog will be available at http://localhost/blog/ and So for each project I create a separate directory. |
| \xampp\MercuryMail\MAIL | Mailboxes. |
| \xampp\mysql\data | MySQL databases. |
| \xampp\webdav | Directory for WebDAV access (if enabled). |
Configuration files
| \xampp\apache\conf\httpd.conf | The main configuration file for Apache. If you need other Apache configuration files, they are stored in the \xampp\apache\conf\extra\ directory. |
| \xampp\FileZillaFTP\FileZilla Server.xml | Configuration file for FileZilla FTP server. It is associated with "FileZilla Server Interface.exe" (which can be launched by clicking the "Admin" button in the XAMPP Control Panel). |
| \xampp\MercuryMail\mercury.ini | Configuration file for the Mercury SMTP server. It is associated with "mercury.exe" (which can be launched by clicking the "Admin" button in the XAMPP Control Panel). |
| \mysql\bin\my.ini | Configuration file for the MySQL server. |
| \xampp\php\php.ini | Configuration file for PHP. |
| \xampp\phpMyAdmin\config.inc.php | Configuration file for phpMyAdmin. |
| \xampp\sendmail\sendmail.ini | Configuration file for msmtp (sendmail compatible interface). |
| \xampp\webalizer\webalizer.conf | Configuration file for Webalizer. |
Log files (.log)
| \xampp\apache\logs\error.log | Apache error log file. Additional files may be in the same directory (if enabled). |
| \xampp\FileZillaFTP\Logs | FileZilla FTP server error log file (if enabled). |
| \xampp\MercuryMail\LOGS\ | Subdirectories of this directory contain log files from several Mercury SMTP server modules. |
| \xampp\mysql\data\mysql.err | MySQL error log file. Additional files may be in the same directory (if enabled). | — to check the FTP server, you can use the FileZilla FTP manager
In today's post, we'll look at how quickly and easily you can install WordPress on your local computer using the XAMPP tool and why you even need it.

Why install WordPress on your local computer?
Before we find out “how” to do this, let’s figure out “why” this is needed and how it will help in working with a WordPress site.
Fast file transfer
You probably have to download a considerable number of files, including themes, plugins, etc. This can significantly slow down download speeds, especially compared to how easy it is to copy and paste information, or extract a zip file from one part of the computer to another.
If you install the version of WordPress for your local computer, you can transfer files, make changes to WordPress, install themes and plugins, and loading pages will not slow down your work with the site.
You will learn more about WordPress
If you're just getting started with WordPress and learning about it, then an offline local installation will help you along the way. You will be able to experiment without anyone seeing what exactly you are doing and what changes you are making to the site.
Develop offline before downloading changes
Most likely, every developer has at least one local WordPress site. However, if you're just getting started with design or development, then you might be interested in the fact that you can quickly download your entire site to your computer and edit it offline.
Creating a personal offline blog
Another reason to create a website offline is to be able to run your own private blog. You will have access to all the features of WordPress, including all the plugins that are used for this platform. And no one will ever see your blog online.
As you can see, there are many reasons to install WordPress on your local computer. Now let's figure out how this can be done, and completely free.
Installing WordPress Locally Using XAMPP
To use WordPress on your computer, you first need to download the free software XAMPP. This is a PHP development environment, although there are many other options for using WordPress locally, but this is the best.
Step 1. Download XAMPP
This software can be downloaded here, just select the appropriate option depending on the operating system on your computer and download the file.
Step 2. Install XAMPP
After downloading the appropriate file, start the installation by double clicking.

During the installation process, leave the default settings and click “Next”.
When it comes to choosing a folder to save XAMPP, you can choose the default folder or create a new one. If you don't know how best to do it, choose the first option.

We are waiting for XAMPP to install before moving on to the next step.

Step 3. Launch XAMPP
Once XAMPP is installed on your computer, select “Start downloading Control Panel now” and click “Finish”.

After that click "Start" for Apache and MySql:

At this point, you will usually receive a security alert from Windows, but you don't have to worry about anything. Make sure you click on "Unblock" and your local XAMPP server will be ready to use.
To check if everything was done correctly, open your browser and go to this address:
http://localhost
If XAMPP is configured correctly, then you should see the following:

Step 4. Create a database for WordPress
Since WordPress uses a database, we need to create one before installing WordPress. This is done very simply and in just a few steps.
To get started, switch to the control panel, click on the “Admin” button, and then on “Start” for MySql:

After this, the phpMyAdmin admin panel should open in your browser:
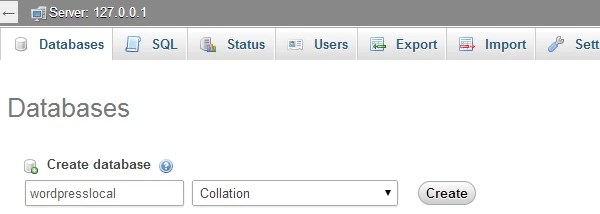
Here, click on “Databases”, enter the name of your database (any set of Latin characters) and click on the “Create” button. Since you can create several databases and perform several installations of WordPress on your computer. The main thing is to give the database a name so that you don’t confuse which site it belongs to later.
When you see a message confirming that the database has been created, you can proceed to the next step.
Step 5. Download WordPress
Go to wordpress.org and download the latest version of WordPress. After downloading the zip file, move it to where you installed XAMPP and save it in the "htdocs" folder.
Then unzip this file by right-clicking on it and selecting “Extract to current folder”:

You can give the folder a unique name so that you can distinguish it from others that you will create in the future.
Step 6. Setting up WordPress
We've done almost everything. All that remains is to edit and rename one file. In the WordPress directory you just created, find the wp-config-sample.php file and open it with a text editor like Notepad++:

Edit the data in the highlighted area according to the name of the database you created in step 4.

Save the file and rename it to wp-config.php, removing –sample from its name.
Step 7. Install WordPress
To install WordPress, enter the address in your browser: http://localhost/wordpress/, where “wordpress” is the name of the folder you created in step 5. Once the page loads, you will see the following:
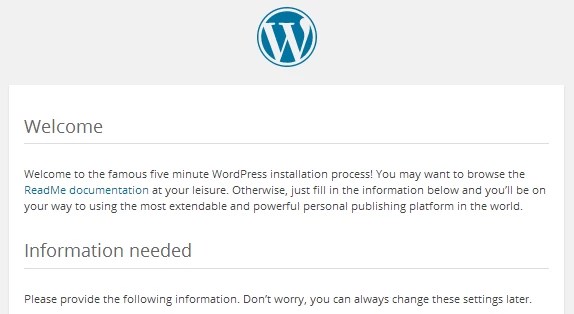
Then enter the required details, click on “Install WordPress”, and then an offline WordPress installation will appear on your computer.

If you want to install themes or plugins, you can do so through the WordPress admin as you would online, or you can copy the file to the appropriate folders on your computer:
- Themes: c:\xampp\htdocs\wordpress\wp-content\themes
- Plugins: c:\xampp\htdocs\wordpress\wp-content\plugins
If you can't access WordPress offline using these links, make sure XAMPP is active and Apache and MySql are running.
If you want to upload a website online for offline use, or vice versa, then the free Duplicator plugin will help you with this.


