How to mount an image of a multiboot flash drive. Multiboot flash drive with everything you need
Previously, new computer programs or applications came on CDs. But recently, most computers are not equipped with drives for reading them. More popular is installing software via the Internet. But what should you do if the operating system fails or you need to reinstall a new version of it on another computer? In this case, a flash drive will help, on which the utility for automatically loading the operating system will be installed. It is possible to make a bootable USB flash drive yourself.
Why do you need a bootable USB flash drive with utilities?
For a computer to function properly, it is not enough to install an operating system on it. For correct operation of all functional units in it, correct display of information, playback of audio and video content, drivers or codecs will be required. There are universal collections of codecs for each operating system that work on computers of different configurations, power, types of processors, video cards, input/output devices, and peripheral equipment. When installing an OS from a bootable USB flash drive, you must install all these utilities.
Creating a multiboot flash drive
The solution to the problem is possible by using a flash memory device that is connected to a USB port. To install Windows and all the necessary utilities for its correct operation, you will need a 16 gigabyte (GB) flash drive. To create a multiboot flash drive for Windows XP/Windows XPE/Vista/7/Windows 7PE/8/10, a flash memory capacity of up to 32 GB is useful. A Windows 10 multiboot flash drive is created using specialized programs: Acronis Disk Director & True Image, RMPrepUSB, Bootice, WinSetupFromUSB, XBoot, FiraDisk_integrator.
What you will need
To create a recovery flash drive, you need a copy (or image) of the OS installation disk. To create it you will need the UltraISO program, administrator rights and a disk with the original OS. After downloading, installing and launching, you need to select the location of the image. The UltraISO Wizard will create an ISO image with the OS. Next, select “Burn hard disk image” and create a bootable flash drive. This multiboot flash drive will need to be filled with the necessary service programs, and a standard set of them will need to be downloaded - antiviruses, codecs, backup tools.
Program for creating a multiboot flash drive
It is difficult to create a separate MultiBoot USB Flash for each operating system. It is possible in Windows 8 to create a multiboot flash drive from the command line, but this can lead to errors. Therefore, several utilities have been created that automate these actions, which have the ability to additionally integrate several operating systems, add antivirus programs to the installer, the programs you need, and batch install this entire set onto a multiboot flash drive. Among them the most interesting are:
- RMPrepUSB is a universal multi-booter for flash drives, launching them in MS-DOS, FreeDOS, WinPE 1, 2 or 3, BartPE, XP, Win 7, Win 8.x, Win 10, Linux. Works with different file systems - FAT16, FAT32, NFTS. Facilitates checking flash memory, formatting hard and flash drives, creating backup images of a bootable flash drive, and has many auxiliary functions in interactive mode.
- Bootice is a useful program for reinstalling the OS on computers without an optical drive; it has the functions of formatting and splitting the amount of flash memory into several partitions, changing the way the system boots, and you can rename the bootloader.
- WinSetupFromUSB is a free software product for creating bootable Flash USB for Windows and Linux systems with a simple graphical interface. It has the functions of formatting and marking flash memory, copying installation files from distributions, and final testing of the created bootloader.
- XBoot is a free program for transferring images of operating systems, codecs, and programs to a flash drive. Its advantages are the ability to create a boot disk simultaneously for Windows and Linux OS, and choose the type of boot loader ISO Emulation or Grub4DOS. The downside is the menu is in English.
- YUMI – Multiboot USB Creator – a small utility for creating a bootable USB flash, has a simple English interface with descriptions of distributions and recommendations for different computer configurations, offers links for downloading antiviruses, codecs, and drivers.
- FiraDisk_integrator is a multifunctional boot loader, has the ability to integrate all versions of Windows of different assemblies, there is a choice of localization of installed software according to the interface language, simple creation of an image from all distribution sources loaded into the SSD folder.
How to make a flash drive multiboot with MultiBoot USB - step-by-step instructions
When installing a multiboot program, some antiviruses may block this action. It is worth disabling them temporarily or adding this program to exceptions. To create an emergency flash drive, you must complete the following steps:
- Formatting a USB drive for the bootloader format.
- Installing the bootloader.
- Adding operating system images (files with the .iso extension).
- Copying files.
- Testing the resulting tool.
Formatting a USB Drive
Preparing a multiboot flash drive to turn it into a bootable tool starts with formatting it. Move all the information you need from its memory to other media - formatting will completely clear it. To format, you need to do the following:
- Launch HP USB Disk Storage Format Tool.
- Select your drive from the list.
- Specify File system – NTFS if files larger than 4 GB will be installed. FAT32 markup must be left if you intend to work with computers based on BIOS UEFI.
- In Format Options, you should check Quick Format - quick formatting.
- Click Start.
Installing the bootloader
Above are several options for utilities that will download all OS distributions and service files. To use them you need:
- Copy the installation module of your chosen bootloader to a formatted USB drive.
- Then run this installer.
- Choose a name for your flash drive.
- Click Install.
After successful installation of the program, a message will appear on the screen confirming the installation of the boot utility on the computer. A message will be displayed on the screen asking you to start it. If up to this point you have created a database with all the necessary distributions and programs on your hard drive, you can check the Start program box and click the Finish button.
Adding operating system images
To add images of different operating systems to a multiboot flash drive, you need to prepare them in the root folder on your computer’s hard drive. This will be several files with an iso extension. Using a bootloader like WinSetupFromUSB, you can make a multiboot flash drive for Windows XP, 7, 8, 10 and Linux. To do this you need:
- Select the name of the flash drive from the list.
- Check the boxes next to the required operating systems in the list, for example – Windows 2000/Xp/2003 Setup.
- Specify the location of the mounted images.
- Click Go.
Copying utilities and files
After transferring operating system images, you should copy the installation files of all the utilities and programs from our list necessary for the system to work on a flash drive. To do this, in the WinSetupFromUSB program:
- Uncheck the Auto format it with FBinst checkbox.
- Select the item Linux ISO/Other Grub4dos compatible ISO by clicking the button on the right.
- In Explorer we find the folder with program images, select all the programs in turn and click “Open”.
- We make sure that they are named correctly in the Boot menu name.
- Click Go and see the process of adding the selected utility to the bootable flash drive.
To create a recovery and recovery multiboot flash drive, the installation package can include the following basic utilities, which can always be changed, removed or replaced with new versions:
- Windows distributions versions 8.1, 10 and XP;
- Paragon Hard Disk Manager – disk space allocation manager ;
- AOMEI Backupper Standard – free backup;
- K-Lite Codec Pack – universal codec package;
- Kaspersky Rescue 10 – Kaspersky antivirus;
- DrWeb LiveCD – Doctor Web antivirus;
- 7-Zip – archiver of files and folders;
- Recuva – file recovery utility;
- RegeditPE – registry editing utility;
- Symantec Ghost v11.0 – for archiving and restoring personal computer data;
- Elcomsoft System Recovery Pro v3.0 Build 466 – the purpose of the utility is to restore user access to Windows accounts and Microsoft applications;
- Universal Boot Disk v3.7 – servicing NTFS drives in MS-DOS;
- NT Password & Registry Editor – change the password and the ability to edit the Windows XP registry;
- Active@ Boot Disk Professional v2.1 – will help you recover and edit deleted files;
- QuickTech Pro v5.8 – setup, diagnostics of the computer and its components;
- MemTest86+ v4.20 – testing RAM;
- MHDD v4.6 – checking hard drives;
- Victoria v3.52 – IDE and Serial HDD maintenance;
- HDD Regenerator v2011 – eliminating physical damage to hard drives;
- Reanimator – fast liveCD for data recovery and work environment repair;
- Alkid LiveUSB – universal system recovery utility;
- Acronis Disk Director & True Image – check hard drives;
- Elcomsoft System Recovery – viewing, changing, deleting passwords for accounts in Windows OS of all editions;
- Daemon Tools is a popular virtual CD-ROM;
- DOS-Navigator – console file manager for OS/2 and DOS;
- Alcohol 120% is a program for copying and virtualizing disks.
Testing
After creating a multiboot flash drive, you need to check its functionality. To do this, you can use the Test in QEMU utility in WinSetupFromUSB. To do this, do the following:
- check the box next to Test in QEMU;
- press GO;
- the program itself will check the presence of all elements and finally display a list on the computer screen under the heading “Set of boot images and utilities for working with hard drive partitions”;
- Below is a list of all operating systems, programs and utilities;
- If some utilities are not installed, you must repeat the installation process.

Burning a bootable USB flash drive using the RMPrepUSB program
The first step is to run RMPrepUSB. Then you need to go to the dialog box, check in the top window whether the multiboot flash drive is defined. Then we do the following steps:
- Size – enter MAX.
- Volume label – the name of the flash drive in the OS.
- On the right, check “No questions asked.”
- In the “Boot sector” section, select WinPEv2/WinPEv3/Vista/Win7 bootable (CC4).
- File system and options – NTFS.
- To the right you need to select the option Boot as HDD (C: 2PTNS).
- Check the “Copy system files from the following folder...” checkbox.
- An explorer will open in “Browse”, in which you need to select the Easy2Boot archive and click OK.
- If you click “Prepare disk”, formatting of the flash drive starts, which must be prepared for this.
- Click “Install Grub4DOS”.
- We answer “No” to the MBR request.
- In the GRLDR ALREADY EXISTS window, press the OK button.
- After that, we manually transfer the boot programs to the USB flash drive into the MAIN MENU and UTILITIES Menu folders.
- To complete the creation, open the menu item Drive->Make All Files on Drive Contiguous.
- By launching the RMPrepUSB emulator and pressing the F11 key, you can check its functionality.
If you copied all your OS distributions to the MAINMENU folder on a flash drive, then they will be reflected directly in this menu. The UTILITIES Menu item will display service utilities and computer maintenance programs. This completes the process of creating a multiboot flash drive using this program. To select the OS and programs to install, you need to navigate through the menu and select the utilities needed for installation.
Multi-flash drive in Bootice - creation procedure
It is known that Bootice is a utility for creating a multiboot flash memory card. You can download Bootice from the official website of the developer. The utility must be unpacked, and after launching the program:
- In the Destination Disk item, select the flash drive that must first be prepared.
- You should click Process MBR (master boot record).
- Select GRUB4DOS 0.4.5c/0.4.6a (grldr.mbr).
- Click Install/Config.
- Click Save to disk to write all the information to the flash drive.
- For Linux systems, SUSLINUX 4.06/5.01 (FAT/FAT32/NTFS) should be installed.
- Click Install/Config.
- Select SYSLINUX 5.01.
- Click confirmation - OK.
- After completing these steps, the multiboot flash drive will be ready.
Creating a bootable USB flash drive with multiple operating systems in WinSetupFromUsb
After launching the WinSetupFromUSB utility, the SFX archive will be unpacked, the program will start and a menu will open, at the top of which we find our flash drive in the drop-down list. Your steps will be:
- Format the media – check Auto format it with FBinst, then – NTFS.
- Check the box for Linux ISO/Other Grub4dos compatible ISO.
- Press the GO button.
- The flash drive is being formatted.
- In the next step, we sequentially select items from the Add to USB disk list and press the GO button - the OS distribution kits are transferred to a multiboot flash drive.
To randomly select downloadable programs, select Linux ISO/Other Grub4dos compatible ISO and click on the button with the image of three dots on the right, an explorer opens in which we select the utilities and programs we need. Then we add all the ISO images in exactly the same way. The Test in QEMU item will help you check the recorded images. To control, we boot from this multiboot flash drive and check its boot menu.
Utility for creating a multiboot USB drive Xboot
The Xboot interface is simple - to create a multi-boot device for installing and restoring the OS, you need to do the following:
- To add images, you need to drag iso files into the program window. At the same time, in a green window with the question “How to perceive this image?” when adding Windows images, you must specify Add using Grub4dos ISO image Emulation.
- If you are installing a Unix system, then use Utility-Ubuntu.
- In addition to OS images, you can add utility images. The program has links, to access which click File->Download. Select utilities and download.
- After clicking Create ISO, the program will ask for the path to save the image file and offer to check it in the virtual machine.
FiraDisk_integrator script for resuscitation flash drive with multiple OS
To start creating a multiboot flash drive using the FiraDisk_integrator utility:
Video
MultiBoot USB. How to create a multiboot flash drive?
Multiboot flash drive (MultiBoot USB) is designed for installing operating systems Windows XP/2000/Vista/7/8
and loading recovery images and utilities directly from a USB drive.
Utilities included in the installation package of a multiboot flash drive:
- Acronis Disk Director & True Image— Working with hard drive partitions
Symantec Ghost v11.0 - Working with hard drive partitions
Windows XPE - Mini version
Windows 7PE - Mini version
Elcomsoft System Recovery Pro v3.0 Build 466— Password recovery and change
FreeDOS - Boot in command line mode, includes DOS-Navigator and VC
Universal boot disk v3.7- Access to NTFS partitions in MS-DOS
NT Password & Registry Editor— Changing the password and editing the registry
Active@ Boot Disk Professional v2.1— Recovering deleted files
QuickTech Pro v5.8 - Testing and diagnostics of hardware and its components
MemTest86+ v4.20 - Testing and diagnostics of RAM
MHDD v4.6 - Testing and diagnostics of hard drives
Victoria v3.52 - Testing and service of IDE and ATA HDD
HDD Regenerator v2011 - Eliminating damage (bad sectors) on HDD
Skins are located in the Boot folder. The default skins are “Moonlight” and “Rainbow”. When replacing skins, copy them to the Boot folder and write the name of the new skins in the files menu.lst and menu_2.lst in the line: “gfxmenu /Boot / Moonlight”.
Installation and work with the program.
To install the program on your computer, you need to run the multiboot flash drive installer - Multiboot flash drive.exe. After unpacking the SFX archive and finishing copying the files, the program will automatically start and the selector menu will open with a set of all the necessary utilities and programs for creating a multiboot flash drive. After installing the program, two shortcuts are created: on the “Desktop” and in the “Start/All Programs/Utilities” menu.
If the operating system Windows 7 or Windows Vista is installed on your computer, the program must be launched as an administrator.
1. Formatting a USB flash drive.
Before you start creating a multiboot flash drive, you need to format it.
Launch the HP USB Disk Storage Format Tool, select the file system NTFS (preferably) or FAT32, check the box for “Quick Format” and click on “Start”.

2. Install the grub4dos bootloader on a flash drive.
After formatting the flash drive, proceed to installing the grub4dos bootloader. Launch the Grub4Dos Installer utility, select “Disk” in the “Device Name” window, find your flash drive and click on “Install”.

If everything was done correctly, then in the window that opens, an inscription with the text “The MBR/BS has been...” will appear.
Press “Enter” and go to the next menu item.
3. Installing the Windows PE/XPE distribution kit on a flash drive.
Iso image of Windows XPE USB WIM using Daemon Tools, UltraISO or Alcohol. We launch the PeToUSB utility, below in the “Source Path To Built BartPE/WinPE Files” field we indicate the path to our virtual disk. Check the box only in the “Enable File Copy” window and click “Start”.

4.1. Installing the Windows XP distribution on a flash drive.
We mount an iso image of Windows XP onto a virtual disk using the Daemon Tools, UltraISO or Alcohol utility. We launch the WinSetupFromUSB utility, check the box in the “Windows 2000/XP/2003 Setup” window, specify the path to our virtual disk and click “GO”.

4.2. Installing the Windows 7 distribution on a flash drive.
We mount an iso image of Windows 7 onto a virtual disk using the Daemon Tools, UltraISO or Alcohol utility. We launch the WinSetupFromUSB utility, check the box in the “Vista / 7 / Server 2008 - Setup /PE/RecoveryISO” window, specify the path to our virtual disk and click “GO”.

5. Copy files and utilities to a flash drive.
Using the “Browse...” button, indicate the path to the flash drive and click “Eject”. To the question: “Do you want to replace an existing file?” click “Yes”.

After copying files to the flash drive is completed, it can be tested and checked for functionality.
Attention!!! Completing points 1; 2 and 5 are a must!!!
Any of points 3; 4.1 and 4.2, if you don't need it, you can skip it.
Testing a multiboot flash drive.
To test and see what we got, run the WinSetupFromUSB utility from the selector menu, check the box in the “Test in QEMU” window, click “GO” and enjoy

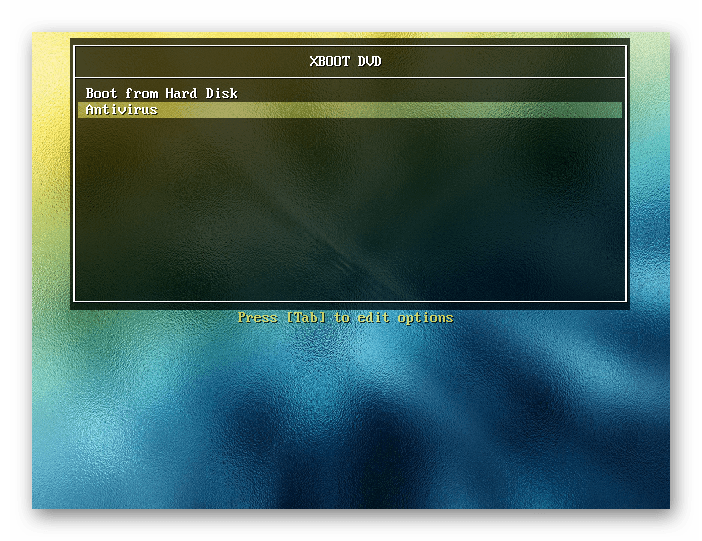
If everything went well, the bootable flash drive interface will look like this:

Distributions for bootable flash drive: https://yadi.sk/d/6nBtL8wDuW9ek
I hope this article helped you.
In contact with
16.04.2017
It is quite convenient to keep a USB drive with several OS and programs for working with a computer from the BIOS (Dr. Web, Acronis, Windows 10, Ubuntu, etc.). Most computer technicians carry a device like this with them to quickly analyze a damaged PC or laptop and begin repairing the operating system on the spot. To create a multiboot flash drive it will take about 30-60 minutes and some software.
Creating a multiboot flash drive
Most computer technicians periodically have to work with Linux, Acronis, Kaspersky, Dr. Web, etc. software via boot drive. It is inconvenient to buy a dozen flash drives for such purposes. It is much more practical to install all the software on one multiboot drive and use it while repairing your PC.
To create such a device, the user will need to install some programs. The task of the software is to copy the boot loader (Grub4dos or Syslinux) to the storage device, mount the ISO image into the desired folder and enter the necessary paths to the files in the menu.
Method 1: WinSetupFromUSB
The most popular software for creating a multiboot drive is WinSetupFromUSB. This utility has a simple interface and allows you to write not only third-party operating systems, but also ISO images of programs to the drive.
After downloading, you need to unpack the archive:
- Run the .EXE file.
- In the window that appears, click on the button «…» .
- Select the installation folder and click "OK".
- Click "Extract".

Next, go to the previously designated folder, it will contain two applications of 32 and 64 bit versions. Select the one that matches the processor size of the device you are using. Run first "WinSetupFromUSB_1-7_x64". The file name may differ depending on the software version. If you opened the wrong version of the program, a warning window will appear.

To create a multiboot drive, you must follow the instructions:

More details about menu items:
- Windows 2000/XP/2003 Setup – used to record older versions of Windows.
- Windows Vista/7/8/Server 2008/2012 – used to record modern versions of Windows OS.
- UBCD4Win/WinBuilder/Windows FLPC/Bart PE – partition created for recording bootable disks under WInPE (Windows Preinstallation Environment, loaded into RAM). Used among specialists, WinPE allows you to boot Windows and use the OS in Live mode without installing it to disk.
- LinuxISO/Other Grub4dos compatible ISO - created for recording Linux systems, as well as program images. For example, through this section you can install Dr. Web, Victoria, Kaspersky Rescue Disk, Ubuntu, Kali linux and other software.
- SysLinux bootsector – used for Linux systems with pre-installed Syslinux bootloaders. As a rule, it is used by specialists to test various versions of Linux.
After burning the first ISO file, you can begin installing other OSes and utilities. For this purpose, the instructions remain almost unchanged. Except you don't have to do any formatting.
For example, let's install Kali Linux as the second OS. For this:

If you wish, you can not install the files separately, but immediately select several images for installation at the first stage. Also, if desired, you can open additional settings for formatting, system boot, menu interface, etc. There is no particular need to change the parameters.
Please note that when working through WinSetupFromUSB, problems may arise when recording Windows 7, 8 and 10 versions simultaneously. A similar error was observed on older versions of WinSetupFromUSB.
Method 2: YUMI Multiboot USB Creator
This program has a simple and intuitive interface. A distinctive feature from WinSetupFromUSB is a more detailed classification of programs when recording. This allows you to create a bootloader with additional auxiliary settings at startup.
After downloading, run the utility. To create a multiboot drive you need to follow a few simple steps:
- In chapter "Step 1" select the desired device.
- IN "Step 2". Choose what type of system you will be installing. The drop-down list contains many different names; select the program you need from among them. If you don’t want to select a specific utility, then at the end of the list, find the item "Try an Unlisted ISO". In this case, the image will launch without additional boot settings.
- Select the system image you want to burn. For this purpose in "Step 3" click the button "Browse" and in the window that appears "Conductor" find the required ISO file.
- If you are using the drive for the first time, it is recommended that you format it first. To do this, you can use standard Windows tools or check the box "FAT32 Format". This section may not be present in the utility.
- To begin installation, click "Create". After this, the installation of the image will begin. In this case, archivers will periodically open, as well as Windows windows with information about copying will pop up.

After the software has finished running, you can test the flash drive directly through the computer’s BIOS. Or run the QEMU test in WinSetupFromUSB. The loader interface is minimalistic and distributes the installed software into folders automatically.

Method 3: Xboot
This utility is another type of software for creating multiboot flash drives.
To use XBoot on a PC, you must have the .NET Framework version 4. To create a multiboot flash drive, follow the instructions:


When you launch the created flash drive, a pleasant interface with a beautiful background and an attractive menu appears in front of the user.
Every user can create a multiboot drive. This will require a little time and some software. You can use such a device to repair computers. You need to insert a flash drive with installed utilities into your computer and run the boot loader on the media through the BIOS. After this, you can use all installed software and use them to begin treating or restoring your computer.
To scan your computer for viruses. From this multiboot flash drive, you can install only one version of Windows 7 and Windows XP recorded on it. That is, I don’t yet know how to make sure that there are several images of Windows 7 on a flash drive so that we can choose during installation. (If you have several operating systems in the image for installation, in this case there will be a choice. Read and see how to make it possible to install Windows 7 from one image of Windows 7 Ultimate: Starter; Home; Professional or Ultimate). I hope to sort this out in future articles. He covered all the nuances. Let's run to create a multiboot flash drive.
Let's download the MultiBoot USB program with which we will make a multiboot flash drive.
Download conveniently from torrent
http://rutracker.org/forum/viewtopic.php?t=3848726
After downloading, it is advisable to check the checksums

The checksums have agreed, we proceed to the installation.
Run as administrator MultiBoot USB - Multiboot flash drive.exe

Click OK


The installed program starts immediately

Half the battle is done.
Download and install UltraISO
You don’t have to do this step if you already have a program for working with ISO images (for example DAEMON Tools) installed. We need a program to mount images into a virtual disk to burn Windows to a USB flash drive.
Download UltraISO from the official website and with the desired language
http://www.ezbsystems.com/ultraiso/download.htm

Launch the downloaded file. In the security warning window, click Launch

We are greeted by the UltraISO installation wizard. Click Next >


Click Install

Click Complete

UltraISO launches. Click Trial period...

UltraISO installed and running

Let's format and install the bootloader on the flash drive
Go down the page in the Download section and download the ISO image in the archive


