How to distribute WiFi from a laptop: instructions from A to Z. How to make a Wi-Fi access point from a Windows-based computer
Often, users need to provide several gadgets with a worldwide network. However, the purchase of special equipment will require certain funds. But there are other ways. In this article we will tell our blog readers how to distribute WiFi from a laptop to Android tablets or smartphones.
There are several ways to distribute the Internet from a laptop to Android devices, which we will talk about now.
In order to ensure the distribution of wifi from a laptop with Windows OS to Android (or any other device), several conditions must be met, and they are mandatory regardless of which method you prefer.
- The laptop must be equipped with a Wi-Fi adapter (in the case of a desktop computer, you will probably need an external receiver connected to a USB/PCI connector).
- The Wi-Fi adapter must have a driver that supports Virtual WiFi installed. If the virtual network does not start, you will need to update the Wireless adapter to the latest current version.
- The laptop must be connected to the Internet, which will be active.
Using Windows 7 Tools
This option is quite simple and does not require the installation of additional software. However, you need to take into account that the tools with which you can distribute Wi-Fi are available in an OS with an edition no lower than Professional.
So what we have to do:
On your laptop, click “Start” in the lower left corner of the screen and go to Control Panel:

Now select “Network and Sharing Center”:
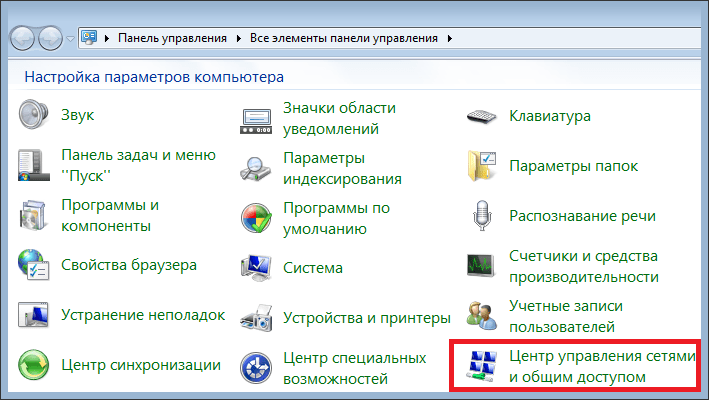
*If sorting is set to categories on your PC, select “Network and Internet”.
Here we must click on the line “Set up a new connection or network”:

From the list of connection options that opens, select “Computer-to-computer” and click the “Next” button:

Now enter the network name (optional), create a password and check the box “Save the settings of this network” so as not to enter a password every time you connect:

That’s all, now you can distribute the Internet from your laptop (or computer) by connecting an Android device.
Using the command line
First you need to check whether it is possible in principle to distribute from your PC. To do this, on the laptop, press the button “ Start" and enter in the search bar " cmd»:

After the system finds the program, open it, this will be the command line:

Now we need to enter the command " netsh wlan show drivers"(without quotes). After this, information will open in which we find the line Hosted Network opposite it should be written “ Yes"(for settings in Russian: " Hosted network support»: « Yes»):

So, if our laptop supports distribution, then we return to the command line again and enter the settings for the network distributed by the device: netsh wlan set hostednetwork mode=allow ssid=» MyWIFI"key=" 12345678 ". Where ssid— network name, it can be set arbitrarily (in the screenshot MyWIFI), A key— password, we also specify it arbitrarily (in the screenshot “ 12345678 «):


Now all that remains is to configure our newly created network. To do this, follow the path described above: “Start” - “Control Panel” - “Network Control Center”, on the left side of the window we find “Change adapter settings”, open it, find your network, right-click on it, in the window that pops up activate “Properties”:

In the new window on the top panel, click the “Access” tab and, by checking the box, we give permission to other users to use the Internet connection from their PC. In the field below, select your network and click “OK”:

Now we can connect our Android device via Wi-Fi to the Internet, which is distributed by the laptop.
Possible problems:
- The smartphone does not connect to the created network
Most likely, a firewall, antivirus or other similar programs are blocking the connection. We disable them, and if everything starts to work, then you need to add your connection to the antivirus exceptions.
- Gadgets connect, Wi-Fi is active, but the Internet does not work.
Perhaps the settings did not allow general access to the Internet. You need to make sure that the Internet is working on the distributing laptop, check the settings for permission to share, restart the PC and start the network again.
Starting the network after rebooting the computer
This does not require entering a network or password, just enter the following command - netsh wlan start hostednetwork
How to open a hotspot on a smartphone
So, if one of the methods described above gave a positive result, all we have to do is provide access to Wi-Fi on the Android device. This is done quite simply:

*On your device, the items may have a different name, for example: “ Settings» — « More» — « Modem mode» — « Wi-Fi hotspot».
Distributing wifi from a laptop using third-party software
If none of the described options suits you, then you can easily and simply get what you want by installing one of the applications. I will tell you about the Connectify program, with which you can distribute the Internet without much effort.
You can download Connectify from the official website of the developer, where you can get acquainted with the functionality and capabilities of the program in more detail.
Briefly introducing the program, I will say that this is a tool that programmatically provides Internet distribution without the help of a router (router), while assigning a Wi-Fi adapter built into the motherboard as a distribution device.
The application is distributed on a paid and free basis. The free version provides use of the WiFi sharing function. After downloading Connectify, we will need to agree to the license agreement. Then, after waiting for the installation to complete, we reboot the system (button Reboot now).
After the restart, a corresponding icon will appear on the desktop, open the program, go to the “ Settings" (settings). Here we are interested in three points in which you will need to enter the following data:
- « Hotspot Name"—the name of the network; the free version has the one you see in the screenshot.
- « Password"—password containing at least eight characters.
- « Internet to Share"- here, by clicking the button, select from the drop-down list the active connection that we will use
That's all the settings, all you have to do is press the " Start Hotspot" and start the distribution process. We will see that the WiFi sign has turned blue, and in “ Disconnected Clients» the changed access point status and encryption type will appear.
You can connect your Android smartphone to the created network (activate the access point and enter the password), and if everything went well, a message about connecting a new device will appear below:

If you still have questions on the topic of how to distribute Internet to Android from a laptop, write to us and we will be happy to answer them. I have nothing more to add. Good luck!
In this article we will try to figure out how to distribute Wi-Fi from a laptop (computer) on Windows 10? It is worth noting that today many already know that a laptop or personal computer with a Wi-Fi adapter can be used as a router for distributing the Internet network. Internet distribution is also carried out when a regular wired Internet is connected. A laptop with Windows 10 can also work as a router, increasing the range of Wi-Fi, thus distributing the Internet to which it is connected.
Features of Wi-Fi network distribution on Windows 10
Many articles have been published on the Internet about ways to distribute an accessible Internet network from a laptop or PC via Wi-Fi, on different operating systems. In this article we will look at a detailed scheme for distributing wireless Internet from a computer device that runs specifically on the Windows 10 operating system. The process of creating an access point on this version of the OS occurs exactly the same as on the seven and eight.
In the first versions of the dozen, no significant software changes were introduced; only with the release of subsequent updates was the “Mobile hot spot” function added, which configures the necessary parameters automatically. But despite this, when setting up the distribution for the first time, you will need explanatory instructions that will help you quickly set up an access point in Windows 10. This publication also indicates some points on which it is important to pay special attention, for example, if you cannot start the configured network or the device fails get an IP address.
This instruction will be useful to those people who have not heard about the concept of virtual Wi-Fi, and how you can distribute the Internet from computer devices to other devices. Let's take the situation as an example: you are the owner of a laptop to which the Internet is connected via cable. In addition to the laptop, there is a phone, tablet or second laptop, which also requires Internet distribution only via a wireless network. There are two solutions here. The first is to buy a router, and through it distribute the Internet to phones and tablets. Second, refuse to buy a router and use a laptop or computer with a Wi-Fi beacon as one. The same can be done if, for example, it is connected to a wired network or 3G modem and you need to distribute the Internet network to other computers or other devices:
Method 1: standard Windows 10 function for distributing Wi-Fi to other computers and devices (smartphone, tablet)
The Windows 10 OS version includes the ability to launch an access point (internet distribution), this can be done through the computer settings. There is a built-in option for this.” Mobile hotspot”, which provides the opportunity to distribute the Internet via Wi-Fi.
- In order to use it you need to go to “ Options“, opening the menu “ Start“.
- Next to the section “ Network and Internet“.
- And then in “ Mobile hotspot”. Here, at the beginning, you can set the name and password for the network (optional) by opening “ Change” and after that press the button “ On" data usage
If the process of setting up Wi-Fi distribution in the 1st way seems complicated, then you can turn to a program such as Connectify hotspot for help. Managing this program is quite simple. When setting up manually, you need to select the source for connection, as well as the Wi-Fi controller with which the distribution will be carried out. Enter the name of the network, as well as the password and the “enter” button. This way the Hotspot function will be launched and the laptop (computer) will be able to provide the Internet to other devices.
Currently, there are a large number of programs that allow you to quickly set up an access point. All of them are relevant for Windows 10. But in this instruction, as a second method, we will quickly configure how to turn on and off Internet distribution using the command line.
Method 2: Enable Wi-Fi hotspot on Windows 10 via command line
The main condition for starting network distribution is a valid Internet connection. The driver for the wireless network adapter must also be installed. Otherwise, the system should do everything on its own, with the exception of some nuances described below during the connection.
- First, make sure that Wi-Fi is turned on. You can easily check this by clicking on the Wi-Fi icon at the bottom right of your desktop.
- If there is an available network, it will say “ Available” (or in our case, just an icon with signal quality bars shown), as well as the above connected and available networks.
If the buttons WiFi“no and you can’t turn it on, you need to open it first” Start menu", choose " Network and Internet” and further “ Options“, “Ethernet” and in “ Configuring adapter settings” Check to see if the wireless adapter is enabled. If it does not turn on, you need to check whether drivers are installed for it or try reinstalling it.
- If there is a button, then after checking the Wi-Fi status, you can proceed further. First of all, you need to implement launch command line on behalf of the PC administrator. To do this, right-click on the menu “ Start"we find" Command Line (Administrator)” (you can also press the “ buttons Win and X“). In the window that opens you need to insert “ cmd” and press “ OK. Then insert the following command into the open window with a black background:
Where: pc4me– the name of the network, which can be changed at your discretion.
12121212 – this is the password for connection (selected independently).
- After this, the network should start and your device will distribute Wi-Fi.
Note: if the system displays a message that the created network cannot be started, a possible solution is below in the article
After this, you can connect third-party computer devices to the network. But by default the system has the following: settings that do not allow other devices to use the Internet network, traffic will not be transmitted? In order for it to work you need share. The procedure for opening access to the network looks like this:
- Right-click on the connection icon, which is located in the lower right corner and click on “ Network Sharing Center“.
- In the window that opens, click on the section “ Change adapter settings“, a window with available networks will open. Here, right-click on the adapter “ Ethernet” and go to “ Properties“. Then you need to select the section “ Access“, in which you need to check the box “ Allow other users...“. Next, select the connection that appears a little lower (as in the figure). In our case - " LAN connection 4” (on your laptop, the network on which Internet access is provided may have a different number). The picture (below) can be enlarged by clicking on it.)
- After these steps, save the settings by clicking on the “ OK“
- Now, to register the opening of access, you need to restart the distribution of the running network, to do this, in the line “ Execute” (described earlier), paste the following copied command below and press enter:
- And again we launch using the command already known to us:
After the completed operations, the function should work normally. Now you can turn on Wi-Fi on another laptop or device and connect to this network:
If the network does not work, which means you need to restart the laptop and restart the network again using the above command.
How to turn Wi-Fi distribution on and off from a laptop on Windows 10? Control commands
After the laptop reboot process, you will need to constantly enter the following command to create an Internet distribution mode:
netsh wlan start hostednetwork
If you need to stop the network, you need to enter the following command:
The following command is used to change the username and password:
netsh wlan set hostednetwork mode=allow ssid=”pc4me” key=12121212″ keyUsage=persistent
Network name and password (ssid=” pc4me” key= 12121212 “) is entered at your discretion.
Create (on desktop) files for direct distribution control
The process of creating a network is performed once, and the distribution must be started every time after the laptop is rebooted. Constantly copying and entering the command line is not very convenient for users of computer devices, for this reason it is recommended to create the following files for management:
- The first file that will start the network;
- The second is to stop her.
To do this, you need to create 2 text files on your desktop start.txt And stop.txt.

And rename the document with the extension .txt to a system file with the extension .bat. But the problem is that by default, Windows 10 displays files without an extension. To display it, you need to open “ Conductor“, click on the tab “ View” and remove the check mark from “ File name extensions“.
Then (for the first file start) you need to right-click and select the line “ Rename” and enter the extension after the dot .bat. It will look like a file start.bat. You can choose the file name (up to the dot) at your discretion, and the extension must be replaced with .bat.
Then click on the file start.bat right-click and select the line “ Change“.
Now you need to copy and paste the command into the file: netsh wlan start hostednetwork. Now close it, saving all changes by clicking on the tab "File” and select “ Save“.
So you get the files start.bat, double clicking on which starts Wi-Fi distribution. With file stop.txt you need to do the same steps to create a batch file stop.bat. For it, enter the combination “ netsh wlan stop hostednetwork“. When you run this file, the network will stop.
The laptop does not distribute Wi-Fi, devices cannot be connected, or distribution does not start?
Often, users who have completed all the steps described above still do not have an Internet connection and distribution still does not start. Let's look at several troubleshooting methods and also deal with them.
- If distribution is not carried out or the device does not connect to the network, you can try rebooting the device. Sometimes this solves the problem. Also, commands must be run as an administrator; this point is very important.
- If there is problem with network creation using the first command in the instructions, it is worth checking the Wi-Fi status, which should be turned on. If it is impossible to turn on Wi-Fi, then most likely the adapter drivers are not installed on the laptop. And after installing the driver, try creating the network again.
- If Internet distribution does not start if the network driver is installed, you need to update it. To do this, it is recommended to download it from the official website.
- Sometimes the problem can be fixed by rolling back the driver to a different version. To do this you need to enter “ device Manager"Windows 10 (login via " Start"), then select " Network adapters", by clicking on the desired device, select the " tab Properties", then " Driver" And " Rollback“.
- The network has started, but devices are not connected. In such a situation, you should disable your antivirus program and programs that block the connection.
You also need to check that the password was entered correctly or try to restart the network by entering a new password. - A common problem is that Internet distribution is configured, but traffic is not transmitted. In such a situation, you need to find out whether there is Internet on the PC from which you plan to distribute the Internet. If the Internet is active, then you need to proceed to the next step - this is checking the sharing settings that the user should have made when starting the network. You can also turn off your antivirus or firewall, because they can block access.
- If after starting Wi-Fi distribution, another connection is created in the network settings, then in this case you need to click on it and select “ Intelligence" You need to check the address in the window IPv4. By default, “ Automatic Network Settings“. It is also common for users to allow network broadcasting for another connection.
- Access must be enabled for the connection you are using. For example, a user is connected to one network, but needs to start distribution from another, then in the “ Access” (Ethernet connection properties) you need to provide access to the desired one.
Error with the title "The hosted network could not start... are not in the required state..."
It often happens that on Windows 10, when starting a virtual network, a window appears with the inscription “ The hosted network failed to start. The group or resource is not located...operations" or " The Wireless Network AutoConfig (wlansvc) service is not running. Failed to start hosted network”
Smartphones can not only receive a high-speed connection, but also distribute a signal. Considering that mobile Internet services are now inexpensive, this is a good option to use it on a laptop or other equipment through a mobile device.
Modern mobile Internet is no worse than a home network
Depending on the operating system, there are different ways to turn your smartphone into a hotspot. Let's look at how to do this on models running Android, iOS, Windows, and find out what application is needed for Nokia brand equipment.
Not all Android-based equipment can distribute the Internet, so make sure that your phone has GSM/3G and, of course, a Wi-Fi module. Turning such a device into a modem that will distribute the connection is quite simple.
This is done in the following way:
- Go to the settings menu, select the “Wireless Networks” section.
- Open the “More…” tab and click on the “Modem mode” line.
- Select the “Access Point” section and open the settings for this parameter in the window that appears.
- A window will appear to create a new connection, where you enter a name for the network under which it will be displayed in the list, set a password and indicate its encryption type.
- Save your changes and return to the Access Point menu to activate this method of operation.

Now you can use your phone as a router, to which you can connect from various equipment. Subsequently, you do not need to reconfigure the settings; you just need to enable the “Access Point” line.
You can also track who is using your Wi-Fi - the list will appear in the “Modem Mode” window. Additionally, the Android platform provides a speed limiting function, which is activated as follows:
- Open the Bandwidth Usage window.
- Enable the bandwidth throttling line.
Applications
There are special programs with which a smartphone turns into an access point, for example, FoxFi or Wi-Fi Tethering. There is also a Tethering Widget utility that works as a widget. What are they needed for? If you often use a mobile device to distribute a signal, it is not very convenient to activate this method of operation every time through the settings, but the presence of a special icon in the menu greatly simplifies the process.

Modem mode on the iOS platform
To share an Internet connection on a device running iOS, do the following:
- In the settings, go to the “Cellular” section.
- Turn on the “Modem mode” line.
- Enter the required connection information and create a password.
- In the future, the Wi-Fi point will be displayed on other equipment under the name iPhone.
Creating a hotspot on Windows Phone
On equipment running Windows 8, you can configure connection distribution as follows:
- In the smartphone settings, open the “Internet Sharing” section.
- Turn on sharing mode, after which, if necessary, you can change the network parameters - its name or password.

This is all! As you can see, enabling modem mode in this operating system is very simple and easy. It is worth clarifying that the maximum amount of equipment that can simultaneously connect to the phone is no more than 8 units.
JoikuSPot app for Nokia phones
To create an access point on models from this manufacturer, you will need the JoikuSPot program, which is available in free and paid versions. Download it and do the following:
- Launch the application and confirm the request to allow external devices to connect to the Internet.
- In the list that appears, select an access point, wait until the program creates a connection called JoikuSPot based on it.

- After turning on the network, in the main menu of the application you will be shown its name, the “Stop” button if you want to stop the connection, and the “Buy full version...” option when using the free version.
- The second tab of the menu shows information about the connected equipment, the third - general data about the operation of the program.
Note!
- When using the utility, the smartphone consumes a large amount of energy, which means the battery drains faster.
- The more equipment connected to the network at the same time, the lower the Internet speed.

As you can see, setting up your phone to work in modem mode is quite simple, no matter what operating system is installed on it. The ability to use mobile Internet on other equipment via Wi-Fi is practical and useful to every user, especially if there are no other ways to connect to the network.
Experienced Windows 7 users know that the WiFi adapter found in every laptop can not only pick up wireless network signals, but also serve as an access point for connecting other devices. Moreover, it is capable of doing this at the same time: as if the laptop had two instead of one wireless adapter. What is seemingly special about this? But according to the WiFi concept, the network card is not capable of operating in two modes at once.
To get around this hardware limitation, developers used virtualization technology, which allows you to create several virtual ones based on one physical device. And each virtual adapter can connect to different networks and be configured differently.
At Microsoft, WiFi virtualization technology is called “Virtual WiFi.” It was introduced into Windows client operating systems only with the release of Windows 7. In earlier versions, you had to use third-party software to create an access point.
Why create an access point on your computer?
Today, many devices support wireless communication technologies. By creating a virtual access point, you can connect your laptop to a printer, TV, computers, mobile gadgets, etc. without cables, combining all these devices into a personal or home network.
In addition to unification, a virtual access point can distribute the Internet to all devices connected to it. To do this, you need to connect your laptop to the World Wide Web in any convenient way (using a 3G modem, cable, WiFi or WiMax) and in the connection settings give permission to other devices to use it. Let's look at how this is done below.
Also, an access point on a laptop can work as an amplifier (repeater) of a WiFi signal when its source is far away.
Creating an access point on a laptop with Windows 7
As was said, to create an access point on Windows 7, the capabilities of the operating system itself are sufficient. We will use the Network Settings Configuration Utility for this. Netsh.
Prerequisites for starting a virtual network
- Turn on WiFi technology by pressing a special button on the laptop body or the Fn+ key combination. Different laptop models have their own WiFi activation key. You can identify it by a miniature image of the antenna.
- Installing a wireless adapter driver on a laptop. The driver can be downloaded from the laptop manufacturer's website or found on the disk that came with your computer when you purchased it. After installing the driver, you need to restart the laptop.

- In order for a virtual access point to distribute the Internet to other devices, any edition of Windows 7, except the initial one, must be installed on the laptop.
Procedure for creating Virtual WiFi
When starting the access point once, you can use the command line (utility netsh does not have a graphical interface), but if you need it constantly, this method will be inconvenient. For such a case, you can create a batch file, save it in a convenient place and run it as needed. For the point to work, both the console and the batch file must be launched as an administrator. So…
Let's open a command line and enter the first command into it: netsh wlan set hostednetwork mode=allow ssid=»moya_virtualnaya_set» key=»moy_parol» keyUsage=persistent

Parameter SSID is the name of the access point to be created, and key- passphrase. The rest should be left as default.
Once executed, Windows will launch the virtual network adapter, which will appear in Device Manager:


To enter this folder on Windows 7, open the “Network Center...” in the control panel, and then in the navigation area on the left side of the window, click “Change adapter settings.”

If successful, Windows will report to you that the hosted network is running. The hosted network is our virtual access point.
Now in the laptop's network connections window the new wireless connection will be active:

But, as we see, he does not yet have access to the Internet:

We’ll look at how to make it appear below, but for now, to further use this virtual adapter, we need to copy the commands into a text file and save it with the extension . bat.
As already mentioned, you must run the file as an administrator.
How to distribute the Internet via a virtual access point
It's time to turn the access point created on your laptop into an Internet gateway - a device that transmits traffic from the local network to the global network and vice versa.
The following steps assume that your laptop is already connected to the Internet. To avoid having to adjust the resolution every time, it is advisable that this connection be permanent.
- Enter the network connections folder, right-click on the Internet connection and open its properties.

- Expand the “Access” tab and check the box next to “Allow other users to use this computer’s Internet connection.” From the list of networks, select the one that was previously created. In our example, this is “Wireless Network Connection 4”.

- Save the setting. After reconnecting, Internet distribution will begin to all devices connected to the access point.
Connecting other network devices to the Internet
Now let's talk about the main thing - how other devices can use a virtual access point to access the Internet. For example, you have another laptop with Windows 7 that urgently needs access to the global network. It will be much easier to configure it, because the access point is already running, which means it is visible in the list of wireless networks.
- Turn on your laptop and boot into Windows.
- Click on the “Network” icon in the system tray and view the list. Among them should be the one you recently created.
- Click on it and click "Connect".

- In the next window, enter the security key - the passphrase you set when creating the access point - and click OK.

The laptop will receive other settings such as IP addresses, DNS and default gateway automatically. But you can also specify them manually.
To change settings for this connection, open its context menu and select Status.

In the new window, click "Properties".


In the “General” window, assign an IP from the range 192.168.137.2 -192.168.137.255 to the connection, specify the default gateway, which will be the IP of the access point - 192.168.137.1 (Windows 7 assigns this address to virtual adapters by default) and DNS addresses. You can again assign the IP of the access point as the main DNS, and assign one of the public DNS or the DNS of your provider as an alternative.

Now your laptop will always connect to the access point with the same IP address.
At this point, the wireless network setup can be considered complete. As you can see, nothing complicated.
We remind you that attempts to repeat the author’s actions may lead to loss of warranty on the equipment and even to its failure. The material is provided for informational purposes only. If you are going to reproduce the steps described below, we strongly advise you to carefully read the article to the end at least once. The editors of 3DNews do not bear any responsibility for any possible consequences.
In the case of Windows 7 and Windows Server 2008 R2, this is just one of many innovations that went virtually unnoticed, although materials on this topic are extremely easy to find on the Internet. Strictly speaking, the Wi-Fi specification implies that the network operates in two main modes - either point-to-point (ad-hoc mode), when all clients connect to each other, or in access point mode (infrastructure mode), when data is exchanged between two hosts goes through a third party. It is theoretically impossible for one physical adapter to operate simultaneously in these two modes.
In practice, Microsoft decided to turn its attention to the now fashionable virtualization technologies and created a layer that abstracts the wireless adapter. In fact, we can have several Wi-Fi modules in the system, each with its own settings, which in reality use the resources of only one physical device. This subsystem is called Virtual Wi-Fi. Intel has a similar development - Intel MyFi (My Wi-Fi). We will not go into the technical details of the implementation of each of the technologies - it is important for us that we can make the adapter work in Software Access Point (SoftAP) mode.
So, why might you need SoftAP? Firstly, to quickly organize a local wireless network, to which you can connect another computer, smartphone, and so on. Secondly, we can distribute the Internet from the main machine inside our small network. In this case, clients will be behind NAT. It doesn’t matter how we gain access to the Network on a machine with SoftAP - via Ethernet, WiMax, 3G, Dial-Up (anything can happen) or something else. It is noteworthy that a computer can be connected to any wireless network and at the same time be an access point.
Thus, it is easy to create a repeater by placing a laptop at the receiving edge of the main wireless network and setting the same SoftAP parameters as the parent access point. Thus, we will expand the range of the network, and all clients, if necessary, will automatically reconnect to the repeater and vice versa. Another possibility is to easily route wireless client traffic to any available network interface, for example, to a VPN tunnel. There are other possibilities for using a software access point that go beyond the moral boundaries of our columns.

To implement SoftAP, we need a Wi-Fi adapter whose drivers support operation in this mode. In principle, almost all modern wireless modules, built-in or external, have this capability. Moreover, support for Virtual Wi-Fi is one of the prerequisites for the adapter to be included in the list of certified compatible devices for Windows 7. Take the time to find out this point before starting setup and update the drivers from the official website of the Wi-Fi module manufacturer, just in case. However, in most cases, the driver that “arrived” along with system updates will work as it should. Unfortunately (not very big, really), now we can create only one virtual access point with mandatory WPA2-PSK/AES encryption.

In order to create an access point, just launch the console (command line) as an administrator and run one single command:
netsh wlan set hostednetwork mode=allow ssid="SoftAP Tst" key="Yourpassword" keyUsage=persistent
Naturally, in the ssid parameter you need to specify the name of the access point, and in the key you need to set the password to access the network. In the future, you can change the AP parameters in the same way. After executing the command, the OS will install the required driver and the Virtual Wi-Fi we need will appear in the list of wireless adapters. To remove an adapter, you need to specify mode=disallow in the command and omit all other parameters.

Now you can launch the point with the command:
netsh wlan start hostednetwork
To stop working in a logical way, change the start parameter to stop in the command.
It is highly not recommended when operating inSoftAP disable physical adapterWi-Fi, for example, pull him outUSB port - this can lead to an emergency shutdown of the OS!!!

To view the current parameters of a virtual access point, you can use the commands:
netsh wlan show settings
netsh wlan show hostednetwork setting=security
When SoftAP starts, the built-in DHCP server will automatically start. To “share” the Internet connection for users of the newly created wireless network, you need to go to the “Sharing” tab in the properties of the network interface that has access to the Network. There you need to enable network sharing permission and select our virtual adapter in SoftAP mode.

To simplify working with a software access point, we can recommend two programs: VirtualRouter and Connectify. The first is absolutely free, but a little outdated and does not always work out of the box, and the second asks you to pay money for access to some functions. However, it's worth it. The functionality of the utility far exceeds the built-in capabilities of the OS for working with a virtual access point. It has an UpnP server, allows you to choose a different type of encryption, has more convenient management of wireless clients, and much, much more. In general, a real little software monster for organizing a hotspot. If you really need this kind of advanced functionality, then $30 a year doesn't seem like a lot of money. A software access point can also be created in Linux or Mac OS X. True, in the first case you will have to tinker with the settings, and there will be fewer options than in Windows 7. In the second case, in the best traditions of Apple's OS, everything is done in a simple way. In addition, with the advent of AirDrop and AirPlay, the exchange of information between i-devices has become much easier. With this, as they say on these Internets of yours, we will consider the topic solved. Good luck!

In our age of digital and modern technologies, it is impossible for the average city resident to imagine life without the Internet. One of her sons can be called WiFi. And the question naturally arises: how is it still necessary to distribute WiFi from a laptop if there is no possibility (or desire) to connect a router. Let's look at this in more detail.

Before distributing WiFi from a laptop
Before you start setting up WiFi distribution via a laptop, you need to make sure that your device is equipped with a built-in device for Internet distribution: a WiFi adapter or USB or PCL type. Their availability can be viewed in the Control Panel in the Network and Internet tab. If you find the Wireless Network item in Network Connections, then you can safely start organizing WiFi distribution.
WiFi is a trademark of the Wi-Fi Alliance. Provides connectivity via the standard IEEE 802.11 protocol. In general, it is a wireless network that can be used by all devices that support a similar transmission standard.
Programs for creating a virtual WiFi distribution point
The first step is to create a virtual access point. It will be your laptop. To make a WiFi point from it, you can download it from the official websites.
mHotspot
One such program is called mHotspot. This software does not require installation. After it is downloaded, you need to launch mHotspot. The necessary program settings will be indicated there. For example, a field called Mhotspot name enters the name of the future network. This is what will be visible in the list of points available for connection.
You can download the program from the official mHotspot website.
Window for working with the mHotspot program
The next field is called Password. This is the password. It must be at least eight characters. It is important to enter it in order to secure the network from access to it by unauthorized people.
A field called Max Clients controls the number of gadgets that can be connected to the network at the same time. Their maximum number is ten. If one is indicated in this field, then no one except your computer will be able to connect to it. Click Start Mhotspot and proceed to creating an access point.
Video: how to use mHotspot
MyPublicWiFi
This is another program that can be downloaded on the Internet - MyPublicWiFi. By following the link to the downloader’s official website, you can download the software to your laptop. The program does not require installation and works immediately after downloading.
MyPublicWifi working window
The MyPublicWifi program allows you to make a Wifi access point from your computer. Operating instructions:
- Download MyPublicWifi (preferably version 5.1).
- Install the program.
- Reboot your laptop.
- Launch MyPublicWifi (or run the MyPublicWifi program as an administrator, if it gives an error during normal startup).
- Specify the Automatic HotSpot configuration item.
- select the name of the network to be created in the Network Name (SSID) field.
- Specify the password in Network Key.
- Select (check) Enable Internet Sharing.
- In the list, select connecting your laptop to the Internet network.
- Click the Set up and Start Hotspot button.
MyPublicWifi works great and does not require much effort to connect
Creating an access point: three best ways
Distribution via existing Internet connection
Windows 7 and 8 operating systems can distribute Wi-Fi via an existing Internet connection.
In order to make an Internet distribution, you must follow these points:
- Start.
- Control Panel.
- Network and Internet.
- Network and Sharing Center.
- Change adapter settings.
- Wireless Network Connection 2. Rename it as desired. As you wish.
- We find our own active connection. Basically it is called local area connection. May also be called Virtual WiFi.
- In the properties of the active connection, find the “access” tab and click on it. In this tab, check the boxes, that is, we agree with all the points. Namely:
- allow other users to use this network;
- Allow other users to manage connections to the selected network.
- Select your active connection from the list. That is: local network connection (or whatever name you renamed the connection to).
- Click the "OK" button and restart the computer.
If you want your smartphone, tablet or laptop to be able to use this access point, you only need to run the Wi-Fi distribution program. And on the devices that will be connected, you must enter network access passwords.
A way to set up WiFi distribution using the command line
The above methods do not work well if you need to distribute WiFi from a computer on which Windows 10 is installed.
What does the command line look like on a laptop screen?
Steps to distribute wireless networks using the command line:
- Check the possibility of distribution. You need to run a command prompt as an administrator and enter the command netsh wlan show drivers.
- Read the item “Support for a hosted network” (if the settings are in English, it will say Hosted Network). The word “yes” should be indicated there.
- Write the following item on the command line: netsh wlan set hostednetwork mode=allow ssid=remontka key=secretpassword. At the same time, the command contains such instructions as “remontka” - this is the name of the wireless network (you can write your own, spaces are not used). Secretpassword is the secret password for WiFi. You choose it yourself.
- After all the data has been entered, enter the command: netsh wlan start hostednetwork.
- Right-click on the Start menu on the desktop and select “Network Connections.”
- In this list, select the Internet connection that is currently in use. Right-click to open the “Access” tab. Allow access to other users.
Configuring network capabilities via the command line
Eventually, a notification will appear on the screen that the wireless network is running. If no errors or failures occur, then you can connect phones, tablets and laptops to this network. They will now have access to the Internet.
Access point with Windows 7: computer-to-computer network
Launch Command Prompt as Administrator and run the command netsh wlan show drivers.
Turning a laptop (PC) into a Wi-Fi access point
An important point to understand. Launching a virtual Wi-Fi network on Windows 7, Windows 8 (8.1) and Windows 10 is practically no different. The operating principle is the same. The launch commands are the same. Even though I will provide links below in the article for starting a network on different versions of Windows, it is important to understand that the principle of operation, and even the solution to the most popular problems, are the same everywhere.
There are several ways in which you can start an access point:
- The standard, and in my opinion the most reliable way, is to launch a virtual access point using special commands via the command line. In Windows 7, 8, 10, these commands will be the same. Below I will write in more detail about this method and provide links to detailed instructions. This method may seem complicated to you, but it is not.
- The second way is to launch hotspots using special third-party programs. If you want more information, then in the article I talked in detail about these programs (Virtual Router, Switch Virtual Router, Maryfi, Connectify 2016), and showed how to work with them. If you decide to launch a network this way, then follow the link I gave above, everything is described and shown there in great detail.
- The third method is only suitable for Windows 10 with the update installed (version 1607). There, a “Mobile hotspot” tab has already appeared in the settings, with which you can launch the access point from a laptop.
Universal method: launching an access point via the command line
I advise you to immediately go to the page with the one that suits you best.
- If you have a desktop computer with a USB Wi-FI adapter, then see the instructions.
How to create a WiFi hotspot on Windows 7
We need to create a software wifi router based on Windows 7 that will receive the Internet in some way and be able to distribute this Internet via wifi.
What do we need?
- Windows 7 Basic or higher. Windows 7 Starter (initial) will not work. More precisely, on Windows 7 Starter you will have to solve the routing issue using a third-party program (for Windows 7 Starter).
- separate note at the end of the article
- Internet connection. For this article, a GSM connection was used through the MTS operator (MTS USB modem). But it can be any connection - PPPoE, VPN, Dail-Up, Ethernet, WiFi.
The first step is to install the wifi adapter, if it is not already installed, and make sure that it is turned on and working.
After this, you need to check whether the “WLAN AutoConfiguration Service” service is running. Usually its launch mode is “Manual”, which means it can be stopped. If you plan to use the created access point constantly, then it is better to switch this service to the “Automatic” startup mode.
You also need to check that the Internet Connection Sharing (ICS) service also has an Automatic startup mode.
These checks are done through "Control Panel - Administration - Services".
After this, you need to open the Windows console (cmd.exe) with administrator rights. This can be done through the menu "Start - Programs - Accessories - Command Prompt", then right-click and "Run as administrator".
In the console, type and execute the command:
netsh wlan set hostednetwork mode=allow ssid="winap" key="123456789" keyusage=persistent.
Instead of winap And 123456789 enter your access point name and password:
Note. Important! The password must be at least 8 characters long, this is a requirement for the WPA2 security type that is used in Windows when creating an access point. It is better not to use the Cyrillic alphabet in your password. Letter case matters - A And A These are different symbols!
Next, check that the connection for the access point has been created.

Open "Start - Run - ncpa.cpl" and after opening the "Network Connections" window, in this window find the wireless connection for which the physical adapter is not specified:

Right-click, then "Properties" and look there - it should be "MicroSoft Virtual Miniport Adapter":
At the same time, you can remove unnecessary connections and protocols.

Immediately rename this connection in ncpa.cpl - for example, to “winAP”:

Next, here, in ncpa.cpl, you need to share (enable Windows ICS) the Internet connection. Select this connection, right button - “Properties”, “Access” tab. Enable ICS and specify the connection to which the Internet will be distributed - to the wifi connection of the access point ("winAP"):
Now you need to connect to the Internet. Or reconnect if the connection was established previously.
After that, type and execute the command in the console:.
That's it, the access point should already be working. Now you can connect the client to this access point (this illustration is from the client’s computer):

How to connect a wifi client to:
- Laptop (or computer) under Windows - Setting up WiFi in Windows 7.
- Laptop (or computer) running Linux - Laptop (or computer) running Ubuntu.
Client connected:

On the computer where the access point is running, you can check its status. To do this, enter the command in the console:
netsh wlan show hostednetwork

It can be seen that one client is connected.
Stopping an access point with a command netsh wlan stop hostednetwork
Complete destruction of the access point by command netsh wlan set hostednetwork mode=disallow
If you want the access point to turn on automatically when Windows boots, then the start command needs to be added to autorun. It's about the team netsh wlan start hostednetwork. The command can be written into a cmd script; you must specify “Run as Administrator” in the properties of this script. Then include the script in autorun.
It is necessary that the connection to the Internet is also established when Windows starts. Otherwise, you will have an access point, but there will be no Internet through it.
Of course this is a very simple access point. But everything is at hand. No third party programs needed. Just Windows 7. And everything can be configured in a couple of minutes. Yes, there are programs like Connectify and Virtual Router.
However, you need to understand that they only do the work that is done by two commands in the Windows console.
These are just add-ons to the functionality of Windows 7. It’s easier to write two commands in the console than to download and install some gadgets.
It’s another matter if you need an access point once a month, for a day or for a couple of days. Or on a business trip. Or on vacation. This is where Windows helps us out. You can quickly distribute the Internet via WiFi from a laptop to a tablet, smartphone or other laptops.
But if there is a need to make a permanent access point on a computer, then it is better to do it under Linux. This is how this is actually implemented in WiFi routers.
For example, as in this article - Access point on Ubuntu.
Hotspot on Windows 7 does not work There is no need to swear at Microsoft, at Windows - in general, look for the guilty on the side. The problem in such cases
- Always
- on your own computer (or laptop). It could be:
- Drivers for the WiFi adapter on which you are creating an access point.
- The WiFi adapter itself.
- You did something wrong.
- Any "left" services or drivers/programs that use the WiFi adapter or USB port (if your adapter is connected via USB).
You have Windows 7 Starter. One of the necessary services has stopped, for example, see the article “Windows 7 Routing and Remote Access Service Stops”. For example, during Windows startup, the WiFi adapter driver can put the adapter into standby mode. And when Windows starts the service
hostednetwork
the adapter does not wake up.
With a normal WiFi adapter and if you haven’t messed up your Windows with crooked programs and drivers, everything will work fine.
In general, always look for the source of the problem on your computer.
WiFi network protection Access point on Windows 7 Starter (initial).
Microsoft did something weird with it. ICS is blocked on it, but you can create an access point as such. Paradox. Why do you need a hostednetwork mechanism if there is no routing? Be that as it may, you can make a wifi access point on Windows 7 Starter. You just need to find a program with which to perform routing between the Internet and winAP interfaces. There are many options here, for example you can use a proxy server, like
3proxy
Ivan Sukhov, 2013, 2014
How to create a WiFi hotspot on Windows 7
We need to create a software wifi router based on Windows 7 that will receive the Internet in some way and be able to distribute this Internet via wifi.
What do we need?
- Windows 7 Basic or higher. Windows 7 Starter (initial) will not work. More precisely, on Windows 7 Starter you will have to solve the routing issue using a third-party program (for Windows 7 Starter).
- separate note at the end of the article
- Internet connection. For this article, a GSM connection was used through the MTS operator (MTS USB modem). But it can be any connection - PPPoE, VPN, Dail-Up, Ethernet, WiFi.
The first step is to install the wifi adapter, if it is not already installed, and make sure that it is turned on and working.
After this, you need to check whether the “WLAN AutoConfiguration Service” service is running. Usually its launch mode is “Manual”, which means it can be stopped. If you plan to use the created access point constantly, then it is better to switch this service to the “Automatic” startup mode.
You also need to check that the Internet Connection Sharing (ICS) service also has an Automatic startup mode.
These checks are done through "Control Panel - Administration - Services".
After this, you need to open the Windows console (cmd.exe) with administrator rights. This can be done through the menu "Start - Programs - Accessories - Command Prompt", then right-click and "Run as administrator".
In the console, type and execute the command:
netsh wlan set hostednetwork mode=allow ssid="winap" key="123456789" keyusage=persistent.
Instead of winap And 123456789 enter your access point name and password:
Note. Important! The password must be at least 8 characters long, this is a requirement for the WPA2 security type that is used in Windows when creating an access point. It is better not to use the Cyrillic alphabet in your password. Letter case matters - A And A These are different symbols!
Next, check that the connection for the access point has been created.

Open "Start - Run - ncpa.cpl" and after opening the "Network Connections" window, in this window find the wireless connection for which the physical adapter is not specified:

Right-click, then "Properties" and look there - it should be "MicroSoft Virtual Miniport Adapter":
At the same time, you can remove unnecessary connections and protocols.

Immediately rename this connection in ncpa.cpl - for example, to “winAP”:

Next, here, in ncpa.cpl, you need to share (enable Windows ICS) the Internet connection. Select this connection, right button - “Properties”, “Access” tab. Enable ICS and specify the connection to which the Internet will be distributed - to the wifi connection of the access point ("winAP"):
Now you need to connect to the Internet. Or reconnect if the connection was established previously.
After that, type and execute the command in the console:.
That's it, the access point should already be working. Now you can connect the client to this access point (this illustration is from the client’s computer):

How to connect a wifi client to:
- Laptop (or computer) under Windows - Setting up WiFi in Windows 7.
- Laptop (or computer) running Linux - Laptop (or computer) running Ubuntu.
Client connected:

On the computer where the access point is running, you can check its status. To do this, enter the command in the console:
netsh wlan show hostednetwork

It can be seen that one client is connected.
Stopping an access point with a command netsh wlan stop hostednetwork
Complete destruction of the access point by command netsh wlan set hostednetwork mode=disallow
If you want the access point to turn on automatically when Windows boots, then the start command needs to be added to autorun. It's about the team netsh wlan start hostednetwork. The command can be written into a cmd script; you must specify “Run as Administrator” in the properties of this script. Then include the script in autorun.
It is necessary that the connection to the Internet is also established when Windows starts. Otherwise, you will have an access point, but there will be no Internet through it.
Of course this is a very simple access point. But everything is at hand. No third party programs needed. Just Windows 7. And everything can be configured in a couple of minutes. Yes, there are programs like Connectify and Virtual Router.
However, you need to understand that they only do the work that is done by two commands in the Windows console.
These are just add-ons to the functionality of Windows 7. It’s easier to write two commands in the console than to download and install some gadgets.
It’s another matter if you need an access point once a month, for a day or for a couple of days. Or on a business trip. Or on vacation. This is where Windows helps us out. You can quickly distribute the Internet via WiFi from a laptop to a tablet, smartphone or other laptops.
But if there is a need to make a permanent access point on a computer, then it is better to do it under Linux. This is how this is actually implemented in WiFi routers.
For example, as in this article - Access point on Ubuntu.
Hotspot on Windows 7 does not work There is no need to swear at Microsoft, at Windows - in general, look for the guilty on the side. The problem in such cases
- Always
- on your own computer (or laptop). It could be:
- Drivers for the WiFi adapter on which you are creating an access point.
- The WiFi adapter itself.
- You did something wrong.
- Any "left" services or drivers/programs that use the WiFi adapter or USB port (if your adapter is connected via USB).
You have Windows 7 Starter. One of the necessary services has stopped, for example, see the article “Windows 7 Routing and Remote Access Service Stops”. For example, during Windows startup, the WiFi adapter driver can put the adapter into standby mode. And when Windows starts the service
hostednetwork
the adapter does not wake up.
With a normal WiFi adapter and if you haven’t messed up your Windows with crooked programs and drivers, everything will work fine.
In general, always look for the source of the problem on your computer.
WiFi network protection Access point on Windows 7 Starter (initial).
Microsoft did something weird with it. ICS is blocked on it, but you can create an access point as such. Paradox. Why do you need a hostednetwork mechanism if there is no routing? Be that as it may, you can make a wifi access point on Windows 7 Starter. You just need to find a program with which to perform routing between the Internet and winAP interfaces. There are many options here, for example you can use a proxy server, like


