How to check RAM for bad sectors. RAM diagnostics
It will probably not be a discovery of the century for any user that most error messages that appear when working with Windows 7 arise due to all sorts of problems with the computer’s RAM. At the same time, detecting them is not as difficult as it seems at first glance, even without resorting to the help of third-party programs. The point, in fact, is that Windows 7 itself already has a built-in utility for checking RAM, which in terms of efficiency is not much inferior to similar analogue programs. Want to check it out? Then let's get to work!
Option #1: Microsoft System Method
It is worth noting that testing RAM using Windows 7 itself can be done differently depending on whether the computer is in working condition or not. In particular, to routinely check the performance of RAM on a PC, you can use this method:

In addition, it is possible to check the operation of the RAM when starting Windows 7. In this case, when starting the computer, you will first need to press F8 to get to the menu of additional boot options, and then alternately select Esc on the keyboard (to access the Windows boot manager), Tab ( to select a memory test tool) and finally Enter (to start diagnostics): 
At the same time, you can also perform a RAM test using a disk with the Windows 7 distribution kit. In this case, after launching it on the computer in Windows installation mode, we only need to open and select the memory diagnostic program from among them. The whole process looks something like this: 
In any case, regardless of the chosen method, after starting the RAM system diagnostics, a blue window will appear in which the entire progress of the test will be displayed:

However, you need to take into account that by default in Windows 7 the usual set of several standard RAM tests is selected. It provides, of course, a fairly time-efficient, but average-in-effectiveness check: 
In this case, for a more thorough analysis of RAM after running the utility, it is preferable to reconfigure the test scheme, choosing a wide set instead of the usual one. How to do it? Simply press F1 and then Tab to select the appropriate option and F10 to save the setting. Similarly, you need to disable cache checking and increase the number of passes to at least 20 in order to increase the efficiency of passing the test.
One way or another, after completing the RAM analysis, the testing tool built into Windows will notify you of all errors found in a report or in a system message after restarting the PC (depending on the selected diagnostic method).
Option No. 2: RAM test programs
At the same time, the RAM on a computer with Windows 7 can be checked for errors using special RAM tester programs. They are presented quite widely today, but among them all free software tools such as SuperRam, MemTest86 and SiSoftware Sandra deserve special attention.
The easiest to use among them, undoubtedly, is the Russian-language SuperRam utility. At the same time, in terms of the effectiveness of RAM tests, it is not much different from the well-known software “monster” MemTest86. This utility, in particular, allows you not only to test RAM on your computer in different modes, but also automatically increases the productivity of its use. In addition, the program is compatible with absolutely all RAM modules and versions of Windows, which turns it into a truly indispensable tester for PCs. 
Meanwhile, at the first signs of the impending death of RAM, appearing along with the blue screen of death, the MemTest86 program can bring the computer back to life. Its peculiarity is that, unlike many other similar utilities, it is launched in a “pure” form using its own bootloader, which provides it with a more thorough test of the operating memory for bugs. 
True, MemTest86 also has two small drawbacks. Firstly, in order to check RAM with its help, you will first have to pore over writing a resuscitation flash drive with an iso image of the utility; and, secondly, the analysis process using this testing software tool usually takes quite a lot of time - from 1 hour or more, as practice shows. 
As for SiSoftware Sandra, this program can hardly be called a full-fledged RAM tester, given that it has both a general Windows stability test and separate modules for analyzing the state of the motherboard, CPU, video card and other equipment connected to the PC. Meanwhile, its efficiency indicators are quite good, which, however, sets it apart from a dozen other analogue programs.
If you begin to notice unstable operation of the system, the reason may be the presence of errors in the performance of the RAM. And to make sure that the problem is with the RAM, I suggest you use the following methods: using a hidden tool, included with Windows or third-party, but more advanced and informative program, which will be discussed later in this article.
The operating algorithm of both tools is the same: first, data is written to each sector of RAM in repetitions, i.e. again and again. Then the program reads and verifies the received data, and if even one discrepancy is found, we can assume that the RAM is faulty. How can I fix it?
Method 1: Run Memory Diagnostics on Windows 7, 8, 10
To run Windows' built-in memory checker, start typing "diagnostics" in the search bar and select "diagnose computer memory problems."
After this, to run the test you need to accept the offer and restart your computer:

After rebooting, the Windows memory test screen will open and testing will begin. You don't need to do anything at this point, just wait for the scan to finish, which will take a few minutes. If any errors are found during the process, point "state" this will be written about.
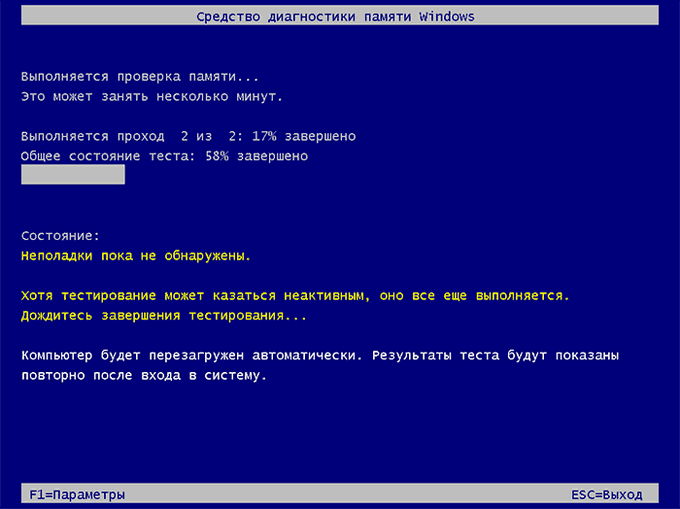
Once completed, the computer will automatically restart and show the scan results.
But! In some cases, particularly in Windows 10, the result may appear after some time or may not appear at all.
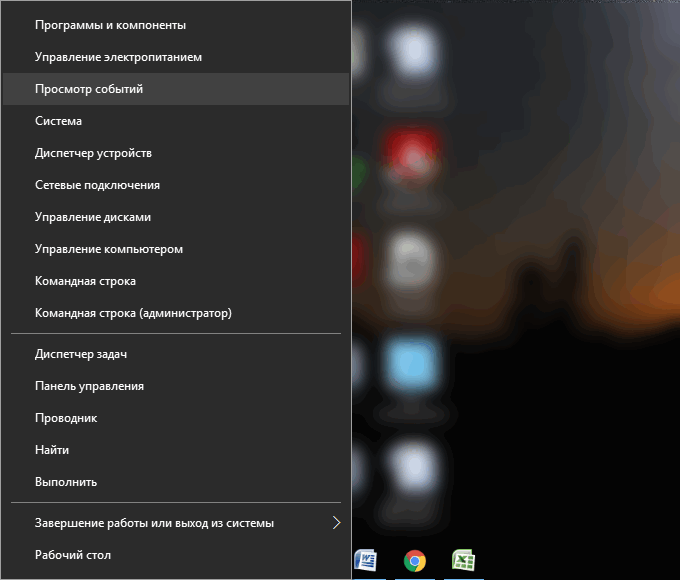
If you have such a situation, you need to search for the result manually. To do this, right-click on the Start menu and select. If you have Windows 7, press the combination Win+R, in the dialog box that appears, enter eventvwr.msc and press Enter.
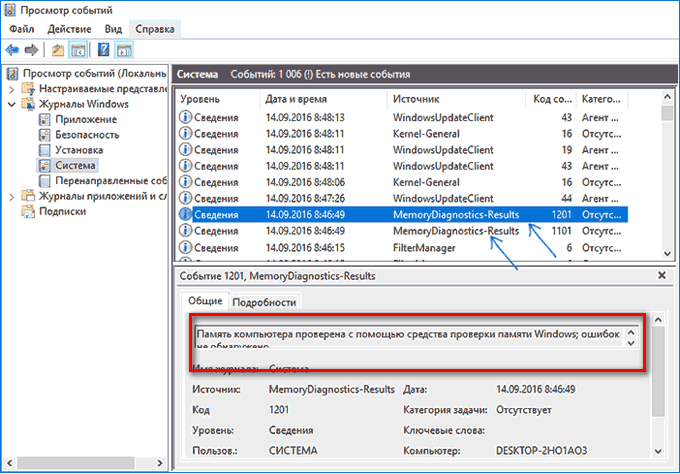
A window will open where you need to select Windows Logs > System and you will see a list of a large number of events. Click Find in the right pane.

Enter “MemoryDiagnostic” in the field, click Find Next and you will see details of the results.
Method 2: MemTest86 program
If you want a more powerful memory test tool, you can download and use MemTest86. The utility can perform a wide range of different tests, unlike the previous tool. For your purposes, the free version of MemTest86+ should be sufficient (the free version has a plus sign at the end of the name, but the paid version does not). However, the program is not actively developed and it is reported that it does not work properly on some newer computers.
Both versions are standalone and downloadable. You can download the ISO image from the official website (I recommend) and burn it to a CD/DVD disc, or you can copy the USB image to a flash drive. To do this, just run .exe file(find what you downloaded among the files) and connect a blank flash drive to your computer. Otherwise, all content will be deleted.
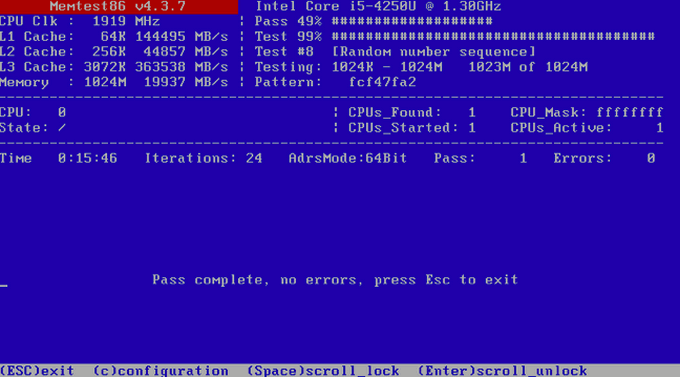
After you make bootable media, restart your computer and boot from the flash drive (after connecting it to the computer). After which, the program will automatically start and begin the scanning process one after another, informing you about errors if there are any. The process will continue until you decide to stop it, allowing you to test how the RAM behaves over a longer period of time. Details of any errors will be displayed on the screen. If you want to end the test, just press the key ESC.
If the tests reveal errors, then the RAM is faulty and needs to be replaced. It is also quite possible that it is not compatible with the motherboard. Try removing the RAM sticks, cleaning the slots and contacts of the RAM itself (alternatively, try installing RAM in other slots), or it’s best to buy a new one, especially if you have a problem with insufficient memory, and besides, their price is not high today.
It is worth noting that these tips also apply to the so-called “parity error” of RAM, which makes 2 short sounds when the computer is turned on.
After making changes, run the scan again to make sure the problem does not recur.
As sad as it may sound, strips of RAM, called RAM, or, in English, RAM, can cause a huge number of problems, starting with the usual delay in loading the operating system and ending with its complete crash (especially if the most primitive conditions are not met, which you need to pay attention to). In general, a RAM test (let's take Windows 7 64 bit as an example) will have to be performed in any case when installing new modules or replacing old ones. And at the same time, it is worth taking into account several main factors that in the future may influence the identification of the causes of malfunctions or the occurrence of conflicts.
Why do you need a Windows 7 64 bit RAM test?
First of all, you need to clearly understand that not every RAM module can fit into the motherboard slot and work without problems. The motherboard itself may simply not support the installation of certain types of brackets or even similar equipment from unknown manufacturers (although it may meet all the stated criteria).
The question is different: most users try to perform a RAM test only when too obvious problems are detected in the computer. And when checking equipment, most of us do not pay any attention to parameters such as operating clock frequency, timing, operating voltage, supported bus, bandwidth (which, by the way, must be compatible with the processor), etc.
Preliminary equipment check
And when problems arise, which are most often expressed in the fact that when the operating system starts, failure messages begin to appear (most often this is a blue screen indicating an error code indicating that the failure occurred not in software, but at the physical level), everyone tries reboot the system, considering the error to be a temporary short-term phenomenon. This is wrong.

Thus, the RAM test (Windows 7 64 bit in our case) should initially be limited to checking the physical condition of the motherboard slots, the performance of the RAM strips and the consistency of the equipment characteristics with each other.
To begin with, really try just restarting your computer terminal or laptop. Sometimes (if the RAM load is too high) the system freezes precisely because of this. This means that at the moment there are too many applications and system processes running, which occupy the maximum amount of RAM, and additional virtual memory, for which the pagefile.sys file is responsible, which reserves free space on the system and logical disks, is also not enough.

Digressing a little, it is worth saying that even if there are logical partitions, a page file is created for each of them.
The simplest method of checking for blue screens on desktop PCs
Now let's turn to desktop computers, since in them, checking the performance of any strip is completely elementary. At least the proposed RAM test on Windows 7 64 bit - or any other system - will give results immediately. The idea is to first remove all RAM modules from their respective slots while the computer is turned off, and then insert them one at a time and then reboot. If the system starts in operating mode, there are no problems with memory. Otherwise, the bar itself will have to be replaced either due to a breakdown or due to a discrepancy with the parameters of the mother chip.
Are there built-in system tools?
The Windows 7 64 bit RAM test, if anyone doesn’t know, is initially turned on when the computer itself starts. In other words, when voltage is applied to the motherboard, the primary hardware detection system BIOS or its more modern version UEFI, which has a graphical interface, comes into play. That's not the point. Have you noticed that the stationary unit emits a signal from the system speaker when turned on? A short one-time signal just corresponds to the fact that all system components are in order.

If something is wrong, you should go into the settings of the primary I/O system and check the RAM parameters (in particular, this concerns the voltage supplied to the strips, the bridge used, etc. - overlockers understand what we are talking about).
How to use built-in diagnostics?
But self-diagnosis in the BIOS is far from the most ideal option for determining the full functionality of the RAM. The Windows 7 64 bit RAM error test itself can cause incorrect data to appear in reports. The problem is that both BIOS and Windows can perceive RAM completely differently.

Here you will have to use at least the built-in system tool. First, you need to call the “Start” menu and enter the line mdsched in it, after which the application that appears will offer two options for checking: without restart and at the next start. It is better to choose the second method, despite the system's recommendations. It will take a little longer to reboot, but the problems will be identified for sure.
Windows 7 64 bit RAM test: Memtest86+ program and AIDA64 application
But Windows-based systems quite often lose out to third-party software. The Mentest86+ utility is recognized as one of the most powerful programs.

Its only drawback is that it only works in DOS mode and produces access errors to RAM sectors, similar to how hard drives are scanned. The average user will understand little about this, but the error addresses can tell a lot to an advanced user.

The second utility (in Russian) performs the Windows 7 64 bit RAM test in such a way that even when launched, it displays the basic characteristics of the motherboard and RAM modules compatible with it. If you use the SPD section, you can learn a lot of interesting things about your motherboard and RAM sticks. For example, it will clearly indicate what maximum volume is supported, which manufacturer is suitable, which slots with their electrical parameters can be used, etc. In general, it is generally accepted (among users and experts) that the Windows 7 64 bit RAM test program "AIDA" produces the best (although none of the proposed utilities eliminates problems, since we are talking specifically about diagnostics). But that's not all.
Checking RAM from a USB drive
Even if there are problems with the hard drive, memory or starting the PC, the Windows 7 64 bit RAM test (errors will only be detected, but not corrected) can be performed even when booting from removable media, for example, a regular flash drive.
The most important condition is to download not only the Memttest86+ utility, but also its additional installer, but not in the form of an ISO image, but in the form of a special USB installer, from which you will need to create a bootable USB flash drive. After this, when you reboot the system, you will first have to enter the BIOS settings and set the USB device you are using as the first one when you start the computer, then boot and perform the appropriate test.
Burning and using an optical disc
If someone doesn’t like this option (for example, a person is used to using exclusively CD/DVD disks, or the settings of the primary system in terms of perceiving the first device from optical media look simpler), you can use the same Memtest86+ utility, launched exclusively in compatibility mode with Windows (and not DOS), after which, when specifying the media on which the main package and boot data will be recorded, the appropriate drive is selected in the menu.
Possible problems
Sometimes you may notice that when loading the above utility from removable media, users often note that the scan runs quite quickly at first, but at some stage it simply freezes. In principle, as the developers themselves note, this is normal. The fact is that testing is carried out on the principle of several passes. In this case, one or two are enough. If there are RAM errors, they will be detected immediately. If they are not there, if the utility freezes, the testing process can be forcibly terminated.
Conclusion
As you can see, this is exactly what the Windows 7 64 bit RAM test looks like. What program can be used? The question is quite complex, because none of the currently created utilities can eliminate errors or problems (unlike the same testing programs, error correction, or even remagnetization of the surface of hard drives). Alas, if problems are discovered, you will have to change the memory sticks, since they can cause physical damage to the hardware and provoke hardware conflicts even at the software level of the primary BIOS/UEFI systems, not to mention the main components of the Windows OS that have access to RAM The relationship is only in terms of system requirements and the maximum available volume for downloadable software modules in the form of heavy dynamic libraries, which are mandatory for serious software products in the main set.
The most reliable option for testing RAM is
We need to burn the Memtest86 utility to a DVD or flash drive that includes this program. Reading the article ““, follow the step-by-step instructions. After the bootable flash drive has been created, we boot from it, usually for this I use the “hot keys” F8, F12, F11, Esc + the key responsible for fast loading, depending on the model of the mat. boards on a computer/laptop. After loading we see the window:
Go to additional utilities and select Memtest86. If everything went well we see the following picture:
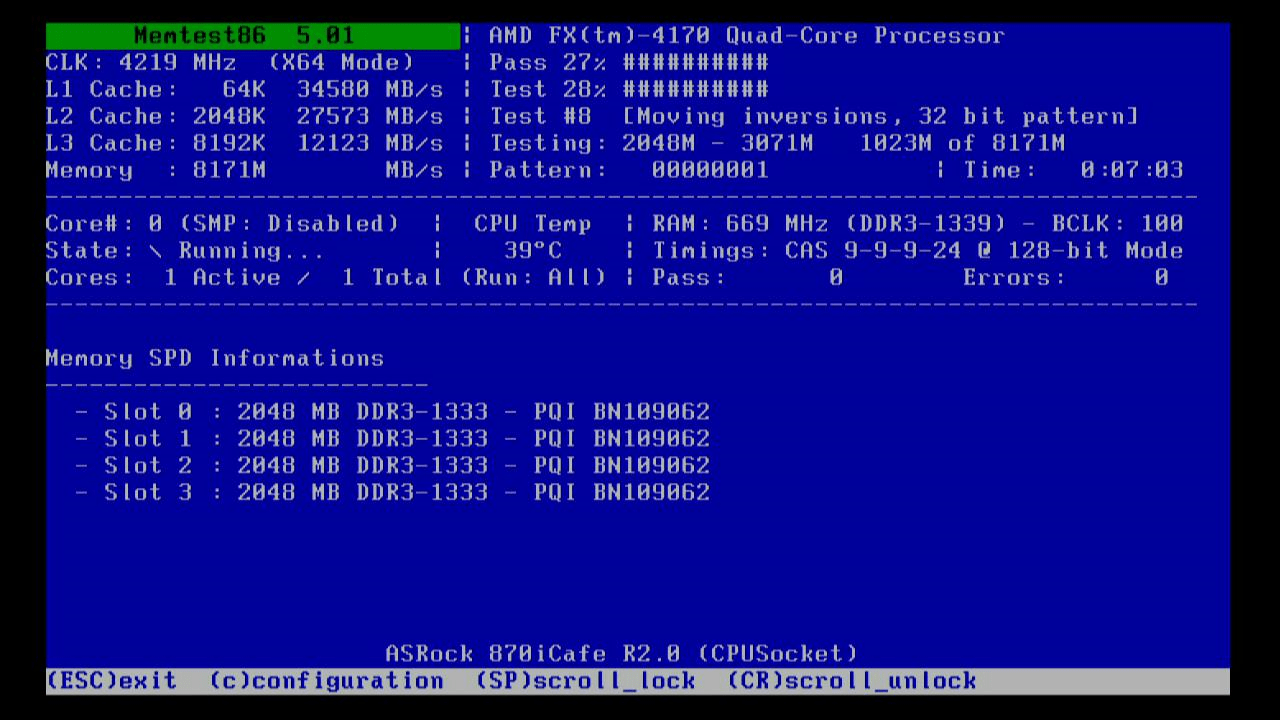
After launching the program will check your RAM is infinite until you stop it with the ESC key. You can check all memory modules at once, or one at a time. By checking all memory modules, the program will not tell you which error, so if there are errors, it is better to check one module at a time. It is better to do several cycles to check. And for maximum effect, it is better to check it at night. Field Pass means the number of cycles completed. If you have errors in memory (Error column), you will see the following:

It is impossible to correct RAM if there are errors in the program. This is not like erasing bad sectors on a hard drive. I recommend this:
The most common is the failure of the RAM module. We test one module at a time. First, we install this module in the RAM slot No. 1.

Let's test and see the result. If there are errors as shown in Fig. above (where it is highlighted in red in the Memtest program), then we place this module in slot No. 2 for RAM. Let's test and see the result. If nothing has changed, then the module is faulty and must be replaced. We change or install another memory module and test it. If the memory module is working properly, at the end of the test we see the following:

It happens that the RAM slot on the mat is faulty. board In this case, we connect the module to another free slot, then we consider the feasibility of operating the computer in this configuration with a faulty RAM slot, the feasibility of replacing the motherboard, or maybe everything will suit you, and the amount of memory will be enough for you.
The program contains 9 tests:
Test 0 - – testing to identify problems in the memory address.
Test 1 - [ Addresstest, ownaddress] – deep test to identify errors in memory addressing registration
Test 2 - [ Movinginversions, ones& zeros] – checking for subtle and hardware errors.
Test 3 - [ Movinginversions, 8 bitpat] – like the previous test, only it uses an algorithm in an 8-bit approach from 0 to 1. 20 different methods are tested.
Test 4 -– Identifying errors related to data sensitive. There are 60 different methods in this test.
Test 5 - – Finding problems in RAM circuits.
Test 6 - – The longest test to identify data sensitive errors.
Test 7 - [ Randomnumbersequence] – Checking for errors in memory recording.
Test 8 - [ Modulo 20, ones& zeros] – Detection of hidden errors in RAM using buffering and cache.
Test 9 - – The test can be started manually. He writes down addresses in memory, after which he goes to sleep for 1.5 hours. After waking up from sleep, it checks the bits in the addresses for similarity. Key C for manual start. The test requires about 3 hours of time.
Now you have seen how it is done RAM testing, how to restore its functionality yourself and check it using the instructions provided.
In contact with
Hello, dear readers, Trishkin Denis is in touch.
A computer consists of several key circuit boards and components. One of them is RAM. In case of problems with the PC, this element in most cases is not the source. However, there are still times when you need to check your RAM in Windows 7 first, and only then try other tools.
Random access memory (RAM or random access memory) is the part of a computer system that stores executable code and intermediate data currently being processed by the processor. She is volatile. This element is considered one of the key ones, and therefore the computer cannot operate without it.
If problems occur with this component, it usually manifests itself in two processes: Windows constantly restarting or the appearance of a blue screen of death.
increase
What to do?( )
First you need to find out whether the emerging instabilities are associated with this particular component or with others. This will allow you to understand what needs to be done next.
If there is a RAM problem, there are only two options:
1 Component burned out. In this option, when turned on, all coolers begin to rotate, but nothing else happens.
2 The element works partially. Failures could occur in one or more chips. Here the situation will not be so obvious. The operating system can run for some period of time, loading RAM. In this case, when running a resource-intensive program, Windows will reboot, freeze, or show the screen of death.
In the first case, everything is clear - you need to replace the component. In the second, first you need to fully test your memory for errors. This can be done using a standard system application or a special program.
Built-in solution on Windows( )
If you manage to boot the OS, then this element is not burned out. To find out the specific causes of failures, you need to run the appropriate performance test program.
For this:

In addition, you can run the diagnostic wizard the next time you start Windows. To do this, in the OS boot manager you need to click " Tab" and select " Diagnostics

increase
What to do if errors were found?( )
You need to immediately understand that it will not be possible to correct the error and return everything as it was before. If faulty components are found, you must contact the place of purchase. It's good if the device is covered by a warranty. Otherwise, the chance of replacing the damaged module is minimal.
Interesting to know! In Windows, if you identify a RAM problem, it is recommended that you contact the component manufacturer directly to obtain all the necessary information to resolve the error.
Extra options( )
If you suspect that there are some problems with the RAM memory, it is recommended to run diagnostics with standard parameters. But at the same time, you can customize the process in detail. As already mentioned, to do this you need to click “ F1».
In the window that appears, install:

To proceed to setting the next parameter, click " Tab" To return - " Esc" Having specified everything you need, click “ F10" and testing will begin.

increase
Memtest test program( )
This product is considered the best for testing RAM. It is compatible with the latest versions of Windows, starting with Vista. To identify RAM problems, this application runs eight different tests one at a time. Each of them is designed to test its own area, including the frequency of operation. For the program to function correctly, you need to make a boot disk or flash drive.
To do this, we find a program that is already offered in the *.iso image. After this, you need to write it to a disk or portable storage device by running the downloaded imageUSB program file.
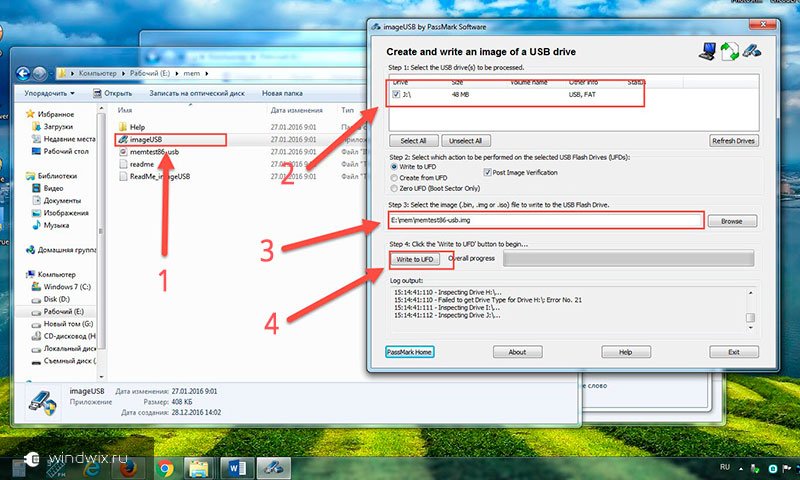
increase
Then we insert the disk or flash drive into the computer and reboot. We need to set the BIOS to boot from a flash drive or use the boot menu - for a more detailed explanation of how to do this, use. After that, we save, reboot and we are thrown into the testing window.

increase
Important! Diagnosis should be carried out only in this way. If you decide to try to check the RAM from Windows, this may lead to a premature reboot. As a result, you will not achieve the desired results.
If errors are detected, red lines appear on the monitor, indicating all the necessary information.

increase
It is also necessary to clarify that if you use several memory sticks, you need to check them one by one. Otherwise, it is simply impossible to determine which module has failed.
It must be remembered that although RAM is not considered the “heart” of the computer, it is nevertheless an important node, which is also supplied with voltage for operation. Therefore, any overvoltage in the system has a negative impact, as well as on other elements.
In case of constant use of the computer under heavy loads, many experts recommend installing an additional number of coolers on the case - as many as will fit on the rear panel. This will help cool not only the memory sticks, but also other elements.
In addition, on the technology market today you can find additional components for cooling RAM. They are:

It should be noted that in addition to problems associated with production or operation, RAM may stop working due to one more common ailment - dust. In this case, the computer sometimes does not start at all and even produces sounds, the designations of which are simply impossible to find in any user manual.
Computer builders often install RAM cards in the first slots, which are closest to the processor, when building a new machine. If you notice this in yourself, it is advisable to move them further away. To enable dual-channel mode, you can install them in slots of the same color. This should increase the speed of operation.

increase
Dust accumulates most near areas where fans are installed. Therefore, it is the first connectors that are most exposed to dust.
Personally, at some point my computer showed a blue screen of death. At that time I did not yet know what to do with him. I started from the principle " turn off/on" or " disconnect/connect" And then I reinstalled the bar further, having first cleared it and the slots from the stick. Everything worked and I didn’t get any more BSOD because of this.
Dust is, in fact, the enemy of all electronics. To clean it, you can use a brush or soft brush. It is imperative to thoroughly clean the recesses in the connectors and the contacts themselves on the board. You can also use a soft eraser for this procedure. After applying it to metal parts, you can immediately notice that they will become lighter.
Damage due to a virus( )
It is worth mentioning separately that there are some viruses whose action can lead to failure of RAM memory. Fortunately for many users, this program is not widespread on the World Wide Web, and it can be found extremely rarely. In addition, antiviruses try to look for such software not only on individual devices, but also on the Internet, cleaning it out. This only proves once again that it is better to have a security program on your PC.

increase
Another surefire method is to use only proven resources. Unfortunately, it is not always possible to realize that you have already left the borders " safe internet» in search of the information you need.
RAM, although not considered the most important component in a computer, nevertheless, not a single machine will work without it. It is a device that operates in the device longer than other components. Despite this, there are still situations when this element fails.
I hope the article helped you. Subscribe and tell your friends about me.


