How to set the screen resolution correctly. How to set a custom screen resolution
Anyone who constantly works with a computer knows that an incorrectly configured image on a laptop screen or computer monitor can cause discomfort. In this case, the eyes are the first to suffer from fatigue. And here the question quite naturally arises of how to adjust the screen resolution on Windows 7 to suit you in order to make your work more comfortable. This will be discussed further. There are several simple ways that will allow even inexperienced users to configure it.
Screen resolution: what does this parameter affect?
For some reason, most users usually associate screen resolution only with the detail of the graphic image, completely losing sight of the fact that this parameter affects some other aspects.
Yes, indeed, when the resolution increases, the picture becomes more natural, while when the value of this parameter decreases, it looks made up of squares. However, if you look at the problem of how to adjust the screen resolution on Windows 7 on a laptop or computer monitor, you will notice that in some applications even the workspace may increase, and previously hidden controls appear.
This situation can be observed in many applications. For example, in the FL Studio music sequencer, at a low resolution, the synthesizers and effects used simply do not fit on the screen (several monitors are required), and when the work area is increased, the problem disappears. The same applies to design programs like AutoCAD, when there is no possibility of installing additional monitors.
What settings should I use?
Of course, the question of how to adjust the screen resolution on Windows 7 manually, if the system has not done it automatically, is a priority, but you should not forget about parameters such as refresh rate, color rendering or image contrast. They play an important role.

What refresh rate is is not difficult to understand. It is enough to move a couple of meters away from the monitor, and horizontally changing stripes will immediately become noticeable. When viewed closely at a distance of about 30-50 cm, they are not visible, but this has a negative effect on the eyes. The same applies to the strong saturation of the color scheme, because too poisonous colors also cause discomfort. So, when talking about how to adjust the screen resolution on Windows 7 or any other operating system, you should take these parameters into account. But let's move on to the setup.
How to adjust screen resolution on Windows 7 in the simplest way?
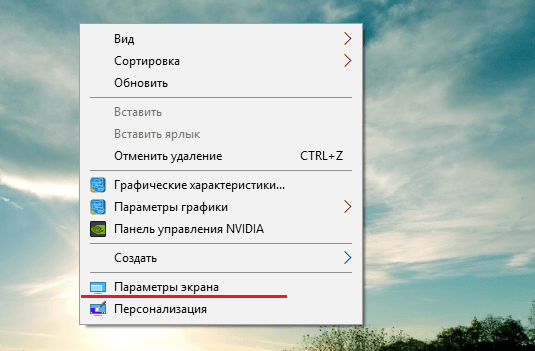
In any Windows system, such configuration is carried out using OS tools very simply. First, you need to right-click on a free area of the “Desktop” to bring up the context menu, in which there is a line at the bottom to go to the appropriate settings.

Actually, the very problem of how to set the screen resolution on Windows 7 comes down to choosing from the drop-down list of supported values exactly the one you want to set at the moment. To make settings easier, you can use a special slider by moving it up and down. When the desired value is selected, the settings should be saved with the “Apply” button, after which the screen will go dark for 1-2 seconds. Nothing wrong with that.
If the user is satisfied with the installed parameters, you can finish there. Otherwise, they should be changed. Typically, you can leave the recommended values or set a higher resolution if it is supported. Only after this the elements of the graphical interface will become smaller, and people with low vision will have to change the same size of the taskbar or icons on the “Desktop” themselves.

In the question of how to adjust the screen resolution on Windows 7, one cannot ignore the refresh rate, which, as mentioned above, also has a strong effect on vision. These settings can be found in the additional parameters section, which is called up by clicking on the hyperlink of the same name. On the "Monitor" tab there is a drop-down list in which the current value is set.
For laptops, 60 Hz is usually used, but on desktop monitors you can set both 100 and 120 Hz, if such values are supported. In general, the higher the set value, the less eye fatigue.
How to adjust screen resolution on Windows 7 after reinstallation?
It also happens that after reinstalling the system, the screen resolution is not automatically adjusted. There is only one reason for this - the absence or incorrect installation of a video driver.

There is no point in installing it from the “Device Manager” (if the system did not automatically detect it, it will not detect it in the future). Therefore, the installation must be done from the original driver disk, using packages like Driver Pack Solution, or simply downloading the original driver from the graphics adapter manufacturer’s website.
Control programs for Radeon and NVIDIA video cards
The question of how to adjust the screen resolution on Windows 7 for Radeon and NVIDIA accelerators is much easier to solve. As a rule, the system contains special programs for controlling accelerators and their settings in a pre-installed form. If there are none, you can install them additionally (PhysX, Catalyst, etc.). Their tools have more options, and the settings are much more subtle, since you can also change the aspect ratio.

Such utilities are especially useful when setting the best image parameters in computer games.
Instead of a total
That's all there is to it in a nutshell regarding the basic screen resolution settings. It remains to add that if discrete video cards are installed on board, it is better to abandon settings using the system and use “native” utilities. By the way, for the same integrated Intel chipsets there are also such programs, although they are not particularly different from the Windows tools.
Modern systems, starting with Windows 7, can independently select the optimal value for the screen, so basically there is no need to worry about this. It turns out that there are people, most likely newbies, asking the question, how to change screen resolution, and it doesn’t matter what operating system it is or what computer it is. The instructions will be individual for everyone and, I hope, will help you.
There are a couple more points that I will touch on here. Let's say you have a monitor with a resolution of 1920 by 1080 or higher. It is known that setting the value 800×600 for it will not work. Why? This is because you will see screen distortion as the values do not match the physical values for the screen.
Let's start from the depths, namely seven. Using this particular operating system, you do not have to worry that the value will not be selected accurately. Although sometimes the value is set lower than necessary, so the knowledge that can be gleaned from this manual comes to the rescue.
The article touched on points on the topic, and the article itself is quite useful. If interested, you can read it.
To manually adjust the screen resolution, you need to right-click on an empty space on the desktop. A menu will appear where we select the option "Screen resolution".
One of the subsections of the control panel called “Display Settings” opens. Here we see three parameters:
- Screen;
- Permission;
- Orientation;
Naturally, we are concerned about the second point. The first one is responsible for choosing an additional monitor, and the last one is already clear. Open the options tab "Permission" and select the maximum. In my case - 1366 by 768. Most likely, opposite the maximum resolution there will be a corresponding word - Recommended.

The note: It is worth paying attention to the moment when you cannot change the screen value. The fact is that you must install drivers for the graphics adapter. As a result, you can change the screen value not only from the control panel, but also in the video card settings. Below I will explain how to use these settings. (Drivers are usually installed automatically).
How to change screen resolution in Windows 10
The specified operating system has the same parameters from the control panel, but it still needs to be found. We won't bother, but let's see how to do this from the options menu.
As in the first case, we right-click on the desktop and select the option "Display Options".
A window opens with the “System” subsection. There are many tabs there, but we are interested in “Screen”. On the right side of the window we see several parameters:
- Night light mode – best suited for reading in the dark;
- Scale and layout– what we need;
- Multiple displays – we can connect additional monitors.
Finding the parameter "Permission" and change it to the maximum value, it will be marked “Recommended”.

In addition, you can specify the text size in applications. The standard value is 100%, but the value can be changed to 125%.
Unfortunately, this method is the only one in the top ten. The “Display” section has been removed from the control panel and the necessary settings can only be changed through the “Options” menu. That's how bad they are, these Microsoft people.
Using the graphics adapter utility
I’ll show you using an NVIDIA video card as an example, since I don’t have AMD.
When we click on the desktop with the mouse to call up the context menu, we can see the following items:
- Graphics characteristics (Intel HD Graphics);
- NVIDIA Control Panel.

Both of these sections have many settings, but only the first includes screen resolution settings. Let's look at the example of Intel HD. If you have this software, then launch it.
The HD graphics control panel opens. Go to the section "Display".

In the main settings of this miracle we see all the options that we need. Now you know how to change screen resolution using HD graphics.

Well, that's all, now you know everything. In the game, this procedure is done in the settings. But I won’t say anything about Windows 8, since the parameters are the same, why talk about the same thing a hundred times. I hope this little guide will help you.
In this article we will tell our readers how to change Screen resolution in Windows 10. The Windows 10 operating system is new, so PC users are encountering problems with the recommended resolution, which is set automatically. Mostly, problems with screen resolution are observed on old monitors and rarely on new ones. Problems usually manifest themselves as a very stretched image on the display, which makes it very uncomfortable to work on the computer. This is due to driver support for both the monitor and the graphics adapter. In order to solve the problem with a stretched image and incorrect resolution, we have prepared examples where we will describe their detailed solution.
We set the monitor resolution using the built-in tools of Windows 10
You can set the correct screen resolution using Windows 10 itself. In this example, to solve our problem, we will take Samsung S19D300N monitor, which has a TN matrix resolution of 1366x768 pixels. Using Windows 10, the problem of a stretched image can be solved in two ways.
For first method we need to go to the new panel "".
This can be done in the menu " Start", by clicking on the item "". In the "" panel that opens, you need to follow the link "". This action will take us to the point we need " Screen" in the window that opens.

Now in this window we need to follow the lowest link “”.

In the window that opens, we are interested in the “” block. In the image you can see that this block has a resolution of 1280x720 pixels, but we need to set it to 1366x768 pixels. To change the resolution to the correct one, we will click on the drop-down list and select the correct item “1366 x 768 (recommended)”. Also in this list you can see how the resolution changes from finer to recommended resolution.

After these actions you need to confirm them. To do this, click the Apply button. At this stage, the setup using the first method ends.
For second method we need to go to the control panel, which is familiar to many users. To quickly navigate to it, Windows 10 provides a special menu that opens with the key combination WIN + X. IN " Control panels"We need to follow these links" Design and personalization» - « Screen" - "". These actions will open the panel window that we need.

" From the image above, you can see that the monitor resolution is 1280x720 pixels, while our Samsung S19D300N supports 1366x768 pixels. To solve our problem, we need to increase the resolution of the Samsung S19D300N monitor to 1366x768 pixels. Therefore, let's click on the drop-down list and set the monitor resolution we need.

Just like in the first method, after the actions taken, confirm them with the Apply button. From the examples you can learn that setting the correct screen resolution is not at all difficult, and any PC user can cope with this task.
Setting the correct resolution using the graphics adapter driver
In this chapter, we will look at ways to change the monitor resolution using video card drivers. Changing monitor settings by driver is especially important when Windows 10 does not see such ultra-high resolution formats as “Full HD (1920x1080) and Ultra HD 4K (3840x2160).” First we will look at the video card driver Radeon from AMD. For all current graphics adapters from AMD, new driver packages called Radeon Software Crimson Edition. To go to the monitor settings, in this package you need to go to the desktop context menu and select the “” item in it.

After this action we will be taken to the main settings panel, in which we are interested in the “ Display».


In the advanced settings, go to the item “ Properties (VGA screen)", which will open such a window.

In this window we are interested in the block “ Monitor properties" In this block we need to uncheck the “Use EDID” box. After this action, we will be able to independently set the size from low to ultra-high screen resolution.
Now let's look at setting up the monitor using the graphics adapter driver NVIDIA. To open the NVIDIA panel, just as in the case of Radeon, let's go to the desktop context menu. In the context menu, select "".

After this, the Nvidia panel will open, where we are interested in the item “ Change resolution».

In the window that opens, the item “ Change Resolution» you can clearly find out what resolution we can set for a given monitor model. If you want to fine-tune your monitor resolution, use the Customize... button.

In this chapter, we looked at the setup for the major video cards currently on the market. From the examples it is clear that adjusting the monitor resolution using drivers is not at all difficult.
Problem solving
Below we have compiled a list of monitor resolution issues that PC users encounter in Windows 10:
- The first most common problem is old video card drivers. Typically, Windows 10 automatically looks for graphics card updates. But if the computer is not connected to the Internet, video card drivers will not be automatically updated.
In this case, the driver discs included with the video card package will help you. Pre-downloaded updates in the form of installers from the official websites of video card manufacturers Intel, AMD and Nvidia can also help.
- Another problem could be incorrectly installed drivers. Typically, this situation occurs when the user downloaded the wrong driver for his video card and installed it on the system.
In this case, removing this driver and installing a new one, specially created for your video card, will help.
- Like video cards, some monitors Same require installation of their own drivers in Windows 10. Typically, these drivers are included with the purchased monitor; they can be downloaded from the official website of the monitor.
- Often users, to save money, use cheap Chinese HDMI adapters and cables. This option of connecting the monitor to the computer often causes problems in which the image is stretched, the picture becomes fuzzy and its quality constantly changes.
This problem is solved by replacing adapters and cables with better ones.
In this chapter, we have described the most common problems that lead to incorrect monitor resolution and stretched images. If you follow all the recommendations presented in this chapter, then you will certainly solve the problem.
Finally
In this material, we answered the question of how to change the screen resolution in Windows 10 in various ways. We have also described a list of problems that affect monitor resolution. We hope that our material will be useful to you, and you will be able to solve the problem with stretched images and incorrect resolution.
Video on the topic
To make it as comfortable as possible for the eyes, you need to know how to change the screen resolution of a personal computer or laptop monitor.
Screen resolution is an indicator that determines the clarity of the display of all icons, pictures, that is, graphics in general. It is important to determine what will be best for the monitor.
The recommended one is always indicated in the device instructions. You can also view it on the Internet; to do this, you only need to determine the screen size (number of inches diagonally).
Changing an extension using built-in OS features
The higher the resolution, the better the clarity of the display. For example, a 22-inch display will have a standard resolution of 1680*1050, which is optimal and maximum for this screen.
All available sizes are available in the settings; it is advisable to choose the largest one offered.
Follow the instructions to change the image resolution of your display:
- Go to the operating system desktop. Right-click on it and select screen options, as shown in the figure below;
- In the window that opens, you can adjust the size of text, icons and other system elements in real time. You can also adjust the screen orientation. To go to the selection tab, enter the word “resolution” at the top in the search bar;
- Select “change screen resolution”;

- Click on the drop-down list as shown in the figure and select the standard recommended one. Save the new settings.

Important! It happens that the recommended resolution is higher than the display. That is, the size of the final image does not correspond to the screen size, so some elements of the desktop may disappear from the user's field of view. Adjusting your monitor will resolve this issue. In the selection options, choose not the recommended one, but the one that fully displays all the elements of the desktop. At the same time, all graphics must be clear.
Several common types of expansion and corresponding display sizes:
- 1024*768 – perfect for screens of 15 or 17 inches. In a display with a resolution of 1024*768 pixels, the color depth is 16 bits;
- 1280*1024 – intended for displays whose size is 19 inches;
- Types of monitors measuring 24 inches most accurately convey the image at a resolution of 1920*1080. All displays with these parameters are FullHD.
Adjusting the screen refresh rate
The higher the display refresh rate, the correspondingly better the image quality. That is why, in addition to size, it is necessary to pay attention to this parameter.
To change the refresh rate follow the instructions:
- Go to the control panel. In the search bar, enter “Screen” (without quotes);
- In the proposed search result, select the item that is responsible for the screen refresh rate, as shown in the figure;

- Set the refresh rate to the highest possible. This will eliminate possible periodic flickering of the monitor.
NVIDIA Software
How to find out the right resolution for your display? This can be done on the official website of the manufacturer or in the instructions that come with the device.
On the boxes of monitors and laptops from Samsung there is information on how to set the correct resolution and what to do if the real one does not match the declared one.
Using a special program that is preinstalled on all computers equipped with an Nvidia family video card, you can also adjust the resolution of the user's monitor.
Follow the instructions:
- Open the main Nvidia graphics settings window by right-clicking on the desktop, as shown in the figure;

- In the window that opens, adjust all the necessary settings;

Main window of the utility
Some monitors may not have a screen resolution that matches what Windows offers.
If you have an Nvidia video card installed, you can add your screen resolution in one of the following ways:
Method 1.
1) Launch Nvidia Control Panel.
2) Open Display → Change Resolution → Add Permissions... → Create Custom Resolution
3) Set the parameters you need, test them and add it to the list for selection
4) Select it and use it.
Method 2.
Using the registry, add the permission you need to the parameter NV_Modes
Which is along the path: HKEY_LOCAL_MACHINE\SYSTEM\CurrentControlSet\Control\Video\(some number)\0000
You can also find other threads containing the parameter NV_Modes and also add the screen resolution you need to them.
Method 3: Before installing the driver.
Open the file "nv_disp.inf" in the folder C:\NVIDIA\Win7\xxx.xx (where xxx.xx is your driver version) and find the value
Below him in NV_Modes There will be all available screen resolutions, add yours there.
But it happens that even after the above manipulations, a new resolution is not added. In this case, you will have to use special programs to force the addition of a user permission.
PowerStrip- A program for managing the parameters of the video subsystem of your computer, supports a huge variety of video cards. A program that supports video cards from a wide range of chipsets and suppliers, simultaneously, under any operating system. The program provides access to over 500 controls over your display hardware, including color correction tools, screen geometry period level settings, and driver-independent clock controls.
Screen Resolution Manager- A program that allows each computer user to set their own screen resolution. In addition to resolution, you can adjust color depth, frequency, brightness and contrast, color gamut and other settings that will automatically take effect after loading a specific user’s profile.


