How to open the asus router menu. How to log into an Asus router using different connection methods
On our website we already have detailed instructions on how to enter settings on routers from different manufacturers, and we even have . Today we will look at how to access the settings on Asus routers. The process itself is practically no different from other manufacturers, but since devices from Asus are very popular, this article will definitely not be superfluous.
We will do everything according to the standard scheme: first we will connect to the router via a network cable or wi-fi network, then we will go to the control panel through a browser. You can go into the settings and change them from almost any device. From a computer, laptop, tablet, phone, etc. But, if possible, I recommend using a laptop or desktop computer and accessing the settings via a network cable. Via Wi-Fi is also possible, just don’t flash your router over a wireless network, otherwise you might get bricked :)
Getting access to the settings of the Asus router
If you are already connected to your router, then scroll down the page a little. You can skip the connection process. If not, then you need to establish a connection via cable or Wi-Fi. Let's first look at how to connect to an Asus router using a network cable.
Everything is very simple. We take the cable that comes with the router and connect it to the router’s LAN connector (look carefully, do not connect to the WAN, they are signed). And on a computer or laptop, connect the cable to the network connector. Like that:
Power on the router (if you haven't turned it on yet) and we can continue. If there is also a WAN cable connected to the router, then you don’t have to disconnect it, it won’t interfere with us.
Wi-Fi connection
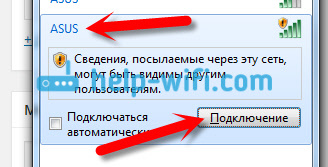
If you have already set up your router, then connect to your wireless network. I think you know how to do this (if not,). If you have a new router, then immediately after connecting power to it, it will begin broadcasting a wireless network with a standard name. Most likely, it will be called "Asus" and will not have a password. Just connect to it from the device from which you will access the control panel.
How to enter settings if you forgot your Wi-Fi password?
If you have forgotten your wireless network password and you do not have any connected devices from which you can go to the control panel and see the password, then you can go to the settings via cable. And if this is not possible, then you can reset your Asus router (press the RESET button for 10 seconds) and configure it again (wi-fi network will be without a password).
Go to the address 192.168.1.1
After we have connected to the router, open the browser and type the address in the address bar 192.168.1.1 . Follow it. If the router has not yet been configured, then most likely the settings page will immediately open, there will be an Asus quick setup wizard. If you are prompted for a login and password, then the standard ones are admin And admin. If you haven't changed them yet. And if you changed the password to enter the control panel and forgot it, you will have to reset the settings.

The standard data for accessing the settings is indicated at the bottom of the router itself.

What to do if you can’t enter the settings of your Asus router?
It all depends on what kind of problem (error) and at what stage you have it. For many people, problems appear at the stage of connecting to the router. Or, after connecting, the “Page Unavailable” settings simply do not open in the browser; it is impossible to go to the address 192.168.1.1. These are the most popular problems.
Try the following:
- Check out this article on this issue:
- Necessarily .
- If the IP settings are set to receive automatically, but the problem persists, then check whether you have connected the cable correctly to the computer and router. Or whether you are connected to the router's Wi-Fi network. Check if the router is powered on (the power indicator should be on).
- Try logging into the control panel from another device.
- If you can’t enter the settings of your Asus router when connecting via cable, then try connecting via Wi-Fi. And vice versa.
- Reset your router settings and try opening the address 192.168.1.1 again.
If something doesn’t work out, you can write about it in detail in the comments, and we’ll sort out your problem together.
In order to configure an ASUS router there are two ways. The first is to use the special Quick Device Setup Wizard. It is specially integrated into the web configurator so that an unprepared novice user can easily connect the router to the provider’s network and set up a Wi-Fi wireless network. Of course, its capabilities are very limited, but it allows you to configure the most basic functions of the router without any problems.
The second way is to work with a full-fledged web interface, which allows you to fully reveal the full potential of the device, if necessary, squeezing out of it everything that it is capable of. Let's consider each of the options separately.
In both cases, in order to enter the configuration interface of the Asus router, you need to enter the device’s IP address in the address bar of your web browser - 192.168.1.1 . When prompted for authorization, enter the login "admin" and password "admin".
Quick Internet setup on an Asus router
When you first access the web configurator, you will see a wizard prompt to quickly configure the device. We agree. The first step is to change the default access password:

Instead of the default "admin" use any other one. It is desirable that it be more or less complex: consist of 7-8 characters, contain letters of the Latin alphabet, numbers and special characters @#$%&.
The next step is to select your Internet connection type:

Asus routers can work in the network of almost any Russian Internet provider - Rostelecom, Dom.ru, TTK, etc. The main thing is that you need to check with technical support in advance which communication protocol the telecom operator uses.

Most often, either "Automatic IP (DHCP)" or "PPPoE" is used.
In the first case, usually, you don’t need to specify anything additional, but in the second, you will need to enter the login and password for the connection, which you were given when concluding an agreement with the provider. Click on "Next".
In the next step, we will configure the Wi-Fi wireless network:

Here you will need to enter the network name SSID and the password for it is Network key. If you are setting up a dual-band router, here you will need to enter the WiFi name and password for the 5GHz band. Click on the "Apply" button.
At the last step of the wizard you will see summary information:


How to set up an ASUS router for Rostelecom, TTK and Dom.ru
This manual is relevant for ASUS RT-N10, RT-N11P, RT-N12, RT-AC51U, RT-AC52U, RT-N56U and RT-N66AU routers, as well as for all other models running on ASUSWRT software (web-based interface in dark colors).
In order to set up a connection with your provider, go to the “Internet” section, “Connection” tab. It looks like this:

Most branches of the largest Russian providers Rostelecom, TTK and Dom.ru use the PPPoE protocol. Select it in the "WAN connection type" field:

Be sure to ensure that the "Yes" checkboxes for WAN, NAT and UPnP are checked.
Below, please make sure that the “Yes” checkboxes are checked for the “Obtain a WAN IP address automatically” and “Connect to the DNS server automatically” items:

In the "Account Settings" section, you must specify the Login and password for connecting the ASUS router to the Internet, which were given to you when concluding the agreement.

There is no need to change any further parameters. Click the "Apply" button and check your Internet access.
Dynamic IP (DHCP)
Some branches of the Rostelecom and TTK providers use the "Dynamic IP" connection type, when the router receives the address from the provider's DHCP server and no other connections or protocols need to be used.
To configure, you need to select the WAN type "Automatic IP".

Be sure to check that all the points indicated in the figure are ticked.
Pay special attention to the fact that DNS server addresses should also be obtained automatically by the device.
How to set up an ASUS router for Beeline
On the Internet, the Beeline provider uses the L2TP protocol for connection:

We leave obtaining an IP address and DNS server in automatic mode.
In the account settings, enter the “Username” (usually this is a personal account) and the password that was issued by the operator’s representatives.
All that remains is to enter the address of the Beeline VPN server: tp.internet.beeline.ru
Click the "Apply" button.
Setting up Wi-Fi (Wi-Fi network)
In order to set up a regular WiFi network in the 2.4 GHz range on ASUS routers, you need to select the “Wireless network” item in the main menu and the “General” tab:

In the SSID field you must enter the name of the Wi-Fi network you are creating. Any word in English can be used in this capacity. Then you need to select the "WPA2-Personal" authentication method and enter the password in the "WPA Pre-Shared Key" field. As a rule, there is no need to change anything else, since the most optimal parameters are set by default.
To configure WiFi 5 GHz on ASUS routers (RT-AC51U, RT-AC52U, RT-AC55U, RT-N56U, RT-AC66AU and AC68U), you need to set the value in the "Frequency range" field 5 GHz:

And then everything is exactly the same as usual: we enter the “SSID” (it is desirable that it is slightly different from the one used on 2.4 GHz), indicate the verification method “WPA2-Personal” and the WiFi password, Click the “Apply” button .
Old web interface
If you are using old ASUS router firmware made in blue tones (RT-G32, WL-520GC, etc.), then in this case just proceed by analogy. Here are some video instructions that you may find useful:
As you can see from the video, there is no difference in the designation of key parameters in different firmware versions.
Connecting a router
Remove the router from the box and install it in a place convenient for you. Connect the power adapter from the kit into the corresponding connector on the back panel of the router and into a 220V outlet. Connect the main network cable (the one that was brought into your apartment when you connected to the K-Telecom network) into the INTERNET port, and connect the included network cable with one end into one of the numbered LAN ports on the back panel of the router, and the other into the network card computer. You will not need the installation disk that came with the router.
Important: Do not connect the main network cable to the numbered LAN ports! This will disrupt the communication service throughout the entire house.
Setting up the router
Open a separate tab in your browser, enter the address 192.168.1.1 in the address bar and press Enter on your keyboard. Having gone to this address, we see the authorization window in the router’s web interface. In the “User Name” line, enter the word “admin” in Latin (English) small (capital) letters without quotes, in the “Password” field - “admin”, in Arabic numerals without quotes. Then press “Log In” on the screen, or press the Enter key on the keyboard.
After this, a window with the router settings will appear in front of you.

To change the interface language, select “Russian” in the “Language” field.

Now you should select “Advanced settings” to configure your Internet connection.

In this window you need to select the “WAN” item.

In the “WAN connection type” field, you must select “L 2TP”, the remaining settings must be specified as in the figures below.


To save the settings, click “Apply”.

Setting up a wireless connection
To set up a Wi-Fi connection on your router, select “Wireless”. In the “SSID” field you must enter the name of your wireless network (numbers and Latin (English) capital and uppercase letters are supported). The remaining points should be indicated in the same way as shown in the figure below.

In the “WPA Pre-Shared Key” field, you must enter the password for your wireless network. It can consist of large and small letters of the Latin alphabet, as well as Arabic numerals. To save the settings, click “Apply”.
Perhaps, from the title of the article, not everyone will understand what problem we are talking about, however, many often encounter it in practice. Each user can name it differently, and there are so many options: some call the modem’s web interface a “modem page”, others call it a “modem website”, others simply call it by IP address “ https://www.192.168.1.1", and some even call the web interface a “personal modem account.” But this is only a small lyrical digression, and now specifically on the topic. So, you have encountered a problem accessing the modem’s web interface. What to do in this situation?

How to enter the settings https://192.168.1.1 of the Internet router and Wi-Fi.
- First, of course, let's check whether the modem is turned on. Let's check the connection of the network cable both to the modem itself and to the computer.

- We check the serviceability of the network card. A faulty network card is a situation that very often causes our problem. Go to Control Panel, Network Connections tab, and check if the network card is active. In Windows 7 and 8 systems, to do this, just press the combination on the keyboard Win+R, and in the window that appears write the command:
ncpa.cpl If the network card is inactive, its icon will be displayed in gray. In this case, it must be activated by simply right-clicking on it and selecting “Enable” from the drop-down menu.
If the modem is turned on, the power cord is supposed to be working, but there is a red cross on the connection icon, or the message “ network cable is not connected", then most likely there is a problem in the network card itself. - Let's check the network card settings. We can do this in two ways.
Method I: keyboard shortcut Win+R call up the window “ execute", and in the window that appears, launch the command line by typing:
cmd So, the command line appears, in it we write the command:
ipconfig/all and look at the result. It should be as follows:
II method: go to Control Panel, select Network Connections ( or combination Win+R -> command ncpa.cpl), in the network connections window, look for the Local Area Connection icon. Right-click on the icon and select “Status” from the list that appears.
If automatic (dynamic) obtaining of an IP address is set in the network card settings, then in the network status (on the network card icon with the right mouse button - state - "Details" button) there will be the following picture: "Address type - obtain automatically", and in the fields IP address and default gateway will indicate our current IP and gateway (modem address).
Pay also attention to the IP address. It should look like this: 192.168.✶.✶, 172.16.✶.✶ or 10.✶.✶.✶. If it looks like 169.✶.✶.✶, then the DHCP protocol, which allows you to dynamically obtain IP addresses, is not activated on the modem, and the IP address must be entered manually.
One more point: sometimes, to eliminate problems on the network, the standard IP address of the modem 192.168.1.1 is changed, say, to 192.168.3.1. In this case, the computer address, naturally, must be in the same subnet, otherwise nothing will work. Therefore, here is some advice: having called the command line, type ping 192.168.1.1 and, as it is called among IT specialists, we “ping” the router:
The router should ping without problems. If the IP addresses are specified correctly, and the router does not ping, see the next point. - Access is blocked by a firewall. In such a situation, one piece of advice is to turn off your Internet connection, completely disable security, and check access to the modem's web interface again. It is worth noting that in some situations, disabling the firewall does not help, and even with correctly defined rules, the system continues to block access. Then the only solution is to completely uninstall the firewall.
To disable the security system, use the keys Win+R call up the window “ Execute"and dial
firewall.cpl In the window that appears, in the left menu you need to select “Turn on/off Windows Firewall”, and then - as shown in the picture:
- Perhaps another of the most common causes of our problem is a browser that can either be infected with viruses (and then only a full scan with an antivirus with the latest updates can help), or the “service” can be enabled in its settings. Proxy" - in this case it will need to be disabled.
It also happens that some kind of glitch occurred in the browser program and a reinstallation is required. Alternatively, you can try installing an alternative browser and logging in via IP from it. It is better if a browser or .

At the above IP address ( 192.168.l.l) routers of most brands of network devices are configured - such as Zyxel, NetGear, TP-Link, ZTE, Qtech. But there are exceptions - this is equipment from D-Link, TrendNET, Tenda and some Upvel models.
In this step-by-step instructions, we will look in detail at how to configure the Asus RT-N10 Wi-Fi router in its various variants:
- RT-N10P
- RT-N10+ D1
- RT-N10E B1
- RT-N10 B1
- RT-N10 C1
- RT-N10U B
And other modifications of this popular and cheap Asus wireless router. The basic setup of the Asus RT-N10 Wi-Fi router, regardless of its modification, is the same. That is, if you need to configure the router so that it distributes wired Internet to wireless devices, you do not need to know which of these Asus RT-N10 Wi-Fi router options you have. The only possible difficulty is the new firmware 3.0.0.x on some models (black background) or 7.0.2.31 on other versions (although routers do not go on sale with this firmware), but in fact, this is not a difficulty - all the actions necessary for successful setup are completely identical. However, we will include screenshots of this firmware here.

- Preparing for setup, connecting the Wi-Fi router Asus RT-N10
- How to enter the settings of Asus RT-N10
- Setting up an L2TP Beeline connection on firmware 2.0.x, 7.0.0.x (plus setting up Beeline television)
- Setting up PPPoE connection to Rostelecom and Dom.ru on Asus RT-N10 with firmware 2.0.x (plus setting up IPTV Rostelecom)
- Setting up a wireless network, setting a Wi-Fi password on Asus
- Setting up Asus RT-N10 with new firmware
- Firmware Asus RT-N10
For novice users who have never set up routers, let me note: there is nothing complicated about this, the whole process will take no more than 15 minutes.
Preparing for setup and connecting the Asus RT-N10 router
Before setting up a Wi-Fi router, you should connect it correctly, and as experience shows, even with this there are problems. And, in addition, pay attention to some network settings that may be critical for successful setup.
First of all, it is recommended to check the settings of the local network connection that is used to configure the Asus RT-N10. In particular, the TCP/IP protocol parameters should be set to “Obtain an IP address automatically.” How to do this is written in detail (will open in a new tab).
The next point to remember: if your provider uses connections like PPPoE, L2TP, PPTP and others, that is, in order to access the Internet, after turning on the computer, you launch some kind of Beeline, Rostelecom, Dom.ru connection from the desktop or from the list of connections in the taskbar, disconnect this connection. And do not connect again either while setting up the router or after the wireless router has already been configured. Those. This connection will later be established by the Asus RT-N10 itself; you don’t need to run anything, otherwise you will get a result in which the Internet will only be available on the computer, but not via Wi-Fi.

And now about connecting the Asus RT-N10. There are five network connectors on the back of the router. One of them stands out among the rest - connect the cable of your Internet provider to it. And connect one of the remaining ports to the corresponding port of your computer’s network card, and then turn on the power to the router. You can start setting up.
How to enter the settings of the Asus RT-N10 router

Go to router settings
To go into the settings of your Asus router, launch your browser (it's already running if you're reading this, so better open a new tab) and enter 192.168.1.1 in the address bar, after which you should see a username and password request. The standard login and password for routers from this manufacturer are admin and admin, here and there. You may be asked to change your default login information, please do so. After this, you will find yourself on the main settings page of the Asus RT-N10, which looks like this:

On this page, all operations for setting up connections, setting a password for Wi-Fi and other actions are performed, which we will now do.
Setting up Asus RT-N10 for Beeline
In order to configure an Asus router for Beeline, on the main page of the router settings, click “WAN” in the menu on the left, then fill in the parameters for the Beeline L2TP Internet connection, which look like this:

Setting up a Beeline connection on Asus RT-N10 (beeline l2tp)
Basic parameters to set:
- WAN connection type: L2TP
- Selecting an IPTV port - if you use Beeline television, select the port to which you will connect the Beeline TV set-top box.
- Obtain an IP address automatically - Yes
- Connect to DNS automatically - Yes
- Username, password - your data for Internet access from the Beeline provider
- PPTP/L2TP (VPN) server - tp.internet.beeline.ru
- Apply the settings. On some Asus firmware, settings are not saved if you do not enter anything in the “Hostname” field. Enter beeline.
If no errors were made, and the Beeline connection on the computer is broken, then after a short time the connection to the Internet will be established and all that remains is to configure the wireless connection parameters. You can make sure that the Internet is working by opening a new tab and trying to access a website. About setting up Wi-Fi on Asus, see below, after the information on setting up a router for Rostelecom and Dom.ru.
Setting up Asus RT-N10 Rostelecom and Dom.ru
In order to configure the Asus RT-N10 Wi-Fi router to work with Rostelecom and Dom.ru providers, which use PPPoE to access the Internet, follow these steps:

- In the menu on the left, select “WAN”
- Set the necessary connection parameters, the key ones being Connection type (PPPoE), automatic acquisition of an IP address and DNS (you need to set it to “Yes”), your Rostelecom or Dom.ru login and password. The remaining parameters can be left unchanged. If the settings do not save without entering anything in the Hostname field, enter rostelecom or domru. Also, if you need to set up Rostelecom IPTV, specify the port to which you will connect the TV set-top box.
Save the settings and wait a short time. The router will have to establish a connection to the Internet and if you try to access any page, it will open, despite the fact that the Rostelecom or Dom.ru connection on the computer itself is disabled. Now it is advisable to configure the wireless Wi-Fi network settings.
Setting up a wireless network and how to set a password on Wi-Fi Asus
Another of the main tasks when setting up a Wi-Fi router is setting up the parameters of the wireless network, which is necessary so that, firstly, strangers cannot connect to it, and secondly, to make it more convenient for you to use it. Setting up Wi-Fi does not depend on what provider you have - Beeline, Rostelecom or any other.

In order to configure the basic parameters of the wireless network and set a password for Wi-Fi, in the settings menu on the left, click “Wireless Network” and on the “General” tab enter the basic parameters:
- SSID (Wireless Network Name) - Enter something of your own here, so you will distinguish your network from others. It is better to use the Latin alphabet, otherwise some devices may have problems connecting via Wi-Fi.
- Authentication Method - WPA2-Personal
- The WPA Preshared Key is your Wi-Fi password, which must be at least 8 characters long.
- You don't have to change the other parameters, especially if you don't know what they mean.
Apply the settings. Wait for a message indicating that the Wi-Fi settings have been successfully changed. And, in fact, that’s all - you can try connecting via Wi-Fi from a laptop, phone or tablet, everything should work.
Setting up the Asus RT-N10 router with new firmware
Frankly speaking, I don’t know if Wi-Fi routers with this type of firmware are on sale (in my opinion, yes, for example Asus RT-N10P and RT-N10U), but it can be downloaded and installed on some models of the RT-N10 router . The firmware index is 3.0.0.x and the web interface of the router with this firmware version looks like this:

As you can see, despite the fact that the design style has changed, the location of the settings menu items remains unchanged when compared with firmware 2.0.0.x and 7.0.0.x. Therefore, the basic setup of an Asus Wi-Fi router with new firmware occurs in exactly the same way as was described above for Beeline, Rostelecom and Dom.ru.
Firmware Asus RT-N10
If you want to flash the Asus RT-N10 router, then this is not particularly difficult. First of all, you will need to download the firmware from the official website. Considering that there are quite a large number of modifications of this router, it is important not to make a mistake here. To do this, go to the router settings panel and select “Administration” in the menu on the left, then open the “Firmware Update” tab.
Pay attention to two points: Product ID and Firmware Version - this information tells you which Asus RT-N10 you have, as well as what firmware is currently installed.
At the top of the page there is a link to the firmware page, but you should not click on it - from experience, it does not always lead to the correct router model. Therefore, the best option to download firmware for an Asus router is to go to the website http://www.asus.com/ru/, select products - Network equipment - Wireless routers, then go to the page of your router model, click the “Support” link ", and then - "Download". In the “Software” group you will find all the firmware that can be downloaded and installed on the router. Download the correct firmware version, extract the firmware zip file, and return to your router's firmware update page.

Click Select New Firmware File and then Submit. Wait for the Asus router firmware to complete; it will take about three minutes, during which the connection with the router may be interrupted. When finished, you will see that the firmware version on your router has been updated.
I hope this instruction helped you. If it’s not difficult, share it on social networks using the buttons below.


