How to free up internal memory on Android in different ways? Get rid of forgotten games. Selective directory cleaning and analysis
RAM is the most important component of any computer or laptop. To a greater extent, it determines the speed of the device and, accordingly, the more RAM is installed on the computer, the better and easier it will work. You can increase the performance of your computer by increasing the physical amount of memory, but in Windows 7 the same result can be achieved in slightly different ways, for example, by cleaning it.
What is RAM, physical and video memory
All operations with information are carried out by the computer's central processor, and it does this only with that contained in the random access memory. A lot of different information is loaded here, including intermediate results of various calculations and current data. Literally all operations that a computer performs involve accessing RAM and its subsequent use. Thus, we can draw a simple conclusion - everything you do on the computer, one way or another, can consume RAM resources.
This makes it clear why computers with little RAM perform much worse than other devices with more resources.
In addition to random access memory, there are several other types of memory, these are physical and video memory.
Each video adapter has its own memory. In essence, this is the same RAM, only installed on a separate computer component, which performs the function of transmitting images to the monitor. Unlike traditional RAM strips, each of which the PC owner can independently replace (add, remove some, or replace them), video memory is non-removable. As a result, you can increase the amount of such memory only by replacing the old video adapter with a new one or purchasing an additional video card.
How to see what the RAM is doing
The Windows 7 operating system can show the user information about what is currently occupied by the computer's RAM.
All this can be viewed independently, without additional tools, using the system’s built-in capabilities. The Task Manager will help users with this. You can open it in two ways: Press the key combination Ctrl+Alt+Del on your keyboard and select the “Task Manager” application in the menu that appears. Right-click on the “Taskbar” and select “Task Manager” there.
By default, the program automatically opens the “Performance” tab to the user. Here you can look at the load on the central processor at the current time, how much it is used by running programs, and also look at the chronology of physical memory use. In some cases this may be necessary. However, only the loading graph of individual system elements is presented here, and users can find more accurate and detailed information in the “Processes” tab.
“Processes” indicates all information about running applications on the computer, including even those processes that appeared as a result of failures. In the leftmost column you can see the name of the process, in the penultimate column the amount of RAM occupied by a particular process, and in the rightmost column a detailed description. This way you can look at the table and sort all processes, for example, by the amount of resources consumed and terminate them if necessary.
How to free up computer RAM The user launches some of them quite consciously, while others begin to work at the “will” of the system or because of startup. We should not forget that there are applications that deliberately harm the device and can consume a significant portion of system resources - malicious software. Be that as it may, they all consume RAM, so the user needs to clean up the RAM regularly.
Close unnecessary programs and applications
The easiest way to clear RAM is to disable various programs and applications.

Closing active applications
This way you can free up some of the physical memory. The Windows 7 operating system displays all active programs and applications in the form of special icons located at the bottom of the screen on the “Taskbar”. Thanks to the new Aero interface, which appeared in Windows Vista, the user can easily view the working view of windows. This way you can understand which windows contain important, unsaved information. All those applications that you do not need now, you can disable and increase performance, free up computer memory, and to do this, just click on the cross located at the top of the active window.
Separate mention should be made about the operation of web browsers. The fact is that each new tab that you open in the browser represents a separate process for the system. Thus, if the number of such tabs is large, and the amount of RAM, on the contrary, is small, then the performance of your computer will significantly deteriorate. If you don’t need your browser at all right now, then close it completely. If you only need some individual tabs, then leave them and remove the rest. For example, it often happens that users enter a query into a search engine and leave this tab open. It will also use system resources, so make sure that all those tabs that you don't need are disabled.
If necessary, users can use the Task Manager to disable active applications. To do this you will need:

All active tasks will be displayed here, including those that cannot be closed by simply clicking on the “cross” in the upper right corner of the window (frozen applications). Try to use this method only when some programs on your computer are frozen and do not respond to actions.
Remember that it is better not to abuse this method of disabling applications. In this case, this is an emergency shutdown of the program and, naturally, some data may not be saved. In addition, this method of disabling may cause problems when the application is launched later.
Closing background processes and services
Some types of programs and applications run in the so-called background and consume RAM. As a rule, they do not have an active window. Their entire interface is either minimized to tray or is not noticeable at all. However, this does not mean that they do not consume system resources. Often they become the reason for a decrease in the speed of a personal computer and a deterioration in its performance. Therefore, it is recommended to check all processes at least occasionally. To do this you should:

All active processes will be displayed here. Be careful not to disable system processes, as this may lead to problems with the computer. If you have no idea what exactly can be disabled and what cannot, then take a look at the name of the process itself. Typically, it is identical or very similar to the application name. If you see familiar, unnecessary processes, then feel free to disable them.
PC users rarely pay attention to running services. They, along with other applications and processes, consume resources, namely, they occupy the physical memory of the computer. Some of the services are system ones, which can cause problems when disabled, but there are also those that can be disabled without problems.

You can view a list of all services running on your computer as follows:
Cleaning startup options
Autoloading occurs immediately after the graphical shell is launched. In this case, all programs and applications included in the startup list will be loaded according to the list into the computer’s RAM.
Typically, various anti-virus applications are prescribed here to ensure the user’s safety while working on the network, email applications (messengers), browsers, as well as malware, provided that they are on the computer and have not been identified by any anti-virus software. If the user does not regularly check the Startup settings, then over time many unnecessary applications may accumulate there, which will partially consume RAM resources.

The most effective way to clean up startup is to change the system configuration. To launch it you should:
All programs and applications that start automatically with your operating system will be displayed here. You can disable all unfamiliar names without any problems.
Please note that “Startup” may contain system utilities, the disabling of which can lead to failures while the computer is running. Therefore, be careful.
Restarting Windows Explorer You can free up a small part of RAM by restarting the Windows Explorer process.

It is nothing more than the user interface (start menu, windows, etc.). First you will have to disable it, and then re-register it in a special line and launch it. This way you will free up some RAM. To do this you will need to do the following:

After this, the entire operating system interface should disappear, but don’t worry - everything goes as it should. The next step is to restart the process:
All icons and the interface will immediately return to their place, and at the same time some of your computer’s RAM will be freed up.
regedit command

You can free up a small part of the memory using the regedit command - cleaning the system registry. To do this you will need:

A special registry editor window will appear, where you have to navigate through it and find:
Be careful, as changing data in the registry requires certain qualifications and caution. Removing important system components may cause your computer to malfunction.
Removing malware
It was already said above that some types of malware can consume exclusively system resources.

Other, less dangerous ones simply use RAM for their work. In any case, it is necessary to combat these misfortunes in order to return the computer to its previous state. You can detect and remove malicious software using antivirus software. Fortunately, today developers provide free versions with limited functionality, but even so they are fully capable of protecting your computer from external threats. To scan and remove viruses, all you need to do is:
Cleaning your computer hard drive The computer hard drive often has a hard time. It can store a huge amount of data, including data that is not used by any program or application. All this can lead to deterioration in computer performance over time. In addition, it is on the hard drive that a certain volume is blocked in advance for storing the paging file, which is otherwise called virtual memory. The system resorts to using it when RAM resources are no longer sufficient.

Then the information is written into virtual memory and subsequently everything necessary is taken from there, but for effective operation it is necessary to have a sufficient amount of free space on the hard drive. This is why experts recommend regularly deleting unused programs, emptying the trash can, and getting rid of outdated files. In addition, it is recommended to defragment your hard drive. It will arrange all the necessary files and folders into specific sections on the hard drive, which will allow the system to find them much faster and easier in the future, without loading RAM or virtual memory. You can do this as follows:
Video: how to unload RAM
Special programs for cleaning RAM
If for some reason you are worried that you might harm your computer, for example, by deleting some necessary files or closing system processes, then you can use the software.
This application is a whole set of settings for working with the operating system. With its help, users can clear the computer's RAM of unnecessary data. The developers provide this program in two variations - paid and free. In the first case, the functionality will be somewhat richer, but in the second you will get the same ability to offload RAM, and completely free of charge. It should be noted that the free version contains not the most pleasant “surprises” in the form of additionally installed programs. Therefore, during installation you should specify “Custom installation” and remove everything unnecessary so as not to clog up your computer even more. If you are an inexperienced user, you can change the interface to “Simplified”. In the “Expert” mode, you can specify all the data that will be subjected to thorough verification. Change the parameters as you wish and click on the “Check” button. After this procedure is completed, click “Fix” and you will get the result you wanted.

Unloading RAM through Advanced SystemCare
It should be noted that no matter what mode you perform the scan, unnecessary information from RAM will still be deleted by the program and you will free up a significant part of RAM.
Wise Memory Optimizer
Wise Memory Optimizer is no longer such a professional program, but it still allows you to perform all the necessary manipulations with RAM. It is free and has Russian localization, so anyone can download and install it on their personal computer without any problems. You do not need any special knowledge or skills to work with this utility. You can download a portable version of the program, which does not require installation, but performs all the same functions. To clean and unload RAM, just launch the application and click on the “Optimize” button. After completing the procedure, it is advisable to restart your personal computer, and you will immediately notice how much faster and better it works.

Optimizing RAM using Wise Memory Optimizer
nCleaner
This free application, along with others, allows the PC owner to optimize his own device, and not only by freeing up RAM. It can delete temporary and unnecessary files that are not used by any applications, delete data from the registry and clear information in RAM. To clear the RAM, just select the “Find Junk” item, click on the “Analyze” button and wait for the procedure to complete.

Unloading RAM using nCleaner
CleanMem
This is one of the simplest utilities that allows you to clean up RAM. It does not have any third-party functions, so it takes up minimal space on your hard drive. In the application settings, the user can change the parameters for displaying processes, the program tray icon, and change other minor parameters. Perhaps the most important feature of the program is that it will work automatically. You don't have to regularly run a RAM check yourself. It will insert itself into RAM every thirty minutes, search for hidden and reserved data and unload it, and all this will happen automatically after installation.

Cleaning RAM using CleanMem
VC RamCleaner
VC RamCleaner is an analogue of the previous utility. This is also a small and simple application, used purely for cleaning and unloading RAM. After launching the utility, you will receive information about the maximum amount of RAM on the computer and the one currently in use. Click on the Clean System Memory button, and you will immediately get the desired result after finishing the cleaning procedure. You can perform the procedure yourself or specify an acceptable time interval in the settings, after which the program will automatically re-analyze the system.

Unloading RAM memory using the MemoryCleaner application
RAM Memory Cleaner and Optimizer
The same easy-to-use, small program that is suitable for every user. After installation and launch, a window will appear displaying current information on consumed system resources at the current time. Despite the apparent simplicity of the utility, it allows you to free up not only RAM, but also the central processor. To do this, just click on the Start Optimizer button. You can minimize the application to the tray and not end the process, then the utility will systematically integrate into the device’s RAM and regularly free it of unnecessary information.

We optimize the operation of RAM through the RAM Memory Cleaner program interface
How not to clog up your computer's RAM
To avoid cluttering up your computer's RAM, it is enough to regularly monitor what programs you have open. If you don’t need any running application right now, then feel free to close it. Do not forget that each web browser tab also consumes RAM, so while surfing the web, try to remove those sites that you no longer need. Often, users forget to restart their computer, and such a simple procedure greatly helps to relieve RAM. The last thing to mention in this case is to use an antivirus to prevent malware from entering your computer. Many viruses and worms consume a lot of RAM, which will have a negative impact on the performance of your PC.
Video memory, due to its specificity, does not require any specialized cleaning. The user will only need to restart the computer or reinstall the drivers for the graphics adapter.
How to clear virtual memory
Virtual memory is no less important than RAM. The device usually resorts to using it when RAM resources are no longer sufficient. Therefore, users are advised to clean it regularly. This can be done in two ways: using the Control Panel or the Group Policy Editor.
In the first case you will need:

Up-to-date information about the computer's virtual data will be displayed here. Change the paging file parameters using the “Set” button and specify the optimal value.
Remember that it should be no more than 50% of the amount of RAM.
In the second case:

Video: how to work with virtual memory
Manually or with the help of additional utilities, each user can free up a significant part of RAM and increase the performance of their own computer, optimize it and continue to work without crashes and freezes. Regular cleaning and unloading of RAM will bring excellent results.
Recently, some smartphones have become smarter than a desktop or laptop. However, such devices still suffer from certain disadvantages. One of them is limited memory space. This is why there is a regular need to free up memory on your phone. This article will tell you how to do this.
It should be noted that there are different types of memory - in this, smartphones and tablets are no different from PCs. First of all, it should be highlighted RAM. It contains the currently running applications. But the operating system consumes the most RAM. If your device only has 1GB of random access memory (RAM), then you are bound to run out of memory from time to time. That is why much larger amounts of RAM are built into modern flagships.
Tablets and smartphones also include permanent memory. It is non-volatile. It stores photos, music, application files, videos and much more. Gradually, it can become filled with junk files, resulting in the need to clear the internal memory. You can find out about the current memory status as follows:
Step 1. Go to the section " Settings».
Step 2. Click on the item " Memory».

Step 3. Here you will see exactly what the built-in memory is full of.

Step 4. At this moment, you can clear the cache on Android. This word refers to all sorts of residual application files that may have already been deleted. This action will definitely not lead to anything terrible. You can do it by clicking on the item “ Cache data"and confirmation of your desire.

It should be remembered that different manufacturers may hide the “ Memory" in different places. For example, in Samsung tablets this section is located in “ Settings", in the tab " Are common».

The easiest ways to free up memory
In about half of the cases, users need to free up RAM. This is usually required in order to have the resources to run a game with very heavy graphics - for example, some kind of 3D shooter with a first-person view.
The easiest way to free up RAM is to close all currently open applications. This is done by pressing the corresponding system key and “swiping” the thumbnails of running programs.

You can also use third-party utilities for this purpose. For example, CCleaner or something similar. Some such programs can close applications automatically, every hour or some other period of time. Modern Samsung smartphones have an analogue of this utility called Smart Manager. It can be used to clear both RAM and permanent memory.

Clearing the built-in memory
Freeing up permanent memory is much more difficult. It stores many files, and the user does not always know the purpose of each of them. Not to mention the fact that without root rights, access to a certain category of them will be closed. In any case, you cannot do without a file manager. You can use ES Explorer or a utility called, surprisingly, File Manager. Using these programs, you can go through the file system, transferring photos, music and some other user data to the memory card. If your smartphone does not have a memory card slot, then you will simply have to delete heavy files.
But the problem is that the permanent memory is clogged not only by the data that gets into it at your will. Gradually, all sorts of garbage accumulates in it, which only a specialist can detect with the help of a file manager. An ordinary user can clear memory on Android only with the help of specialized applications. For example, the aforementioned CCleaner copes well with this task. Working with this utility is very simple:
Step 1. Download, install and launch the application.

Step 2. Click the button Analysis" The utility will immediately begin scanning the operating system for junk files.

Step 3. At the end of this process, CCleaner will show you the maximum amount of memory that can be freed.
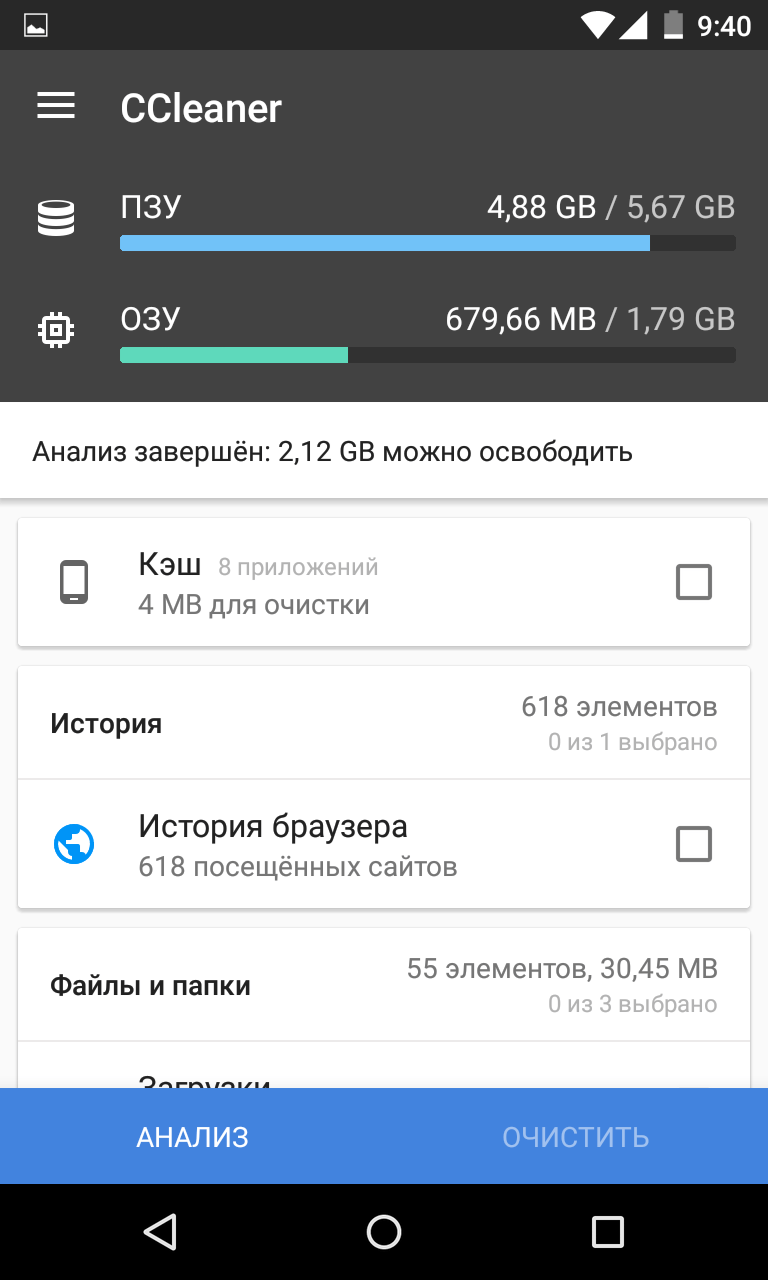
Step 4. Select the types of files you are ready to delete. Be careful. For example, “” may well contain the musical compositions or pictures you need. Therefore, each section should be checked before allocation.
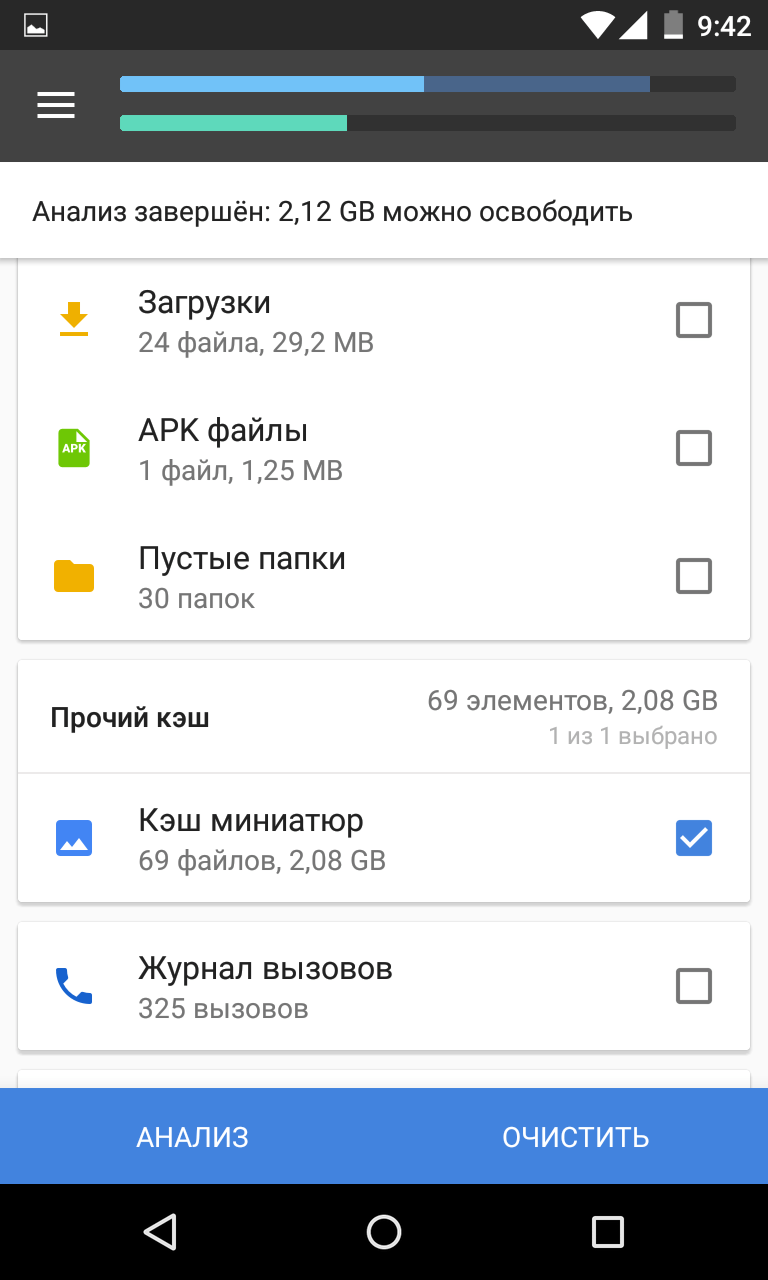
Step 5. Click the button Clear" After this, the application will try to clear the device’s memory, then presenting you with the results of its work.

Step 6 In the case of CCleaner, you can schedule the cleaning of selected partitions. In this case, you will no longer need to do regular memory cleaning on your own.

As mentioned above, you can free up system memory using some other utilities. The essence of their work is the same. In this regard, you can easily understand their interface and functionality.
The memory full problem, which can be identified by the message issued by the Android operating system “Memory Full,” is quite common. Moreover, there are no universal solutions for it, but there are many tips. In this material we will try to systematize all, or at least most, of the available information on this issue.
Types of memory in Android devices
RAM, Random Access Memory or RAM - random access memory or random access memory. Software (including the operating system and installed applications) writes the data they need during operation into this memory and can quickly read it. RAM requires constant power - when you turn off or restart the device, it is completely cleared. The more RAM, the correspondingly more different processes and services can be launched simultaneously. The “Phone memory is full” error may occur if the entire amount of RAM is completely exhausted, and there is not enough free space for the application being launched.
ROM, Read Only Memory or ROM - read-only memory. The information stored in it cannot be changed and is recorded during the manufacture of the phone, or when reinstalling the operating system - that is, during the flashing process. ROM is often divided into several sections to perform internal functions.
Interal Storage (Interal Phone Storage) – internal storage of a smartphone (or other device). This memory section is designed to store user data, installed applications, and so on. This is something like an analogue of a hard drive in a personal computer. Naturally, in the process of writing data to the internal memory of an Android device, the free space here becomes less. The total storage capacity and the amount of free space can be viewed in the device settings.
External Storage – or, essentially, a microSD/microSDHC memory card. The user can expand this type of memory at will, if, of course, the device supports memory cards and there is a corresponding slot for this. It is something like an external hard drive for a personal computer. The total and occupied volumes of this type of memory, as well as the free space on the card, can be checked in the settings of the Android gadget. You can store multimedia data such as music, movies, pictures on the memory card. Starting with Android 2.2, it became possible to transfer installed applications to a memory card if the application itself supports it, thus saving space on the internal storage. Before replacing a memory card, it is strongly recommended that you first unmount it rather than simply removing it from the device.
Why does memory run out?
Usually, after some time of relatively “quiet” use of a device on Android, users begin a period when they want to modify this very device in every possible way programmatically. The endless installation of applications, scripts, and so on begins. And sooner or later the message “Phone memory is full” appears, especially if the model is not one of the “top” ones, and there is not that much memory. It is logical to assume that the problem is in RAM - yes, this is partly true. But cleaning it up is much easier; this can be done both through the settings and using various downloadable utilities. So, a message about a lack of memory in the device appears when the internal storage is full. Of course, you can constantly clean this very drive, remove unnecessary applications, and so on, but over time it will be seen that the notorious “Phone memory is full” will appear more and more often. What is this connected with?
- The Android operating system installs applications to internal memory by default;
- Not every application can be transferred to a memory card;
- Vital programs like Google Maps and Google Play built into your device are periodically updated, taking up additional internal memory cells;
- Some manufacturers load up the smartphone or tablet you buy with pre-installed games and other software called bloatware.
Checking free space
Via dispatcher
Button - call the dispatcher
On Samsung devices, press and hold the Home button for about a second, then go to the memory icon.
The data here is displayed in the format "Occupied/Total", so you will need to remember a little arithmetic lessons.
Through settings
Everything is simpler here: Settings > Options > Memory . And you don’t need to count anything.
How to clean - overview of options
Operational measures
For a quick, although not very long-term, solution to the situation, clearing temporary files will help. They have the extension .rm and are stored in the folder datalocal mp. You can delete temporary files with Root access, for example, using Root Explorer.
Also, in the above folder data you can find many files that have the extension .log and contain “error” in the name - these are log files of errors from various applications that take up quite a lot of space. We delete them and forget about “Phone memory is full” for a while.
Removing dex files
Now let's look at a more thorough method of cleaning space on the internal drive. Each program on a smartphone or tablet, or any other Android device, when installed, creates a file with the extension .dex in the directory datadalvik-cache. But sometimes, on some system applications these files are missing, and the following picture is visible:

It's really strange that the program takes up 0 bytes. As it turns out, the reason lies in the fact that along with these files, the firmware contains files of the same name, but with the .odex extension. These files can be created, and then there is no need to leave the .dex files. For example, LuckyPatcher can “oddex” applications. So, first, look in the application properties to see how much space it takes up:

In this case it is 1.68 MB, so the corresponding .dex file is in datadalvik-cache takes up the same amount of space, and the created .odex file will weigh the same. We launch the mentioned LuckyPatcher, select the desired application in the list, press on it (not just “tap” once, but press and hold), we see the context menu:

We select the first or second item, and it does not matter that the application may not need to remove license verification or remove advertising at all. After this, the program will create the .odex files we need. You can now remove .dex files from datadalvik-cache. And now we see that the application already takes 0 bytes, but it works fine. This method is suitable for system applications.


For custom applications, everything is a little different. We select the application we need and go to its folder on the memory card, look at the free memory of this application. In this example, 1.56 MB is reserved for the program folder, while the .dex file occupies 1.68 MB.

There are several ways to solve this problem: either move the selected application to the system directory and carry out the manipulations described above, or forget about this idea specifically with this application and take on some other program. By the way, if you move the application to user memory and then create .odex, you can delete .dex, and the program will work normally. But when you move it to a flash drive, the .odex file will be deleted and the application will refuse to work. In this case, there are only two options left: reinstall the program again or do a complete clear of dalvik-cache. So not every application can work without .dex - the method will only work with applications that have more free memory than .dex.
Hard reboot
You can solve the problem radically by using Hard reset - a hard reboot of the communicator. This is a good step, returning the device to its original factory settings. The speed of operation increases, the smartphone instantly responds to all input and literally begins to “fly”. But, on the other hand, such an action can cause inconvenience for the user, because this is the deletion of data, files, applications that he will be forced to install again.

An effective but harsh way to solve the problem
Removing unnecessary applications, their updates and cache
To get rid of unused apps, go to Settings > Options > Application Manager.

Finding it in the Application Manager menu is not so difficult
Once in the “Downloaded” tab, call up the menu and sort the files by size. Next, select the applications you abandoned and click “Delete”.
You can only remove updates from applications that you installed yourself - a similar trick won’t work with built-in ones.
Select the application, click on “Uninstall updates”, and then click on “Disable”.
If you have root, then you can even get rid of system software. But be careful - one awkward move and your smartphone will fall asleep.
To clear the application cache, go to: Settings > Options > Memory.
Wait a few seconds until the amount of occupied space is determined, then select “Cached Data” and tap “OK”.
Using CCleaner utility

CCleaner is perhaps the best of the utilities
I can’t say that this method is super-effective, given that some utilities themselves take up a lot of space and even display advertising. Therefore, if you decide to resort to it, then choose the proven CCleaner.
After the utility has done its job, you can safely delete it - until the next need.
Video: How to free up memory on Android
“Phone memory is full” is certainly one of the most unpleasant and annoying messages for Android device owners. We hope that thanks to our advice, she will not bother you for a long time.
Freeing up memory on Android is not such a difficult task if you do it right. And this article is designed to teach you exactly that.
Before deleting something from the device, it is necessary to audit what is stored on the device and how much memory each element occupies. To do this, go to the “Settings” section, then “Device memory”. Here you can see detailed statistics on how much memory space is occupied by applications, pictures, audio, video downloads and other components.
By clicking on each element you can go to the screen for managing these elements. For example, by clicking on the “Photo” section, you will be taken to your photo gallery.
Note that if you click on "clear device cache" this will free up memory on Android, but it may slow down your apps a little as they have to fetch that cache data again. In addition, clearing the cache may lead to the fact that in some of your applications you will have to re-enter your username and password to enter them.
It is also worth noting that if you manually moved music or video files to other directories, Android will count them in the “Advanced” column.
If you have an SD card in your smartphone or tablet, then in the same section you can also view the data located on it.
Now that we have studied what our memory is clogged with, it’s time to move on to freeing it
2. Managing your applications
Look at the application icons on the desktops of your devices and honestly answer the question of how many of them you use regularly. Surely there are some that haven’t opened for several months. It's time to delete them to free up Android memory.
If you cannot decide which of the installed applications can and should be removed, go to the settings section and select “Applications” or “Application Manager”. Select "Downloaded".
Here you can see a list of applications that you have recently downloaded, as well as how much memory space they occupy. This will help you make an informed decision about which applications can be safely removed.
Start with the apps you no longer use, look at the largest apps that take up a lot of space, and consider whether you need them. To remove an application, simply click on its name and then the “Delete” button.
Please note that some of the applications you will not be able to uninstall due to the fact that they are built into Android or the software of the smartphone or tablet manufacturer. But if you select the “All” tab and click on any of such applications, you will find a “Force Stop” button there, then that application will no longer run and waste Android memory. In addition, you can remove updates for these applications, which will also relieve the device memory.
It also makes sense to transfer some applications to an SD card, however, unfortunately, not all Android devices support this function. In addition, if you format the SD card, your applications on it will become unavailable.
3. Clean up your photos
Review your photos in the gallery and make sure that there are no random or unnecessary ones. You know, photographs of the floor, ceiling and sky are of little artistic value. In addition, the necessary photos can be placed on an SD card, your computer, or, finally, on one of the cloud services, for example, Dropbox or Picasa.
4. Stream music and movies
If you have a really large music library, you don't necessarily need to store it on your device. Services like Google Play Music and Amazon Music can store a large amount of music files and stream it to you whenever you want.
Five full-length films in HD quality can take up 15 gigabytes or more of memory. A dozen 1-2 minute videos you shoot will add a couple more gigabytes to this. So it is not practical to store all this on your gadget.
If you purchased a movie using Google Play or Amazon, then they can always be found in the cloud services of these companies. Don’t forget about services where you can watch videos online, without having to download them to your tablet or smartphone.
5. Cloud services
We've already mentioned cloud services for streaming music, videos and storing photos, but we'll name a few more such services.
For example, Google Drive is an obvious choice for Android users, making collaboration very convenient.
Google Drive along with Google Play, Google Music and other Google services like Gmail and Google Docs give you 15 GB of storage space to store your data.
10.08.2017
All owners of gadgets running the Android operating system often face the problem of filling up the internal memory of their device. How to clean it and get rid of problems associated with ROM fullness. Let's figure it out.
All manufacturers of smartphones, tablets and other mobile equipment declare the amount of internal memory in their characteristics. But when purchasing such a gadget, you need to understand that part of this memory will already be occupied by the operating system and system programs. This poses certain problems when downloading the latest episodes of an interesting TV series or the discography of your favorite group to your device. If you don't want to see the inscription " Android internal memory is full", you have to compromise and upload one thing.
This can be avoided if, in addition to your own memory, you purchase a large flash card for your device. But, not all modern devices support external drives. What should owners of such devices do, how to clear their phone memory?
There are several solutions to this issue:
- Transfer “heavy” files (pictures, audio and video) to your computer
- Clear memory of unnecessary (“junk”) files
- Transfer files to the cloud
Transfer files to a flash card
But let's start by solving this issue for those devices that support SD cards. Want to know how to move files on Android? Nothing could be simpler. In order not to fill the memory, you can save all possible files to a flash card. To do this, specify this option in the settings:
- Cameras
- Voice recorder
- Browser
- Messengers
- File downloader
This list can be continued for a long time. Particular attention should be paid to applications that work with “heavy” files. For example, image, video or audio editors. When saving files to a memory card, create a folder there (if this is not done automatically) for each application. Then you can avoid problems with your device’s memory being full.
IMPORTANT
This method of clearing device memory cannot be used for system files. This can cause problems with the performance of the gadget and even its failure.
 The easiest way to move files from the device memory to the card is using a file manager. There are a lot of applications in this category in the Play Market. The most popular today is.
Many consider this manager to be the best for Android, and for good reason. With its help, you can simultaneously move several folders and files, it is possible to save apk files of installed applications and much more.
How to move files on Android using ES Explorer:
- To do this, you need to select them (long press on one file),
- call menu ("More" button)
- find the “Move to” item
- in the proposed list you need to select “SDCard”
How to move files on Android using PC
Synchronizing your device with your computer has many benefits. You can share files and keep the amount of free memory at the required level. For example, before going to work, you can “upload” new chapters of an audiobook, music albums or videos. This procedure can be carried out every time you need to update and measure such files.
Connecting your Android smartphone or tablet to your computer is very easy. All you need to do is connect these devices using a USB cable. To do this, you do not need to download any programs or drivers. Modern computer operating systems can easily determine the type of connected device. You can enter its memory using standard conductors.
Today you can use a more modern solution - AirDroid. With it, you can share files with your PC remotely. While outside your home, you can download a music album or movie from your media library and listen to it. No wires are needed for this. All you need is a stable Internet network. To which both the PC and the mobile device must be connected.

Setting up such synchronization using this service is very simple. Thanks to the user-friendly interface of the program, even those who have never had the opportunity to share their files remotely can do this.
How to transfer applications to a memory card
Any application installed from Paly Market by default is installed in the device memory. And it takes up an unreasonably large amount of space. In order to transfer applications from the memory of a smartphone or tablet to a flash card, you must have super administrator rights () and install special software Link2sd.
IMPORTANT
If the procedure for obtaining root rights is incorrect, your device may turn into a “brick”. Therefore, this procedure must be carried out very carefully, monitoring every step. But even properly rooted, it voids the developer’s warranty. Is it worth the risk? Answer you.
Some applications can be transferred from the device memory to the card without special rights and applications. To do this, go to “Settings” and select the “Applications” section. There you can find a sparse set of tools for such a transfer.
There is another way to transfer applications to a memory card - the program Android Assistant. Essentially, this is a whole package of small utilities that will help you carry out all the necessary actions with your Android system.
This application can be found on the Play Market. After you install and run it, you need to go to the “Toolbox” section. Among the lists of provided tools, you need to find “App2Sd”. When you click on this item, a menu will appear. Where you need to select “Application information”, and then “To SD memory card” (if this item is active).
Using Android Assistant, you can batch remove unnecessary applications. And thereby clear the memory of your device.
How to clear internal memory of Android from garbage
A very large amount of the memory of any device is occupied by garbage. In order to keep the amount of free space under control, you need to periodically clean the system of such files. The easiest way to do this is with special software - Clean Master.
By “garbage” we mean the cache of Internet pages, running applications and their remains after uninstallation. Over time, such garbage accumulates and not only causes the internal memory of Android to fill up, but also negatively affects the performance of tablets and smartphones.
Clean Master is a very convenient and multifunctional tool for cleaning Android internal memory from garbage and optimizing the device. To use it, you need to install this application and select the menu item - “Garbage”. Then click on the “Clear” button. The program's algorithms will analyze the memory and find files that can be deleted.
Storing files on cloud services
Thanks to high-speed Internet, today there is no need to download the files you need to smartphones or tablets. They can be uploaded to special services (“clouds”) and used if necessary. Almost all leading companies provide the opportunity to use cloud services for free. And if the space provided by such a tariff is not enough, then it can always be expanded at an additional cost.
The most popular cloud storages are:
- Google Drive
- Yandex.Disk
- OneDrive
- [email protected]
Each of these solutions has an application for easily syncing files with a remote service. It is enough to install such an application (or several), mark the files that need to be placed on the server and, after transferring them, delete them from the device. Then, when you need to use such a file, just go to the application and click on it.


