How to Set Up an iPhone from Scratch - Detailed Instructions. Opting out of setting up an account to access Apple services. What you need to use Apple Pay in Russia
Over time, the iPhone begins to work somewhat slower. This is especially noticeable by users who use the device to its fullest, installing hundreds of applications and tweaks from Cydia. In this article, we will describe how to troubleshoot all problems, erase your device, and set it up as new.
Before you begin the active steps of setting up your iPhone as new and erasing all data from the device, you need to back up your data. No one wants to lose the photos, videos, contacts and music that have accumulated over several months or years, so you should approach this stage very carefully.
Note: the instructions are valid for both iPhone, iPad or iPod touch.
How to set up iPhone like new? Preparatory work
Step 1: Install the latest version of iOS. To do this, go to the menu " Settings» → « Basic» → « Software Update» and check for new versions of iOS. If your device is jailbroken, you can only install the latest version of iOS using iTunes.
 Step 2: Back up your device data.
Using iTunes:
- Open iTunes and connect your iPhone to your computer using a USB cable.
- Select your device in iTunes, turn on the " This computer" and press " Create a copy now».

- Wait until the copying is complete and check if there is a backup copy by going to the menu " Edit» → « Settings» → « Devices».

Using iCloud:
- Go to menu " Settings» → iCloud → « Backup copy».

- Click the button Create a backup».
Step 3: Turn off iMessage by going to the menu Settings» → « Messages».
 Step 4: Disable Find My iPhone under " Settings» → iCloud.
 At this point, all the preliminary measures necessary to set up the iPhone as new are completed and you can begin cleaning the device.
How to set up iPhone like new? Cleaning your device
Step 1. Go to menu " Settings» → « Basic» → « Reset».
 Step 2: Select an item “Erase content and settings» .
 Step 3. Confirm your choice and wait until the operation is completed.
The device is completely cleaned, and a welcome message appears on the iPhone screen - which means we have done everything correctly and you can start setting up your smartphone as new.
How to set up iPhone like new? Setup process
Step 1: In the device setup prompt (appears after deleting content and settings), select " Set up like a new iPhone».

When you turn on any of the Apple tablets and smartphones for the first time, you need activate. New iPhone and iPad users are unaware that the activation procedure is quite simple - they are willing to pay sellers to take the right steps.
The initial setup service for Apple equipment is one of the most expensive; in different salons, consultants charge from 500 to 1,000 rubles for activation. This article will tell you how to properly set up your iPhone the first time you turn it on. on one's own, and will relieve the user of the need to enrich communication stores.
Before you begin setting up your Apple device for the first time, you need to take the following steps:
- Recharge your device. It is necessary that the gadget's battery is filled at least 30%.
- Insert the SIM card into the tray using a special needle. Without a SIM, it was possible to activate gadgets with a pre-installed iOS operating system lower than version 7 by making an emergency call to 112. The new iOS 10 operating system does not provide this option.
- Connect your smartphone to Wi-Fi or mobile Internet. If 3G (or LTE) appears next to the network signal indicator and the operator's name, you will be able to do without Wi-Fi. If you have an EDGE signal (letter E), you will have to connect to the router.
- Download and install the latest version of iTunes on your PC. You can find the program here - http://itunes.apple.com/. If the user does not have access to a Wi-Fi network and does not have an “unlimited” SIM card, he can perform the initial setup via a PC/laptop with iTunes installed and wired Internet.
After completing all of the above steps, you can proceed directly to activating your iPhone.
How to set up iPhone for the first time?
You need to activate your Apple gadget as follows:
Step 1. Turn on the device by holding down the “Power” button for 2-3 seconds. The Apple logo will first appear on the screen, followed by a greeting in different languages (“Hello,” “Hello,” and so on).
There is no need to be afraid of hieroglyphs at this stage - if the greeting is in Chinese, this does not mean at all that the iPhone is fake.
Step 2. Swipe your finger from left to right along the bottom of the display and on the next screen select Russian from the list of available languages.

Step 4. Select an available Wi-Fi network and connect to it.

If the network you would like to use for activation is not in the list, add it - click the “Select another network” button and enter the SSID.
If you want to use mobile Internet for initial setup, click on the “ Use cellular connection", located just below the list of networks.
Step 5. Enable/disable location services. Many of the iPhone applications are related to geolocation - if you refuse it, you will not be able to use, for example, a navigator. On the other hand, geolocation consumes a lot of energy - therefore, it is still recommended to turn it off during activation (“ Disable»).
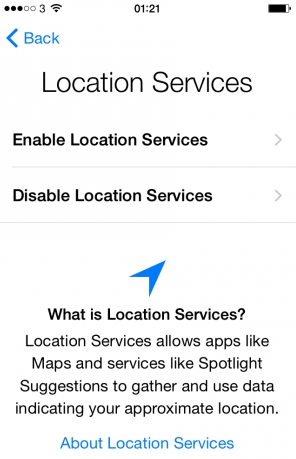
Whatever decision you make at this stage, it will not be fatal. Location services can be activated or deactivated at any time.
Step 6. The iPhone will prompt you to create an Apple ID or sign in with an existing account.

Click on the button " Skip this step" and then confirm your decision by clicking " Skip».

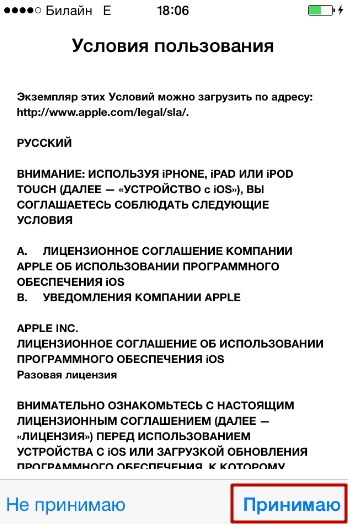
Step 7. Accept Apple's terms of use - click " I accept" You can familiarize yourself with them in advance, but this will not bring you much benefit - there is nothing remarkable or interesting in the text.
Step 8. If you are the owner of an iPhone 5S or a newer model, the device will prompt you to configure Touch ID- fingerprint sensor. At this stage you have 2 options: " Tune" And " Set up later».
It is clear that by choosing the first option, you agree to configure the fingerprint sensor immediately, and if you prefer the second one, you postpone the procedure. It is recommended that you set up Touch ID the first time you activate it. This does not take much time and effort - the user only needs to touch the button with his index finger or thumb several times. Home" You can be sure that the procedure has been completed correctly if the message “ Successfully» (« Success»).
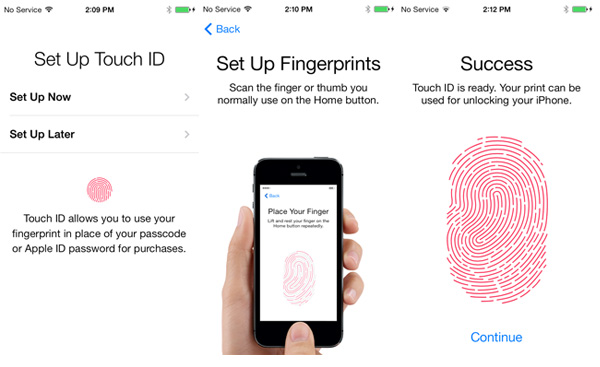
Image: everythingicafe.com
Step 9. Create a numeric password. This code will allow you to unlock your device if for some reason Touch ID is unable to recognize your fingerprint. Enter 4 numbers that you will definitely remember, twice.

You can leave creating a security code “for later” - to do this, click on the “ Don't add a password».
Step 10. The final step is to choose whether you want error data to be sent to Apple. The manufacturer recommends choosing the option " Send automatically“- according to representatives of the Apple company, reverse information allows you to create more advanced products.

Information that goes to Apple includes geodata. This essentially means that the manufacturer will know where and when you were.
This completes the initial iPhone setup process. The welcome message “ Welcome!».

Click " Get started"and start exploring your new device!
Common iPhone activation problems and how to solve them
Most often, problems arise when activating an iPhone because of the SIM card. If the user sees the message “ Activation Error", he needs to make sure that the SIM card is working.
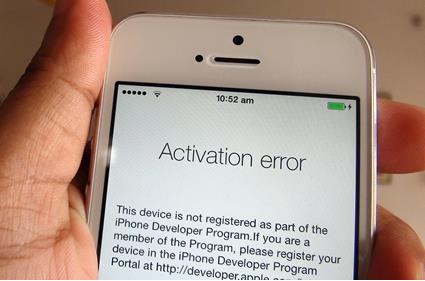
Image: infoidevice.fr
To do this, just move the card to another phone and see if the network is detected.
If the SIM is OK, you should try to fix the error as follows: by pressing the " Home"Call the bottom menu and click on " Start Over" This will not take you to the first settings page - try activating it again. You may have to do this procedure 6-7 times in order to get rid of “ Activation Error».
During the initial setup, you may encounter another error - “ Could Not Activate iPhone."
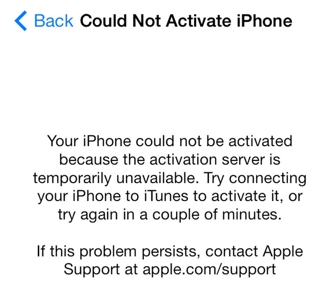
Image: ipadappsbuzz.com
The reason for this error is high load on the Apple server. It is best to wait 2 - 3 minutes and try to activate again. If this doesn’t work, you should change the way your gadget connects to the Internet - for example, use 3G instead of Wi-Fi. You can also write a complaint to Apple support, but you will have to wait several days for a response from the company’s specialists.
Finally, the third common problem is that beginners are unable to set up Touch ID - the sensor simply does not respond to finger touches. The solution to this problem lies on the surface - it is necessary to remove the factory film from the front edge of the device. The desire to protect the new iPhone from scratches is commendable, but for this you need to use a special film, and not the one that comes in the kit.
How to set up your iPhone like new?
The need to set up a used iPhone like New occurs when the device begins to freeze and slow down. The gadget's memory becomes clogged - this leads to slow and unstable operation of the device. A complete reset of your iPhone will help you quickly get rid of “garbage” in your memory. There is no need to worry that all user data will be deleted as a result of the reset - after all, you can first “pack” valuable information into a backup copy.
Correctly configure your Apple device like new you need this:
Step 1. Check if Apple offers you to update the operating system of your gadget. To do this, follow the path " Settings» — « Basic» — « Software Update" If you see that under the iOS version it says " Latest software installed", carry out further actions.
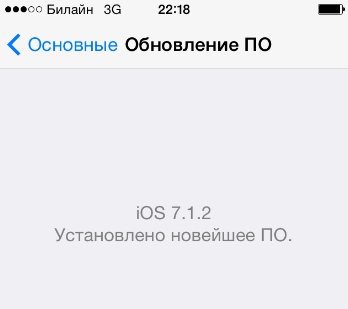
If there are updates available, install the latest version of iOS
On a jailbroken iPhone, you can only update the operating system through iTunes.
Step 3. Disable iMessage and the " Find iPhone" The messenger is deactivated in the " Messages" V " Settings" To turn off " Find iPhone"you need to go to the section " iCloud».

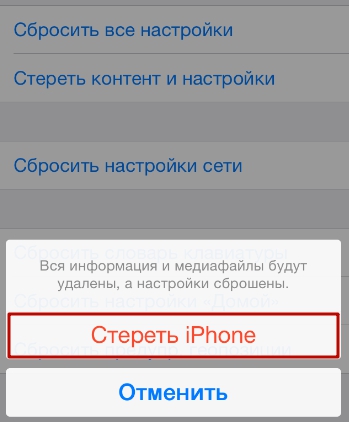
Step 4. Start cleaning your device. Follow the path " Settings» — « Basic» — « Reset" In the last subsection you will find the item “ Erase content and settings" - that's what you need.

Click on this item and enter your security password.

Then confirm that you want to erase your iPhone - click on the appropriate button.
Next, wait for the gadget cleaning procedure to complete. If at the end of the procedure a welcome message appears on the screen, it means you did everything correctly. Set up your iPhone according to the instructions in this article, and then restore your data from backup. Through such manipulations, you can significantly increase the performance of the gadget without losing any important information.
Conclusion
When setting up your iPhone for the first time, the most time-consuming part is opening your Apple ID account. Another difficult step used to be registration in Game Center - but this application is no longer available in iOS 10. You can complete all other stages of iPhone activation in 5 minutes - they are simple and do not require the user to have programming skills. For this reason, paying the money that consultants ask for the initial setup of an Apple gadget is completely unreasonable.
Great new feature in iOS 11.
After selecting your device language and region, iOS 11 will offer to use the automatic quick setup feature. To do this, you need to bring another iPhone, iPad, or iPod touch running iOS 11 close to the new or custom device.

At this time, a window will appear on the screen of your main device asking you to confirm the start of the setup procedure using your Apple ID account. Click Next.

Immediately after this, the Quick Auto Setup main window will open on the iPhone, iPad, or iPod touch you're setting up.

And on the main (or old) device there is a window with a camera lens. To finally confirm the quick setup of a new iPhone, iPad or iPod touch, you need to place the blue ornament on the new device in the camera lens. Note that if the camera does not work on your old device, then by clicking on the “Manual Authentication” button, you can transfer the settings without having to use it.

On the next screen, iOS 11 will offer to restore applications and their data along with settings. This feature makes it especially convenient to switch from an old iPhone to a new one. On the new iPhone, all your applications will be in their usual places, and most importantly, all your data will be available in them. If you do not want to transfer absolutely all applications and their data to a new device, then click the “Other backups” or “Do not restore” buttons.

Ready! In this simple way, Apple proposed in iOS 11 to transfer data and settings from device to device.
Have you just come from the store, taken out a brand new product from Apple with your hands trembling with happiness, but don’t know what to do with it now? No problem, read these detailed instructions, how to set up an iPhone and enjoy! Go!
iPhone activation and setup
When you turn it on for the first time, you need to do several steps once to initially set up your iPhone, which you will never have to repeat later. So, after pressing the power button, the first thing the phone will do is greet us in several languages and offer to set up the iPhone. Click on the corresponding link
In the next step, select your country

Next, to set up the iPhone, we will be asked to connect to a WiFi network. If you wish, you can do it right here. If there is no free Wi-Fi in the coverage area, then skip this configuration and select “Use cellular communication.”

After this comes geolocation - determining the location of the smartphone using GPS satellites. Since it consumes battery power unrealistically when constantly activated, it is better to disable it at this stage of setting up the iPhone. Subsequently, when installing applications, for example, Navigator, the phone itself will ask again whether you need to allow the use of geolocation specifically for this application - then we will allow it.

All modern iPhone models contain the unlocking function using a fingerprint; you will be offered to set up the so-called Touch ID in the next step. Follow the instructions on the screen, place your finger on the scanner and this smartphone protection will be activated. Later you can add more fingerprints for other fingers or family members.

And upon completion, we will also be asked to come up with a six-digit password in case the fingerprint scanner does not work

The next step is to restore settings from your old phone. If you already had an iPhone before, you can transfer all the old saved iPhone settings to the new one. If this is your first Apple phone or you don’t have a backup copy of your old one, then select “Set up as a new iPhone.” There is also the opportunity to transfer data from the Android platform, but this is a topic for a separate article.


When creating an Apple ID, we will be required to enter the region again

Accept the privacy policy

Enter your real email, which will receive a letter with a registration confirmation code, and also create a password


That's it - now go to the mailbox specified during registration and confirm registration.
Let's return to setting up the iPhone. After creating and authorizing your Apple ID, the voice assistant Siri activation window will appear. The thing is convenient, but you need to get used to using it. Therefore, if you do not plan to control the phone with your voice, then turn it off - also to save charge.

Finally, if you have the latest iPhone model in your hands, you can customize the appearance of icons and text on the display in a standard or larger version.
All! The iPhone is configured from scratch and is completely ready to work. Now you can start the fun part - installing applications, but more on that some other time 😉
Steve Jobs, unlike most of his colleagues, was neither a programmer nor an engineer, which is why we see key Apple devices as they are - simple and convenient for the average user. However, when purchasing their first Apple device, most people still have some questions.
In contact with
In this material, we focus on the primary setup and preparation of the iPhone for use, without touching on various nuances related to hardware, jailbreak, iCloud cloud service, etc. Probably, the list of actions below will allow beginners to avoid annoying (but correctable) mistakes.
Check if you bought a new iPhone

You need to buy an iPhone in Apple Stores, Apple online stores, or from official resellers (you can find them). In this case, you should definitely save the sales receipt or receipt, which will avoid many problems in the future.
However, we do not live in an ideal world; most people still prefer to save money. In the case of the iPhone, this may be buying a “gray” (imported bypassing customs), used or refurbished device. In all three cases, you can buy a smartphone relatively cheaply, indistinguishable from the one on display at the Apple Store, but there is also a risk of a bad purchase. We have repeatedly talked about the nuances of choosing and purchasing an iPhone in our materials:
How to activate and set up iPhone
When you turn on your iPhone for the first time, the device must go through activation on Apple servers and initial user setup. This process should not cause any difficulties, but we will still describe it in as much detail as possible.
- Insert a working SIM card into your iPhone. The “paper clip” for removing the SIM card is located in the box (on the inside of the cardboard); if you don’t have a proprietary tool, you can use a paper clip, pin or needle;

- On the Welcome screen, swipe " Set up" from left to right;
- Choose language;
- Indicate your region of residence;
- Connect to an existing Wi-Fi point (if you don’t have one, to activate your iPhone you will have to connect it to a computer with Internet access and the iTunes application installed);
- If desired, enable location services (you can later disable them in the settings);

- Enter your fingerprints into the Touch ID memory to later use the scanner to log in to various services, purchase applications, unlock your iPhone, etc.;
- Set a digital screen unlock password (in the parameters you can select the number of characters - 4 or 6);

- Sync data from iTunes/iCloud backups or use a tool to export them from your Android device. If there is no such need, select “Set up as a new iPhone”;

- Enter your Apple ID and password. If you don't already have an Apple ID and don't plan on making iTunes purchases anytime soon, DO NOT SIGN UP FOR IT ON THIS SCREEN! Consistently press " No Apple ID or forgot it", and then " Configure later in Settings" And " Do not use". Create an Apple ID without linking it to a credit card (described in the next paragraph of this article);

- Accept Apple's terms and conditions;

- Activate the Siri virtual assistant or select " Turn on later«;

ON THIS TOPIC:
- If desired, submit a diagnostic report to Apple;

- Select the display mode of interface elements according to your vision and preferences;

- The activation and configuration process is completed, you can start working.

How to create an Apple ID
The difference between Apple and many ecosystems is the clear linking of devices, rights, subscriptions, content and services to a specific user. That is, almost all actions (reflashing a smartphone, installing applications, changing critical settings, etc.) are performed not by the abstract “Ivan Ivanov”, but by a very specific person who is assigned a special identifier - Apple ID. Therefore, you must approach the creation of an appropriate account responsibly - use a trusted email address, come up with and remember a complex password, and be sure to save it. In addition to protective properties, various bumpers, cases, covers and films can also expand the functionality of the device.
ON THIS TOPIC:
Extending battery life

Users have been waiting for innovative power supplies for mobile devices for many, many years, but lithium-ion batteries are still the most effective option in terms of price/quality ratio. However, despite all their advantages, such batteries have a very limited resource - if the iPhone is handled correctly, the battery capacity will decrease by about 20% after 500 charging cycles, otherwise by 50%.


