Instructions for updating the BIOS on your computer. BIOS firmware from Windows
Most PC users are unlikely to need to know how to update the motherboard BIOS, since this process is quite risky and does not provide much benefit.
However, in some cases an update is still required:
- If there is unfinished microcode on the board (as a result of the manufacturer’s attempt to beat competitors by releasing the product earlier);
- If necessary, eliminate some problems with integrated devices (for example, refusal to work with a theoretically supported type of memory or processor).
Checking Upgradeability
Having decided to reinstall the BIOS on the motherboard of your PC, first of all, you should make sure whether you need to update this collection of firmware and whether this is possible.
You can find this out on the manufacturer’s website in the technical support section (CPU Support List).
As a rule, it also contains information about the compatibility of processors and BIOS versions.
However, before doing this, you should definitely find out the revision of your motherboard and the parameters of the BIOS already installed on your PC.
Checking the revision and BIOS
There are several ways to determine a revision:
- look at the inscription on the motherboard;
- read the labeling on its packaging.
The last option is simpler - but only if the box from the board has been preserved. In addition, sometimes a computer is purchased assembled, and the box goes directly to the entire system unit.
Therefore, most often you have to remove the side cover (after disconnecting the PC from the network) and look for inscriptions like REV 1.0 or REV 2.0 on the board. This is a revision.
Determining the version of the BIOS installed on the board requires less time.
Usually it is enough just to display the system information window by entering the text “msinfo32” in the command window (Windows keys + R).
Among the information provided, you can find the manufacturer of the motherboard, its model, and BIOS version.

When all the required information about the board has been received, you should visit the official page of its manufacturer and check for BIOS updates.
Sometimes the data is presented in English, however, most manufacturers have official resources and technical support in Russian.
Finding BIOS information for your board is usually quite easy.
Advice: If the computer was purchased already assembled and has a certain model, you can try to find suitable BIOS versions on the website of the system unit manufacturer. As a last resort, at least the parameters of the board will be indicated here, knowing which you can continue your search on the resources of the company that issued it.
You might also like these articles:
Update methods
Depending on the specific model of the board installed on your PC and its manufacturer, the BIOS can be updated in one of three main ways:
- from DOS mode, present on all, even modern computers designed to work with Windows OS;
- from Windows;
- using special programs (utilities) produced by manufacturers and allowing flashing not from Windows or DOS, but directly from the BIOS itself.
Update in DOS
The first option was used 20 years ago, although at that time a boot floppy disk was required for flashing.
Now you will need a special disk or flash drive where the Autoexec.bat (or Update.bat) file is located, which is necessary to start the installation.
Additional utilities and BIOS elements should also be recorded here.
Having prepared a bootable USB flash drive (you can use special programs for this), you should set the ability to boot from media in the same BIOS and proceed with the update.
It will take a little time, but it is very important that the computer is not turned off or restarted at this time.
Updating the firmware package through Windows is much easier, although not much faster. To do this, you must first download a new version of the BIOS from the manufacturer’s website, which will be installed on the board.
In addition, all manufacturers have their own installers.
For example, Asus has this application ASUSUpdate.
Before starting the flashing, install the utility, like a regular program, and then open it.
When the request appears on the screen, select the update “from file” and indicate the path to the BIOS package already located on the computer’s hard drive.
Sometimes the utility can find, download and install the latest version suitable for the board on its own

Update Utilities
In order to be able to update the BIOS using proprietary programs from the manufacturer, you should find them on the official pages of the manufacturers.
There are such utilities, for example, on the pages of manufacturers Asus, Gigabyte, MSI and Intel.
This option is most suitable for regular users as it requires the least amount of steps and also avoids the mistake of using the wrong BIOS.
Advice: While the utility is running, you should close all other programs. In addition, it is not recommended to perform any actions on the PC. Moreover, it takes little time - up to a minute on new computers, 2-3 minutes on old devices.
ASRock
ASRock, a company that produces motherboards for powerful processors and the latest memory modules, has its own flashing utility.
This can usually be accessed by pressing F6 when testing or booting the system.

The utility itself finds the necessary storage media from the BIOS and displays only suitable firmware. After selecting the desired version, with just one click, you can update in a couple of minutes.
ASUS
Most of the latest models of Asus motherboards are successfully updated using the USB BIOS Flashback utility, which is downloaded from the website of the Russian branch of the manufacturer.
For older versions, use Asus Update Utility, which runs on Windows.

MSI
You can reflash MSI motherboards using the proprietary MSI Live Update program, which automatically detects the appropriate versions and downloads them from the network.
You can find the utility and instructions for it on the official website of Micro-Star International.

Gigabyte
The best place to download utilities for updating the BIOS of Gigabyte boards is on the manufacturer’s official website. It automatically detects the required version and downloads it from the network.
Board manufacturers Foxconn, Toshiba and most other lesser-known manufacturers most often do not have their own universal utilities.
Sometimes reinstalling the BIOS using proprietary programs of these brands is not possible for all motherboard models.
In this case, other flashing methods are selected.
Hello friends! In today's article we are with you update the BIOS of the ASUS motherboard. This is a serious matter and needs to be treated as such. The process of updating the BIOS of any motherboard, although very simple, any mistake in it will cost you dearly - you will have to bring the motherboard back to life in a service center, since you probably do not have a special programmer. At the beginning of the article, I will briefly remind you what BIOS is.
BIOS is the most important element of a computer - a microprogram written on a chip, which in turn is located on the motherboard.
BIOS - provides basic OS access to the computer's hardware capabilities. In simple words, BIOS explains to the operating system how to use this or that computer component.
Immediately after turning on the system unit, BIOSchecks all devices (POST procedure) and if any component is faulty, thena signal is heard through a special speaker, which can be used to identify the faulty device. Eif everything is fine, The BIOS will begin searching for the OS boot loader code on the connected drives and finding it passes the baton to the operating system.
Now about the not so good. The BIOS update process itself lasts a couple of minutes, but if at this time, the electricity in your house will be turned off, and your computer is not connected to an uninterruptible power supply(UPS), then the operation of the firmware will be disrupted and you simply will not turn on the computer. To restore, you will have to look for a special programmer (BIOS recovery is a topic for a separate article).
I must say that manufacturers foresaw the seriousness of the issue at the dawn of motherboard production completely excluded the possibility of updating or flashing the BIOS, Only very recently the BIOS began to be equipped with a special program for its update. But still,Updating the BIOS of any motherboard usually occurs once in its life, and sometimes not at all.
The most important rule if you work on a computer or laptopquite satisfied, then you don’t need to update anything, butif you still decideupdate the BIOS, then there must be good reasons for this. Here are some of them.
There are no new features in your BIOS. For example, there is no technology AHCI, but there is only an outdated IDE, but you bought a new interface hard drive SATA III (6 Gb/s) or generally SSD. Technology AHCI will allow your drive to use modern capabilities and the operating system on the new hard drive will run faster than in IDE. Having visited the website of your motherboard manufacturer, you saw that a new BIOS update had been released, and you also learned that after the update, your motherboard will supportAHCI! In this case, you can update the BIOS without hesitation.
One of my friends lost sound on his computer, reinstalling Windows and drivers did not help, he decided that the built-in sound card had burned out and bought a discrete one, so the system worked for 7 years, then the processor on this computer had to be replaced, this required updating the BIOS, after the update the built-in The sound card worked.
Another case. The client's computer constantly rebooted and reinstalling the operating system did not help, they replaced everything that was possible in the system unit, they did not change only the motherboard and processor. We finally decided to install new firmware on the BIOS and it helped!
In the “System Information” window that opens, we see the BIOS version - 2003
Now we go to the official website of the manufacturer of our motherboard ASUSP8Z77-V PRO and choose "Drivers and utilities"
Select any operating system and expand the “BIOS” item. We see that there is update 2104 (a newer version than ours).
Click on the “Global” button and download the firmware.


Latest BIOS firmware (P8Z77-V-PRO-ASUS-2104.CAP) downloaded in the archive. We extract it from the archive and copy it to USB-f leshka. The firmware weighs 12 MB.

The USB flash drive must be formatted in the FAT32 file system and must not contain anything other than a BIOS update.

Reboot and enter BIOS.
In the initial BIOS window we see the old firmware version 2003.
Click "Additionally" and go to the additional BIOS settings.
(Left-click on the screenshot to enlarge)

Go to the “Service” tab

Select the BIOS firmware utility - ASUS EZ Flash 2 or you may have ASUS EZ Flash 3.

In the ASUS EZ Flash 2 window we see our USB flash drive with firmware P8Z77-V-PRO-ASUS-2104.CAP.

Click on the file with the firmware with the left mouse button.

If you have reached this topic, there is most likely something wrong with your computer. Updating (also called "firmware") the BIOS can help solve some problems, such as incorrect operation of peripheral devices or lack of support for modern processors. But don’t rush to change things; let’s first study the theoretical part.
How to update BIOS Gigabyte
The first and most important thing you need to know is that the BIOS update operation must be treated with extreme caution. If you turn off the computer's power during the update process, there is a high chance that the motherboard will fail. If your PC is working properly, then you should not chase the latest updates so as not to sacrifice performance.
Have you decided? Then go ahead! If possible, connect your PC to an uninterruptible power supply, and fully charge the battery on your laptop.
There are two main ways to update Gigabyte BIOS:
Method 1: Q-Flash
Q-Flash is a utility from the manufacturer Gigabyte built into the BIOS. “Firmware” with its help is a simple and understandable process, and the update can be carried out by an ordinary user who does not have deep knowledge of computer technology. If you have an older BIOS version that does not have Q-Flash, proceed to method No. 2.
We will analyze the update using the example of the Gigabyte GA-H110M-S2H motherboard:
- Go to Gigabyte official website.
- Click on the magnifying glass (search button) in the upper right corner of the screen.

- Enter the equipment model (in our case GA-H110M-S2H) and select a model from the drop-down list.

- Click on the link "Advantages", then click on "Support".

- Click on the button "BIOS", select the latest version and click on the download icon.

- Unpack the downloaded archive, from it you only need one firmware file, in this case it is "H110MS2H.F21".

- Copy this file to a flash drive, first save it in FAT32.
It is advisable that the flash drive only contains the firmware file!
- Restart the computer, after starting press the key "END" until the Q-Flash utility loads.
- Select an item "Update BIOS from Drive" and press "ENTER".
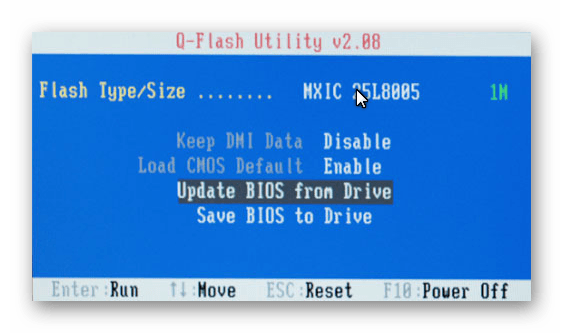
- From the drop-down list, select a flash drive, most likely its name will be “HDD 1-0” (depending on the number of media connected to your computer) and click "ENTER".
- Select the file with the firmware (if you listened to our advice in step 7, then there is only one and you won’t have to look for it) and click twice "ENTER".
- Wait until the update process completes and a completion message appears.
- Press any key and you will be taken to the initial menu. Next click "ESC" And "ENTER", after which the computer will reboot.
Method 2: @BIOS Utility
@BIOS Utility is a utility for Windows OS that can update the BIOS directly from the system. In order to use the @BIOS utility, you must first download and install the .Net Framework version 4.5 or higher and APP Center (an application from Gigabyte for making the most of the motherboard's capabilities).
- Follow the first four steps from method No. 1.
- Click on the button "Utilities", and then to the loading icon in the line with the phrase "APP Center".
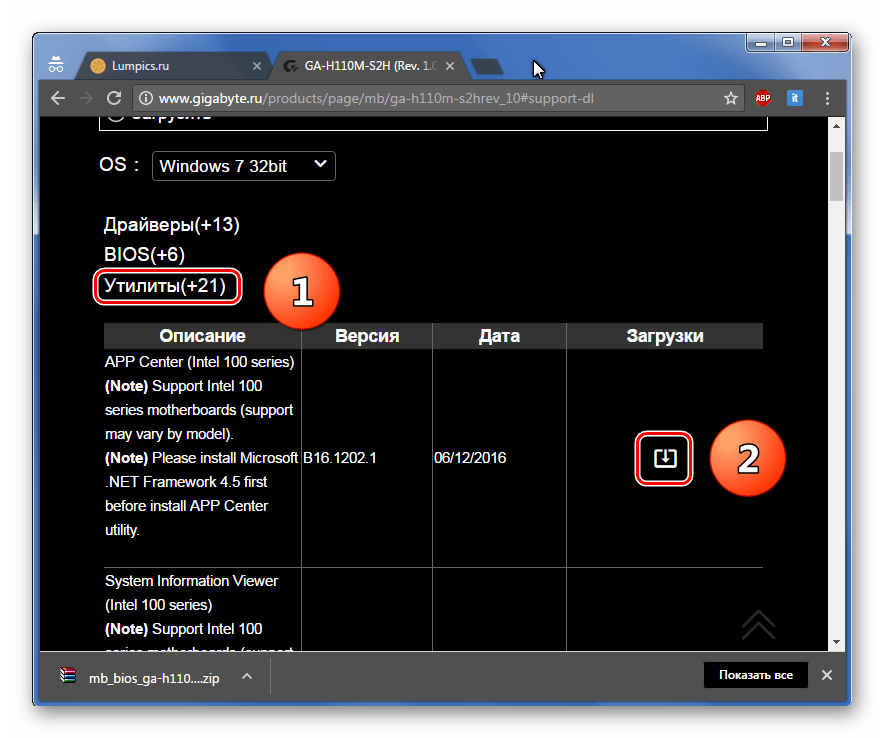
- Unpack and install APP Center.
- Find the phrase in the table "@BIOS" and click on the download icon.
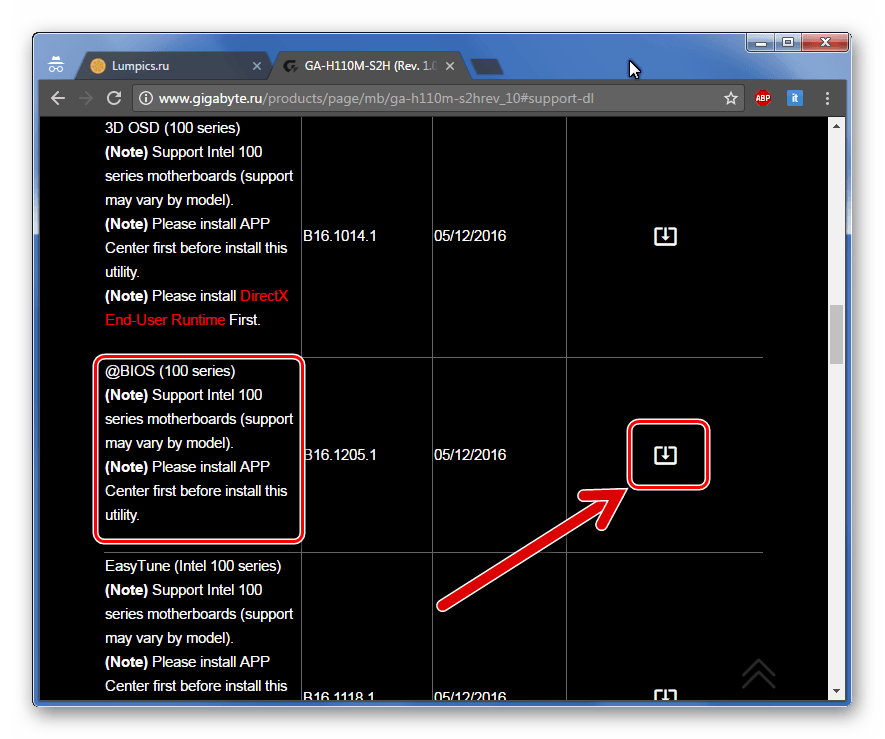
- Unpack and install @BIOS Utility.
- Launch the utility.
- Click on the button with the text "Update BIOS from GIGABYTE Server". The firmware file will be automatically downloaded and the program will update the BIOS.

When downloading the firmware, stable power supply to the computer and Internet connection must be provided!
- You can also use the firmware file downloaded manually in method No. 1, to do this, click "Update BIOS from File" and select the file.
- Wait for the update to complete and restart your computer.
In this article, we looked at two ways to update the Gigabyte BIOS. It turns out that there is nothing complicated about “reflashing”. The main thing to remember is that you must not allow a power outage or internet connection (if the second method is used).
If problems arise with the motherboard, when purchasing new hardware for the system unit, errors may appear in the BIOS. In some circumstances, it is enough to update the BIOS. But it must be done with caution and only in cases where it is really necessary.
Reasons for flashing
With the help of BIOS, the joint operation of all equipment located on the motherboard is ensured. And since processors and RAM are changing quite rapidly, there is a need to improve the compatibility of these devices with the motherboard. With the right approach, it is, of course, possible to harm a computer or other devices with an installed OS, but it tends to zero. The process is usually short and takes from a few seconds to a minute.
Determining the current version
Before updating the BIOS, you need to check which version is installed on your computer. The newest ones may solve problems with some processors and motherboards, and you may have the latest version.
The check can be carried out using OS tools. For example, in Windows it is done through the command line by entering:
- wmic bios get smbiosbiosversion.
In addition, you can use third-party software, for example, msinfo32 or AIDA64.
In other operating systems that are becoming increasingly widespread as desktop operating systems and are most widespread among server operating systems - GNU/Linux - this check is carried out through the terminal (console):
- dmidecode -s bios-version.
This command is executed with administrative rights.
Downloading the update

Updating BIOS varies slightly among different motherboard manufacturers. They share common methods, but the tools, files, and instructions are different.
First of all, you need to find out the name and model of the motherboard. This can be done by opening the system unit, finding sales receipts for the purchase of computer components, or using special programs that will display available information about the equipment.
You need to download the firmware provided by the manufacturer. You should not search through a search engine, since you can find one that can lead to infection of computers with malware.
Updates usually come in zip format. Once downloaded, they need to be written to a boot disk or flash drive.
Update using USB via BIOS
Motherboards, as a rule, have special modes through which BIOS updates can be installed. You can launch it directly from this program or using hot keys after the computer is started.
Updating the BIOS via BIOS is carried out by installing the first boot device of the one on which the new version of the downloaded firmware was unpacked. After downloading from this media, you may need to indicate where the installation file is located.
Update for Gigabyte motherboards using Q-Flash

It is possible to use the previous option here. In addition, updating the BIOS of Gigabyte boards can be done using the Q-Flash mode:
- To activate it, when starting to boot the system unit, you need to press the End button.
- Files with updated firmware should already be on the appropriate media.
- After selecting this mode, the file browser starts, in it we select the “Update BIOS from the drive” item.
- Then we indicate the device on which the firmware is saved.
- After confirmation, by pressing the Enter key, a fairly long period of updating the microsystem code starts.
The recording process cannot be interrupted, as this will contribute to the failure of the computer, and then it will be possible to “revive” it only using special equipment.
Update for Gigabyte motherboards from various OS

In addition, the update for this card can be performed from under Windows OS using the @BIOS flasher program. It is downloaded from the manufacturer’s website, where you need to select the download option that matches the computer configuration.
- After this, we launch the program to update the BIOS, having first killed processes that take up a lot of memory and heavily load the processor and closed running programs.
- What's next? In the running application, select “Update BIOS from file”, indicate where the unpacked firmware is located and begin the recording process.
- After a short period of time, the update will complete.
Similar actions can be carried out using GNU/Linux OS distributions. There, using the methods intended for installing programs in this particular distribution, you need to install the flashrom package.
- #flashrom -r (file_name_in_which_the_firmware_is_saved).bin;
where (file_name_in_which_the_firmware_is_saved) is the name given directly to the firmware.
Then we issue a command to install the new firmware in the BIOS, using the same command, only instead of the ‑r key we enter the -w key and, accordingly, the name of the file of the new version. The program can check the installed version (we additionally specify the -v switch), as well as make the output informative (the -V switch). There are other keys that can be found using the help.
If several chips are used on the motherboard, then the selection is made with the -c key.
This system allows you not only to flash the BIOS, but also to save or record by loading the nvram module. Then from root, using the dd program, reads from this device to a file:
- dd if=/dev/nvram of=(file_name).bin.
The settings can be written back by swapping if and of.
Flashing the BIOS of an MSI motherboard

In this case, you can carry out flashing in any available way. The company itself produces the Live Update program, which is capable of updating BIOS for MSI boards in computers. It is not advisable to use it in other gadgets, since such use can lead to unexpected errors that will then be difficult to fix.
The program is launched with administrative rights. It is better not to use the automated version of the firmware, since there are reviews that it does not always work correctly; it is better to download the archive and unpack it.
In the “System Information” tab, click on the “Scan” button. The application will search for the required firmware, after which we click on “Install on Windows”.
The update can also be performed when the computer boots, selecting the M-Flash option. When using it, you enter the BIOS and look for this name there. In the “M-Flash Function as” option we set: “BIOS update”.
You can also install it like Gigabyte, using a device with written firmware as the first boot.
In the GNU/Linux system, the same actions are performed as described above.
Flashing the BIOS of an HP motherboard on a laptop running Windows

Using this manufacturer as an example, let's look at how to flash a laptop.
On his website we download the WinFlash application. Updating the BIOS in HP laptops with corresponding motherboards is carried out when using this program by clicking on the “Start” button. The program will do the rest itself. You can also use the Phoenix Tool program.
If suddenly something goes wrong:
- Take a flash drive and format it to fat.
- Copy a file with firmware with the extension .fd onto it and rename it to a file with
- Disconnect both the power and the battery, then press the “Super” (Win) + B key and hold until the power turns on.
The computer will beep, but will restore the previous BIOS version.
Flashing the BIOS of an HP motherboard on a laptop running GNU/Linux OS
In GNU/Linux OS, the firmware can be downloaded from the official HP website. True, it will be in EXE format, but it can be unpacked either using wine or using the 7z program. From the entire list you will need only 3 files: one with the extension .bin, another - .efi and the third - .sl12.
- In the boot partition /boot/efi/EFI we create the HP/BIOS folders.
- In it we create a New directory, in which we place the bin file, and in the HP/BIOSUpdate directory we place the two remaining files.
- Reboot the laptop, press Esc (F10) (see what is written below) and select File → Update System BIOS.
The firmware is updated while the power is on. The process continues for several minutes. The FS on the flash drive must be FAT32 ESP. If you have an Internet connection, the update can be done directly through it using the same menu.
Updating the BIOS of the AsRock motherboard

This board has an Instant Flash program integrated into the BIOS. With its help, the chip code is rewritten.
Updating the BIOS of an Asrock board does not occur in the OS, but through the BIOS shell itself, so user intervention here is minimal.
The update can also be performed from Windows. To do this, find the downloaded firmware, unpack it and run it with administrative rights. The update will be performed automatically from the command line.
Actions after flashing
You need to study the instructions for your motherboard. If no additional actions are provided there, then they do not need to be performed, except for restarting the computer. After which its operation can be tested.
If any failures are noted, then it is better to roll back to the old version of the BIOS, which is best saved first. How this is done in the GNU/Linux family of operating systems was described above; in Windows, this function is built into the corresponding programs with which flashing is carried out.
Thus, after updating the BIOS, the main action is to reboot.
Finally
As you can see, there are a sufficient number of programs for updating the BIOS. First of all, the user must decide whether he needs to flash a computer or laptop or whether he is quite satisfied with the way these devices currently work. After all, as a result of an incorrectly carried out update, you can end up with non-functional equipment.
If the user still decides to take this step, then he needs to download the firmware from the official websites of motherboard manufacturers, having first found out the name of the specific model. Then you need to follow the instructions provided or search on the manufacturer’s website, since, although not so often, both the software and BIOS menu items can change.
The most dangerous thing that can happen during an update is a power outage, so it is better if you have an uninterruptible power supply.
In the vast majority of cases, the user No need update the BIOS, but there are exceptions when updating the BIOS is simply necessary to gain access to different functions or new features. For example, to install a new generation processor on a compatible motherboard that was originally designed for earlier processor models. Often this scenario is directly related to updating the BIOS and in such cases the user has a question: how to update the BIOS?
For reference: This article describes basic principles and concepts the very concept of updating the BIOS. Each manufacturer has its own BIOS/UEFI update process. Therefore, it is best to consult the official manual from your PC or motherboard manufacturer. After reading these instructions, of course.
Although modern computers use UEFI instead of BIOS, this article refers to “updating the BIOS” as including updating the UEFI. You can find out in a separate article.
Warning: Be very careful when updating the BIOS. If your computer freezes, crashes, or loses power, the BIOS or UEFI may become corrupted, leaving your device bricked. This risk must always be taken into account. If you are not confident in your abilities, it is better to contact a specialist, technical support, or completely abandon the idea of updating the BIOS. And yes, not worth it update just like that. If you do not know why exactly you need to update the BIOS, it is better not to update it at all. The universal principle “if it’s not broken, don’t fix it” applies to this procedure like no other.
How to check BIOS version
Before updating the BIOS, you need to find out if there are new versions for the motherboard. And to do this you need to find out the motherboard model or BIOS version.
How to update the BIOS of a computer or laptop
Now go to your motherboard or computer manufacturer's website to check if there are any motherboard software updates available. The section with driver downloads often lists all BIOS versions released for this motherboard. Select the latest option or the specific version you need. It should also be noted that manufacturers often offer beta BIOS versions, which may not be as stable as the release versions. We do not recommend installing beta versions unless you have experience with BIOS flashing and other experiments. We remind you that you should install a specific BIOS version only if you know what you need it for.
Again, each manufacturer may have its own website structure and download section, but the basic principle is that BIOS versions are often located in the section with drivers for your particular computer or motherboard.
Most likely the BIOS will be packaged in a ZIP archive. Unzip its contents to any folder and familiarize yourself with the contents. There are also cases when the BIOS is loaded as an executable file.
There are several methods for flashing the BIOS, but you need to look for the one recommended by the manufacturer depending on the motherboard or computer. The frequently downloaded BIOS file contains a Readme file where you will find detailed information about the installation and flashing process.
Some manufacturers have provided a special button for updating inside the BIOS. You load the updated BIOS onto the flash drive, reboot your computer, open the BIOS, click the update button, select the file on the flash drive, and the BIOS magically updates to the new version. You can get into the BIOS in different ways. Often these are the F12, F2 or Delete buttons, which must be pressed while the computer boots.
There are also more traditional DOS-based BIOS flashing tools. You will need to create a DOS Live USB flash drive, copy the firmware utility and the BIOS itself to it. After this, the computer reboots and starts from the created USB flash drive. After this, the BIOS flashing procedure occurs inside the minimalist DOS interface. Often the command for flashing looks like flash.batBIOS.bin or something like that. If your computer's motherboard BIOS must be flashed via DOS, the manufacturer will most likely ensure that the necessary files are downloaded along with the BIOS on the official website. This must be a file with permission bat or exe. We remind you: Always look for guides on updating the BIOS on the manufacturer's official website. This approach guarantees you a minimal chance of making a mistake.
All the described methods for flashing BIOS can slightly frighten an unprepared user and discourage him from flashing. And this is good, since, most likely, such a user does not need to flash the BIOS at all. Still, there are more friendly, but at the same time more risky ways to update the BIOS. Some manufacturers have developed special applications that can update the BIOS inside Windows itself. It is difficult to recommend this method.
The developers themselves often do not advise using them (paradoxical, but true). It is best to use the update mechanisms built into the BIOS or a DOS Live flash drive. MSI, for example, advises its users to update the BIOS exclusively within the BIOS itself.
Flashing the BIOS inside Windows can lead to a number of problems. Software running on Windows may prevent the utility from properly uploading the firmware. The fact is that BIOS is low-level software that should very deep get into the hardware of your computer. There is a risk that the operating system's protective mechanisms will interfere with this process and interfere with the operation of the utility, which in turn will lead to BIOS errors or failure. Keep this in mind. If there is an alternative, it is always better to use DOS or the built-in BIOS update mechanism than a Windows application.
In general, the BIOS update process consists of the following steps:
- Download the BIOS from the official website.
- Copy it to a flash drive.
- Boot into BIOS.
- Launch the update mechanism and select the downloaded file.
- Wait for the process to complete and restart the computer.
Yes, you won't find specific instructions here. This is impossible to do due to the number of different manufacturers and different nuances, but we hope that this article has given you a general impression of what a BIOS update is and how it all works.


