Which is better AHCI or IDE? How to improve HDD performance. AHCI or IDE which is better
If you turn to the system administrator and ask a question, what is the weakest link in the computer? - you will receive the answer that it is the HDD, because it is practically the only mechanical element of the system that slows down the operation of the entire computer. In this regard, many manufacturers were looking for a way out, at least some opportunity to speed it up, also with SSDs. The output became visible when using AHCI.
AHCI disk mode includes several main differences (there are 3 of them), which make it a priority in the use of all disk drives, except outdated IDEs. The main features of the mode:
- Hot Plug – allows you to “hot” change computer components (disks). Thus, there is no need to turn off and unplug the PC; you can change the HDD and SSD directly in operating mode. This is important for server stations where disconnection is unacceptable and is simply convenient for anyone who uses multiple disks;
- NCQ – support for “deep” command sequence, that is, it is able to configure a more efficient trajectory of the head in mechanical ones and significantly increases the output in SSDs;
- TRIM is primarily applicable to SSDs, as it guarantees a significant increase in speed.
AHCI mode allows you to enjoy all these benefits and most likely you have the opportunity to enable it. If you are using an SSD, then you probably need to turn it on to see the proper speed of its operation, this applies to both SATA II and SATA III, except for older IDE drives. Therefore, if you are in doubt about which mode to choose: ide or AHCI, the latter is definitely an advantage.
How to check if AHCI mode is enabled?
The first thing you need to do is find out whether it is worth pursuing further switching; perhaps it is already active for you. There are several places that show the information you need: Device Manager and BIOS.
- Click Start, right click on “Computer” and click on “Properties”;
- Now select "Device Manager";
- Next, expand the “IDE ATA/ATAPI controllers” section;
- Check to see if there is a section called AHCI.
If there is no such item, you may find out that it is inactive. We will also consider another option through the BIOS (UEFI):
- Go to the BIOS by pressing Del or F2 (possibly other keys) when starting the computer;
- You should go to the section called SATA or Storage in different options until you find SATA Mode/Configuration, where the mode will be shown.
At this stage, do not change the connection mode, as this may result in system errors. It is best to enable AHCI mode in the BIOS and install on a new Windows, which guarantees normal processing of the mode, but this is quite radical.
How to enable AHCI mode in Windows 7?
The most relevant and widespread system in which we will perform actions. It's also worth noting that if you're installing a new drive, you can freely switch the AHCI mode without any consequences. There are also several options for activating AHCI: through the registry and through a utility. A more correct option would be to use the registry to prepare the system for further changes; the latter method will simply help solve pending errors in the computer.
- Press Win + R and type regedit;
- Follow HKEY_LOCAL_MACHINE\SYSTEM\CurrentControlSet\services\msahci;
- Replace the value of the Start option with 0;
- Here you will find the lastorV section;
- Also replace Start with 0.
Now you can enable AHCI mode in the BIOS and Windows will correctly detect it by installing the necessary drivers. An alternative method involves changing the mode initially and then simply clearing the error. To do this, use the official Microsoft Fix it utility. After installation, run a check and the failures will be eliminated; you may need to run from safe mode.
How to enable AHCI mode in Windows 10?
In general, the actions are not significantly different; let’s look at the differences in editing the registry.
- In the same section as in Windows 7, you need to change the Start parameters in the iaStorV and storahci folders to the value 0;
- Expand each of the specified sections and go to the StartOverride subsections, where parameter 0 is set to 0.
We were able to enable AHCI Windows mode, but it is worth noting that it is better to launch it for the first time in safe mode in order to avoid unnecessary problems. During the initial startup, the AHCI operating mode will install the necessary drivers automatically.
It is worth mentioning the distinctive features of how to enable AHCI mode in Windows XP and other outdated versions.
Despite the fact that XP does not support this mode at all, there are drivers that expand these capabilities, although this is unsafe.
You should also think about whether it is worth it, because if the computer is very weak for more modern systems, then the speed increase will be insignificant. Also, the AHCI controller mode in Vista is activated in the same way as the “seven”.
So, AHCI sata mode is easy to enable, and the system will reward you for your efforts with an increase in speed. Usually there are no problems with changing the controller, but if you encounter them, just run the Microsoft Fix it utility. AHCI is required when using an SSD drive, otherwise you will not use its full speed.
If you still have questions on the topic “What is AHCI mode and how to configure it?”, you can ask them in the comments
if(function_exists("the_ratings")) ( the_ratings(); ) ?>
Maximum performance is achieved when using the AHCI mechanism. Therefore, all new PCs that run the Windows 7 operating system or older versions of the OS from Microsoft use this option. If we are talking about older systems, then you still need to think about whether to use AHCI or IDE. What's better? The answer to this question depends on many factors.
AHCI or IDE - which is better? How to choose the desired mode?
Despite the popularity of the Windows 7, 8, 10 operating systems, many owners of personal computers and laptops continue to use Win XP. The OS is stable. People feel comfortable working with her. However, Windows XP also has a number of significant disadvantages:
- official Microsoft support for this OS has been completely discontinued;
- technologically outdated operating system;
- does not support new versions of DirectX (versions 10-12);
- safety problems;
- there is no support for the most current technologies;
- It is impossible to install many modern programs on XP;
- There are no drivers for new equipment.
The list could go on for a long time. If we consider the question of which operating mode is better - AHCI or IDE - then it is worth taking into account the fact that Windows XP simply does not support the first option. This, of course, also applies to older versions of the Microsoft OS. Therefore, the choice here is obvious - only IDE. But if a person belongs to the category of advanced users, he can load special drivers into the system that allow the use of the AHCI mechanism. By default, this mode is not supported.

How IDE mode works
Components that require an ATA interface for connection use the IDE mechanism to operate. This technology is outdated, but it was widely used in the nineties of the last century and at the beginning of the 2000s. The standard was introduced in the IBM PC - the first mass popular computers.
The IDE (parallel drive interface) mechanism provided data transfer at a speed of 150 Mbit/s. It did not allow the use of some technological solutions that were relevant at that time. Thus, it was impossible to hot remove a hard drive or CD drive from the system without shutting down or rebooting the system. Similar features were added by engineers some time later, but only a portion of computers received their support. Knowing the background to the development of interfaces, you can easily answer a number of questions: AHCI or IDE - which is better for a specific operating system, which scheme provides faster operation?
Active use of Parallel ATA interfaces ended around 2006, when the new SATA standard began to play a major role. However, even after 10 years, the IDE is still in use, although it is used much less frequently. The mechanism is used in almost all old computers and laptops, and is active even in systems that support AHCI.

Features of AHCI mode
The emergence of the new SATA interface, which had more powerful capabilities compared to the previous PATA technology, created the need for a new mechanism for working with the system. This is how AHCI mode appeared. It allowed the resources of the newly appeared interface to be used to their full potential. Today, this mechanism is supported by all modern motherboards.
Using the AHCI mode allows you to transfer information at the highest possible speed and use any current technological solutions. All current operating systems have device drivers that operate this protocol. So what should you choose now, IDE or AHCI? What is better for a modern computer? In most cases, the choice should be made in favor of the second option.

Advantages of the AHCI mechanism
Modern drives with SATA interface are fully compatible with the new mode. What advantages does this mechanism have? Still, choose IDE or AHCI - which is better? Windows 7 and newer versions of Microsoft OS are capable of working with the two above protocols. But the second one is better used for new systems.
Benefits that the user receives when using AHCI:
- high data transfer speed;
- excellent performance;
- full compatibility with modern operating systems;
- the ability to hot-swap hard drives;
- support for NCQ technology (improves HDD performance).
Knowing about all the pros and cons of the solution, it’s easy to make a choice whether to install AHCI or IDE in the settings. What would be better for a modern computer? If it is not equipped with PATA drives, it is better to install a new mode.
Which mode to set in BIOS settings
Although IDE mode has long been obsolete, it is still supported by motherboard manufacturers. Even the newest models have the ability to use this interface. In the BIOS settings in the corresponding section, you can change one mode to another. The default is usually AHCI. You can run into an exception, but this happens extremely rarely.
If we take a typical situation where a user is trying to install the Windows 7 operating system on a computer, then he does not even have to make any changes to the BIOS to use the new scheme. Perhaps some will find it familiar to work with the old interface. So, IDE or AHCI - which is better? Windows 7 allows you to use both modes.
If the hard drive or other storage device is connected to the motherboard via the SATA interface, then you should leave the AHCI mode set to the default. Full support for this mechanism is provided in the operating systems Windows 7, 8, 10, Ubuntu 16.04 and others. Only with the new mode is stable operation of OS data possible.

What to do if, after enabling AHCI mode, the system stops booting
This situation may arise if the user has Windows XP or an older version of Linux installed. There is no question here whether to prefer AHCI or IDE. What will be better for the old OS? Perhaps it is preferable to set the mode to IDE. You can try to install additional drivers on the system that provide support for the new standard. However, there is no guarantee that after this procedure the OS will work correctly.
In some cases, a computer that has successfully worked for a long time running Windows XP one day stops booting. At the same time, the user did not change the operating mode of the drives in the BIOS. This situation may occur due to errors in the underlying input/output system. In this case, the settings are reset and the AHCI mode is activated. The user must independently install support for the IDE mechanism in the BIOS settings.
It is quite natural that owners of desktop computing systems and laptops strive in one way or another to increase their performance. To solve this problem, some use the so-called overclocking (overclocking) of components, while others make adjustments through the capabilities provided by the developers. When choosing any method, it is important to understand what exactly you want to get and to have a good understanding of the features of the chosen method.
"Bottleneck"
It is known that one of the slowest components of a modern computing system is based on a classical spindle system. Today, SSD analogues have appeared, but they have not yet become widespread due to their too high cost.
Therefore, regular HDDs are installed on almost every computer. The result is that DDR3 memory easily transfers 20,000 MB/s; The internal CPU bus allows you to process ten times more data; and a hard drive with the SATA-3 standard only “accelerates” to a real 100 megabytes per second under ideal conditions. It is no coincidence that it is recommended to use high-performance SSD models, at least for system files. From all of the above, a simple conclusion follows: it is the HDD that slows down the modern system, thereby being a “bottleneck”. And since the user can easily make changes to the way the disk subsystem processes commands, affecting speed to a certain extent, you can often hear the question of which mode is better: AHCI or IDE.
Standards
The interaction of the disk with other components of the computer system occurs through a special control controller. This chip serves as a kind of command translator, converter. Until recently, the only “language” understood by the controller was the IDE protocol.

It originated at the dawn of the computer industry and has been modernized several times. With the advent of high-speed SATA drives, a radical reworking of the protocol was required. This is how it arose to easily cope with the increased data flow (interface), supports the fashionable NCQ command queue and implements the ability to turn off the device “on the fly”. So what is AHCI? IDE with some new features added. Everything is so simple at first glance.
Opportunities and prospects
Since the standards are backward compatible (SATA devices work perfectly using the IDE protocol), the BIOS or its equivalent almost always contains an item that allows you to select the desired mode.

In many cases, this is the only way to ensure normal computer performance. The mode selection function is present only in the software of those motherboards that support SATA. These are all modern systems. However, hybrid solutions can also be attributed here, allowing you to connect both classic IDE devices (PATA, wide connector comb) and SATA (compact connector). So, AHCI or IDE? What's better? To make it easier to understand this, here is a list of “bonuses” that a user receives by activating a more modern mode:
1. via internal electronic circuits “disk controller - board controller” reaches from 1.5 Gb/s (gigabit) for modification SATA-1 to 6 in the third revision. Let us remember that UDMA-6, in which old hard drives can work, provides only 133 Mbit/s.

2. When talking about which is better - AHCI or IDE, one cannot fail to mention support for NCQ technology. Its essence lies in the fact that the hard drive can “interfere” with the command flow queue, rearranging them to improve operating efficiency.
3. Possibility of “hot” replacement of the device, which does not require shutting down the entire system.
4. Parallel access to all disks at once, without using alternate switching.
Here is a very tempting list of possibilities. It is not surprising that the question is: “AHCI or IDE: which is better?” is perhaps one of the most painful. Many computer owners, surprisingly, still believe in the “magic button”.
Theory and practice
So, after all, AHCI or IDE - which is better? From the above list we can conclude that the outdated protocol is significantly inferior to the new one. However, this is not quite true. Let's consider this point in more detail. Yes, indeed, the data transfer speed has increased tenfold, but the magnetic disks in hard drives both rotated at a speed of 7200 revolutions (the most popular solution) and still rotate. Accordingly, no revolutionary breakthroughs occurred in the reading process. The user will not see 6 Gbit transfer in any HDD test. Even 200 Mbit is unattainable! The exception is solid state drives. If there is such a device in the system, then you don’t have to deal with the question: “AHCI or IDE: which is better?”, but immediately activate the updated protocol. However, as we pointed out, due to cost, such drives have not yet become widespread.
Very often in debates about whether AHCI or IDE is better, the main argument in favor of the former is the protocol's ability to support NCQ. Indeed, when several programs are actively accessing the hard drive at once, this function allows you to rearrange the flow of requests in the most optimal way. However, on an average computer, more than two or three programs rarely access the disk at the same time, so it is impossible to talk about a complete lack of acceleration, but it is obtained within the margin of error.

IDE or AHCI - which is better? Windows 7, when the latter mode is activated, supports connecting/disconnecting a SATA device on the go. Quite convenient, especially in server systems where shutdown is undesirable. However, to use “hot swap” it is recommended to use not internal connectors, but SATA modifications routed to the case.
And finally, the protocol allows several hard drives on the bus to work simultaneously, rather than waiting for requests. It is in this case that the potential of NCQ is fully revealed. Not relevant for the average computer.
As a result, it turns out that although the AHCI protocol is more interesting from a technological point of view, nevertheless, the majority of users will receive nothing but moral satisfaction from its inclusion. There are only two exceptions to the general rule: a server system and the use of an SSD.
Nuances of use
Although you can switch modes in the BIOS in a few seconds, there is one important point to consider. It is as follows: if the operating system was installed, for example, with AHCI, then after transferring to IDE, loading may not be possible. This is not a rule, but most often this is how things happen. Therefore, even before installing the distribution, you need to decide which disk subsystem protocol you plan to work with.

AHCI driver packages began to be integrated into the system only with Vista. All previous solutions from Microsoft do not have built-in support, so you need to either use “assemblies” or prepare media with the appropriate driver before installation. Windows 7 works fine with the new standard. Switching SATA from IDE mode to AHCI must be done from the BIOS (Configure SATA item). In very rare cases, changes to the registry may be required.
Switching method
In order to get into the BIOS, immediately after turning on the computer system, you need to press the Delete button (personal computers) or F2 (laptops) several times in a row. Depending on the implementation, the required item may be located in any sections. For example, to activate it, you may need to switch Boot Mode to CSM instead of UEFI, after which Compatible (IDE) and AHCI appear. The item you are looking for may be in the SATA Enhanced section. You need to carefully review the entire existing list. After switching, press ESC and agree to save the changes.
Results
The decision about which protocol to choose depends on several factors. First of all, it depends on the operating system used. From compatibility at the “hardware” level. And of course from the load on the subsystem. The higher it is, the more preferable AHCI is. If we analyze all the reviews, we can say that both protocols work great, without causing any failures when configured correctly. However, it makes more sense to use the updated version. This is, so to speak, a foundation “for the future”, for example, for the purchase of an SSD.
Configuring and enabling special AHCI mode is desirable for every user who would like to significantly expand and at the same time improve the capabilities of their PC for working with SATA hard drives, as well as SSDs.
This mode makes it possible to significantly speed up your PC due to its improved data access speed, and to activate this mode, you just need to perform a few basic steps.
1. AHCI is
A special interface of modern SATA hard drives, which support data transfer rates from one and a half to six gigabits, and its operation is possible in two modes:IDE and AHCI.
IDE– will ensure compatibility with older drives that were produced in the 2000s. AHCI– provides the user with the opportunity to fully use the entire SATA interface. For example, this will help to disconnect or connect the disk to the “motherboard” directly during operation, without even turning off the PC, or with the possibility of minimal movement of the disk heads, thereby increasing its speed.
After activating the mode, the user will significantly speed up working with files, writing them and reading information on the hard drive, which will significantly increase the performance of the PC as a whole. The increase will be approximately 20 percent, but nevertheless, for some demanding tasks, this twenty percent will be quite enough.
If you are working with SSD drives and the SATA form factor, then the option of enabling AHCI is the only correct and possible one.
2. Check AHCI mode. Enabled or not.
Before enabling AHCI Mode, you should make sure that it is not already in use. If you often work with “heavy” applications, your PC is equipped with a powerful modern processor and sufficient memory, then you simply will not notice what mode your PC is currently operating in.Checking AHCI mode:
1. Go to “Computer” properties;
2. Open the device manager;
3. Find IDE ATA/ATAPI controllers;
4. If some name contains AHCI, then the mode is active. If there is no such mode, then it needs to be enabled.

There is another way to check for the presence of AHCI - by rebooting the PC and viewing this parameter through the BIOS. You probably already know how to enter BIOS.
Going to BIOS, UEFI– look in what mode SATA operates, this can be done in the SATA Mode or SATA Configuration section.

3. How to enable AHCI mode
Enabling the mode AHCI, most often, is performed through .But, if you are on Windows 7, then after loading the system, an error may appear on your screen indicating incompatibility with the hard drive. A similar situation can happen with other, newer operating systems, but with less probability. In case of an error, the computer will reboot or restart.
If you select AHCI-mode before installing a new system - the situation will change. This will allow the software from the disk to adapt, which ultimately will not lead to any problems.
Typically, difficulties arise when the system is already on the hard drive, and the user changes the SATA settings to IDE, or vice versa, and tries to turn on NCQ– protocol SATA, which will significantly speed up work with information due to improved command optimization. In this case, interaction with various registry editors will be required. If nothing has provided the desired result, then AHCI mode can be installed only after reinstalling the system.
AHCI for Windows 7
Windows 7 – also most often requires switching the mode to AHCI. To do this, try the following:
1. Enter Registry Editor. This is done through the “Run” menu by entering the following command into it: regedit.

2. Find and go to the section HKEY_LOCAL_MACHINE\SYSTEM\CurrentControlSet\services\msahci;
3. Click on “Start”, while changing the standard value 3 to 0.

4. In the same subsection, change msahci to lastorV, and look for Start parameter;
5. " 3 " change to " 0 »;
6. We finish working with the editor.
Reboot the computer and enable the required mode via BIOS. After loading Windows 7, drivers for drives connected to the motherboard will begin to be automatically installed on the PC. After installing the drivers and making changes, you will need to restart the PC again. The final stage in editing the mode is checking the “cached” recording mode. This is done in the disk properties. If caching is not activated - it needs to be launched.
Microsoft Fix it– an additional option for getting rid of errors after installing a new mode. After the new mode has been launched and enabled. After selecting the necessary actions and eliminating all problems, the software will automatically make all changes, and subsequent errors will not appear.

AHCI for Windows 8 and 8.1
If you have eight on your PC, to enable AHCI mode, you need to go to safe mode. And in case of errors, is it necessary?
1. Change the IDE mode in the BIOS;
2. Restart the PC;
3. Go to launch the command line;
4. Enter the following command: bcdedit /set (current) safeboot minimal;

5. Confirm the action;
6. Reboot the PC and enter the BIOS again;
7. Activate the required AHCI mode;
8. Launch the command line again;
9. Enter bcdedit /deletevalue (current) safeboot;
10. Reboot the system again, after which Windows will display an error.
If the system is on an Intel processor, then AHCI can be enabled using additional utilities from the manufacturer itself. AMD does not have this method.
To use it, you need to do the following:
1. Download the file from the official Intel website f6flpy;
2. Download here SetupRST.exe
3. Go to the device manager and install the special f6 AHCI driver manually in the hard drive properties, instead of the specified SATA one;
4. Restart the PC, go to BIOS and enable AHCI;
AHCI for Windows 10
To correct errors or switch modes, you can also use the program of the same name for Intel processors; this can be done either by reinstalling Windows or through safe mode. But the best option would be to use the Registry Editor, which is slightly different from the standard method that was specified in Windows 7.
You will need:
1. Log in as “Administrator”;
2. Launch the registry editor in an accessible way (for example, using the “Run” utility, entering regedit into it;
3. Go to a special section HKEY_LOCAL_MACHINE\SYSTEM\CurrentControlSet\Services\iaStorV, where you will need to find “Start”, and change the parameter value to “ 0
»;
4. Find in another subsection Services\iaStorAV\StartOverride parameter called 0, and set its value to “0”;
5. Now choose Services\storahci, completely reset the “Start” parameter;
6. In the next subsection Services\storahci\StartOverride, setting the parameter value to “0”;
7. Close the editor and restart the computer;
8. Enter the BIOS and also enable the required mode AHCI.

Advice: It is best to start Windows 10 for the first time in safe mode, and to do this, turn it on using the “Run” menu by entering the msconfig command in it in order to display all system settings. Select the “Boot” tab and check the “safe mode” box, selecting the “Minimal” option.

If instead of BIOS you have UEFI– you need to troubleshoot through the system menu.
1. Enter the menu (Win+l);
2. Enter “update and security”;
3. We enter “recovery”, and then move on to special boot options;
4. Go to a special menu located in the “Additional parameters” tab, and as a result, go to the “ UEFI Settings».

To go to the BIOS settings, you can press a specific key to go to the BIOS - this could be the F2, F12 or other buttons.
4. Other AHCI Features
For Windows XP there is no option to install AHCI. At the time of its development, this option was not intended or planned. If you want to do this, then find a special driver and implement it into the system. But I strongly do not recommend doing this; such a possibility can have a bad effect on the operation of the system.Winodws vista included an identical switching mode AHCI, as in Windows 7, that is, using a utility or registry.
5. Results
Most often, after completing the steps to set the mode AHCI, the system will work stably, plus accelerated. If nothing works, then you can reinstall the system again after the mode change has occurred - this may take quite a bit of time, but the result is most often guaranteed.Enabling and configuring AHCI mode is worth it for every user who wants to improve and expand the computer’s capabilities when working with SATA hard drives and, especially, SSDs.
The mode allows you to increase the speed of your computer due to the increased speed of data access, and to activate it you only need to perform a few simple steps.
Before considering options for enabling the mode, you should first familiarize yourself with its features and operating principle.
What is AHCI
The interface of modern SATA hard drives, supporting data transfer rates from 1.5 Gbit/s to 6 Gbit/s, is capable of operating in two modes:
- AHCI.
The first ensures compatibility with older devices (drives manufactured in 2000).
The speed of even the most powerful disks in this mode is not much different from those of the most outdated models.
The more modern AHCI mode allows you to fully enjoy all the advantages of the SATA interface.
For example, by disconnecting and connecting drives to the motherboard on the fly, without turning off the computer, or with the ability to minimally move the drive heads to increase operating speed.
By activating the mode, the user speeds up the launch of files, reading and writing information on disks and increases the overall performance of the computer.
And, although the increase may not be so significant (within 20%), for some tasks such an improvement may be important.
If you have SSD drives with the SATA form factor, this option is the only option for efficient operation of the device.
IMPORTANT: Should you enable AHCI on an SSD?
When using AHCI mode on an SSD drive, you will only get results if you have a SATA II/III interface; in other cases there will be no improvement in performance.
How to check if the mode is enabled
If you are going to enable AHCI mode, make sure that it is not already used on the computer.
Unless you're running high-performance applications and have a powerful processor and plenty of memory, you may simply not notice which mode you're in.
You can check whether AHCI is enabled or not enabled in this way:
- First, go to the computer properties (Start menu, Computer item, Properties sub-item in the context menu);
- Open device manager;
- Open the IDE ATA/ATAPI controllers section;
- If there is a device here that has AHCI in its name, the mode works. If such a disk is not in the list (and you do not have an outdated IDE hard drive, but a more modern one), you will have to enable the mode yourself.
The second way to check the operation of AHCI is to restart the computer and go to the BIOS menu (using one of the available options - it differs slightly for different motherboards and laptops, although most often it involves pressing the function keys - from Esc to F12).
Read also:
After entering the BIOS (or UEFI), make sure what mode SATA is operating in by finding the SATA Mode or SATA Configuration item.

Tip: If IDE mode is installed, do not immediately switch it to AHCI and save it - especially if you have Windows 7.
How to enable AHCI mode
Enabling this mode on your computer can be done directly from the BIOS.
At the same time, if you have Windows 7, after trying to boot the system, a message like 0x0000007B INACCESSABLE_BOOT_DEVICE will most likely appear on the screen, indicating the impossibility of working with the disk.
Sometimes the same situation occurs with Windows 8 and 10, but the likelihood of a message appearing is less - most often the computer starts up or begins to reboot constantly.
The situation will be completely different if you select AHCI mode before installing the system.
This will allow the software from the installation disk to recognize the parameters of the HDD or SSD during the installation process, and there will be no problems starting the mode.
Difficulties begin only if the system is already installed on the drive, and the user is going to change the IDE parameter to SATA and enable NCQ (Native Command Queuing, an extension of the SATA protocol, which significantly increases the speed of working with information by optimizing the order in which commands are received).
In this case, you will have to use either the registry editor or safe mode, depending on the operating system.
If none of these actions provide the required result, all that remains is to enable AHCI and reinstall the system.
For Windows 7
One of the currently most popular operating systems, Windows 7, requires the use of the registry or a special utility to switch to AHCI mode.
The first option includes the following steps:
- Launch the Registry Editor (Win + R to open the Run menu, enter the regedit command and confirm the changes);

- Go to section HKEY_LOCAL_MACHINE\SYSTEM\CurrentControlSet\services\msahci;
- Go to the Start item, whose default value is 3, and change it to zero;

- Go to the same subsection from msahci to IastorV and search for the Start parameter;
- Changing three to zero;
- Closing the editor.
Now all that remains is to restart the computer and enable the desired AHCI mode in the BIOS menu.
After the system boots, Windows 7 will begin to automatically install drivers for all drives connected to the motherboard, and then require another reboot to make changes.
The last stage of setting up the mode is to check whether write caching mode is enabled in the disk properties. If it is not enabled, the function should be launched.
Another option is the Microsoft Fix it utility, which allows you to get rid of errors after enabling the new mode (you can download it from the official Microsoft website).
Once you launch and select the appropriate troubleshooting action, the application will automatically make any necessary changes and the error message will no longer appear.

For Windows 8 and 8.1
If Windows 8 or 8.1 is already installed on your computer, you can use Safe Mode to configure AHCI mode.
To do this, if an error occurs:
- Return IDE mode to BIOS;
- to restart a computer;
- Run the command line as an administrator (“Start”/“All Programs”/“Accessories”);
- Enter the command bcdedit /set (current) safeboot minimal

- Press the enter button;
- Restart the PC and enter the BIOS;
- Enable AHCI mode;
- Run the command line again;
- Enter the command bcdedit /deletevalue (current) safeboot;
- Reboot the system again, after which Windows should stop displaying the error message.
If your system runs on an Intel processor, there is an additional option to enable AHCI using a utility from this manufacturer (this method does not work for AMD).
To use it you should:
- Download the f6flpy file (mode driver) from the official Intel website, selecting the appropriate version (x32 or x64);
- Download the SetupRST.exe file from the same resource;
- Open the device manager and manually install the new f6 AHCI driver instead of SATA in the properties of your hard drive;
- Restart the PC and enable AHCI in the BIOS (UEFI);
- Run the SetupRST.exe file, which should automatically resolve the problem.
For Windows 10
To fix the error when switching modes, Windows 10 also allows you to use the utility for Intel processors, reinstall the system and safe mode.
But the most effective option is to use the Registry Editor, which is slightly different from the similar method in Windows 7.
To use this method you need:
- Log in as administrator;
- Launch the Registry Editor using one of the available methods (the easiest way is through the “Run” window and the regedit command);
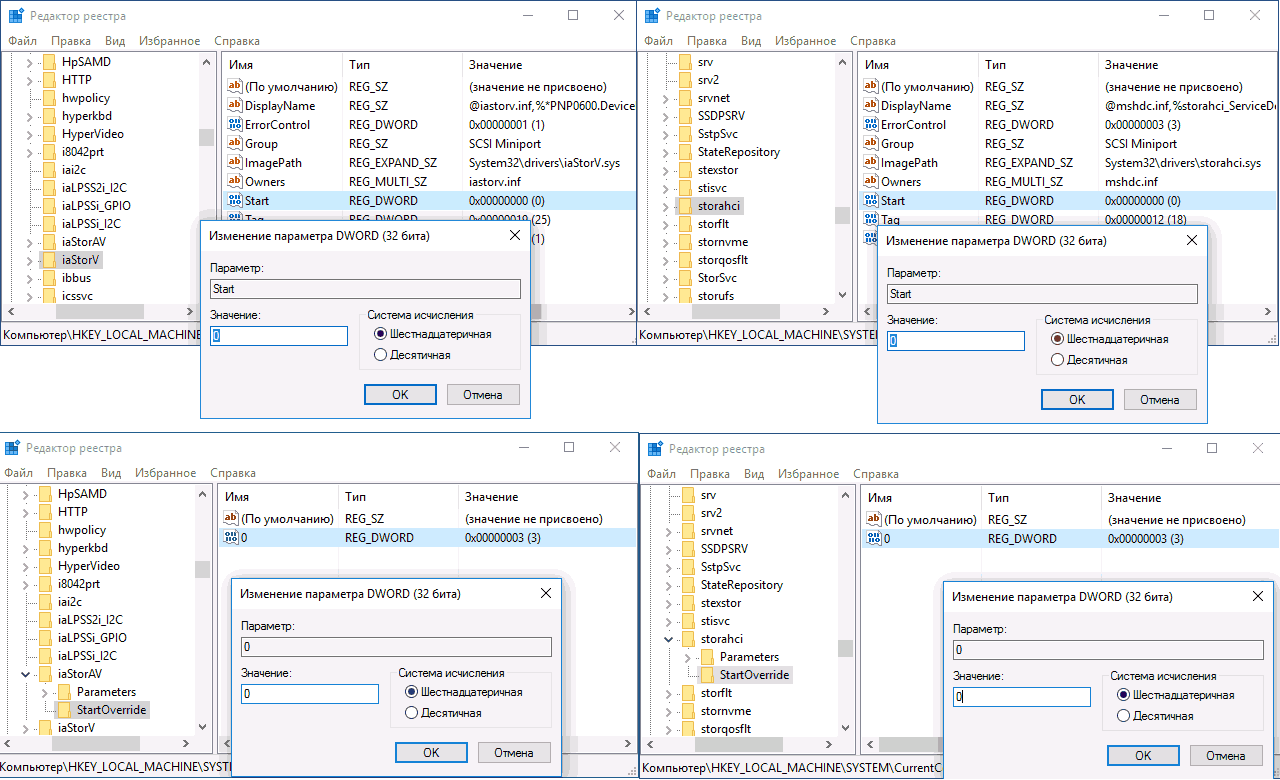
- Go to the HKEY_LOCAL_MACHINE\SYSTEM\CurrentControlSet\Services\iaStorV section and find its Start parameter, changing its value to 0;
- Find in the adjacent subsection Services\iaStorAV\StartOverride a parameter named 0, setting a zero value for it as well;
- Go to the Services\storahci subsection, reset the Start parameter;
- In the Services\storahci\StartOverride subsection, set the value zero for parameter 0.
- Close the editor and restart the computer;
- Enter the BIOS during system boot and enable AHCI mode.
Tip: It is recommended that you run Windows 10 for the first time in safe mode, for which you enable this option using the Run menu (Win + R) and entering the msconfig command to display the system configuration window. Here you need to select the “Boot” tab and check the safe mode box, indicating the “Minimal” option.

If you have a UEFI interface, you need to troubleshoot through the system menu:
- Enter the side menu (Win + I);
- Select the update and security tab;
- Go to “Recovery”, and then to special boot options;
- Go to the Troubleshooting menu, Advanced Options tab and finally UEFI Software Settings.

For the standard BIOS interface, you can access its settings by pressing the corresponding function key during boot.
For example, F2 or F12, depending on the motherboard or laptop model, if the settings are made for it.
Read.
After the first boot, Windows 10 will install all the necessary drivers to work with AHCI, and will not produce any errors in the future.
At the same time, the speed of working with data should increase - especially if the drive has a SATA III interface.


